How to Make Homemade Chicken Stock: Why Roasting Bones Deepens Flavor

Store-bought chicken stock is convenient, but it rarely tastes like much. The sodium is high, the flavor is thin, and the gelatin — that silky, body-building quality that makes a great stock — is almost entirely absent. Making your own at home costs next to nothing if you save carcasses and vegetable scraps, and the result is genuinely different: richer, more complex, and flexible enough to anchor everything from a quick pan sauce to a slow-cooked risotto.
This guide covers the full process — ingredients, technique, timing, troubleshooting, and storage — so you end up with stock worth making space for in your freezer.
What Goes Into a Good Chicken Stock
The Bones
Bones are the backbone of stock (obviously), and the best ones are those with plenty of connective tissue. Chicken backs, necks, and feet are ideal because they’re loaded with collagen, which converts to gelatin during the long simmer and gives the finished stock that luscious, slightly thick texture. A roasted chicken carcass works well too — that’s what most home cooks use — though it’s lower in collagen than raw bones.
If you want the most gelatinous stock possible, add a handful of chicken feet. They’re cheap at most Asian grocery stores and make a measurable difference to body and mouthfeel. Chicken wings are another good option, available anywhere and naturally collagen-rich.
A practical starting point: one whole carcass (or about 1.5–2 kg of mixed raw bones) is enough to make roughly 2–2.5 liters of finished stock.
The Aromatics
The classic mirepoix — onion, carrot, celery — forms the flavor base. Roughly chop them; you don’t need to peel the carrot or the onion (the skins add color). A whole head of garlic, halved crosswise, is worth adding. So is a small bunch of flat-leaf parsley, a few sprigs of thyme, a couple of bay leaves, and about 10 whole black peppercorns.
Avoid strongly flavored brassicas like broccoli or cabbage — they muddy the stock with a sulfurous edge. Starchy vegetables like potato break down and cloud the liquid. Tomato can add color and acidity but is optional.

Salt — Or No Salt?
This is personal preference, but there’s a strong argument for making stock with little or no salt. An unsalted stock is a flexible base: you season the dish you’re making with it, not the stock itself. If you reduce the stock down to a glace (a concentrated sauce), an already-salted stock becomes unpleasantly salty fast.
Add salt at the end if you want it, but keep it light.
The Method: Step by Step
1. Blanch or Roast First (Optional but Worth It)
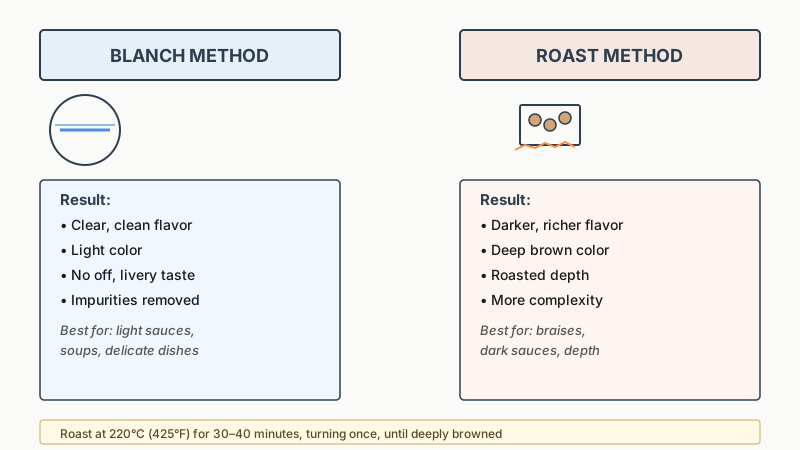
For a clear, clean-tasting stock, blanch raw bones first: cover them with cold water, bring to a boil, boil for two minutes, then drain and rinse under cold water. This purges blood and impurities that would otherwise cloud the stock and give it an off, slightly livery flavor.
For a darker, richer stock with more roasted depth, arrange raw bones on a baking tray and roast at 220°C (425°F) for 30–40 minutes, turning once, until deeply browned. Do the same with the vegetables if you like. This style — sometimes called fond brun de volaille in French kitchens — works especially well as a base for darker sauces and braises.
If you’re using a leftover roasted carcass, skip both steps — the roasting is already done.
2. Combine Everything in the Pot
Place your bones and vegetables in a large stockpot. Cover with cold water — starting cold is important, because it draws proteins and impurities out gradually, giving you a cleaner result than dropping bones into boiling water. Use enough water to cover everything by about 5 cm (2 inches), but don’t overfill: too much water dilutes flavor.
For 1.5–2 kg of bones, about 3–3.5 liters of cold water is a reasonable starting point.
3. Bring Up Slowly and Skim
Place the pot over medium heat and bring it slowly to a bare simmer — this takes 20–30 minutes. As the temperature climbs, a grey-brown foam will rise to the surface. Skim it off with a ladle or a wide spoon. This is the step most people skip and the reason homemade stock sometimes tastes muddy.
Once the foam stops appearing (usually within the first 20 minutes of simmering), you can relax. Add your aromatics if you haven’t already.
4. Simmer Low and Slow
Keep the heat at a bare simmer — small, lazy bubbles breaking the surface every few seconds. A rolling boil emulsifies fat into the liquid and makes the stock permanently cloudy and greasy-tasting.
Timing:
- Minimum: 2 hours
- Ideal: 3–4 hours for a roasted carcass
- Maximum benefit: 4–6 hours for raw backs, necks, and feet
Longer than 6 hours on chicken bones doesn’t improve flavor significantly and can introduce a slightly bitter, over-extracted taste — unlike beef or veal bones, which benefit from much longer cooking.

5. Strain, Cool, Degrease
Set a fine-mesh strainer (or a colander lined with cheesecloth) over a large bowl or second pot. Pour the stock through in batches. Press on the solids lightly — don’t squeeze hard, or you’ll push cloudiness into the stock. Discard the spent bones and vegetables; they’ve given everything they have.
Let the strained stock cool to room temperature, then refrigerate uncovered for several hours or overnight. The fat will solidify on the surface as a pale yellow layer that you can lift off cleanly with a spoon. This is the easiest and most thorough way to degrease stock.
6. Reduce If You Want More Concentration
At this point, assess the flavor. If it’s a little weak, return the stock to the pot and simmer it down by a third to a half. This intensifies everything — color, body, taste. A stock reduced by about 75% becomes a glace de volaille (chicken glaze): thick, sticky, almost jelly-like when cold, and intensely flavored. A tablespoon stirred into a pan sauce is a professional kitchen trick worth knowing.
Troubleshooting Common Problems
Stock is cloudy: You boiled it too hard, or skipped the initial skim. Cloudiness doesn’t affect flavor much but if you want clarity, try the egg white clarification technique (consommé method): whisk egg whites into cooled stock, bring to a simmer while stirring, let the raft form, then strain through cheesecloth.
Stock tastes flat or watery: Either the bones were too few for the volume of water, or you didn’t simmer long enough. Next time reduce the water or add more bones. For stock already made, just reduce it on the stove.
Stock didn’t gel: This means not enough collagen. Roasted carcasses alone rarely produce a firm gel. Next time add chicken feet, wings, or raw necks. Even a weakly gelled stock is fine for most uses — the flavor is what matters most.
Stock tastes slightly bitter: Over-extracted, or too many charred bits from the roasting step made it into the pot. Trim off any very dark, burned parts of bones before adding them next time.
Storage and Freezing
Freshly made stock keeps in the refrigerator for 4–5 days. For longer storage, freeze it. A few practical formats:
- Large containers (500 ml–1 liter): Good for soups, braises, and risotto
- Ice cube trays: Freeze, then pop the cubes into a bag. Each cube is roughly 1–2 tablespoons — perfect for deglazing a pan or finishing a sauce
- Muffin tins: Roughly 60–80 ml per cup — a useful intermediate size
Frozen stock keeps well for 3–6 months without significant flavor loss. Label with the date.

Pressure Cooker and Slow Cooker Variations
Pressure Cooker (Instant Pot)
A pressure cooker produces a deeply gelatinous stock in about 45 minutes at high pressure (plus pressurization time). The speed is real. The trade-off is that you lose the ability to skim, so the stock is sometimes slightly cloudier. Blanching the bones beforehand makes a noticeable difference here. Use the same ingredient ratios; reduce water slightly since less evaporation occurs under pressure.
Slow Cooker
A slow cooker is a hands-off option: load it up before bed, strain in the morning. Set it to low and cook for 8–10 hours. The results are comparable to stovetop, though again, you can’t skim as effectively. Some cooks skim after straining, when the fat rises in the refrigerator.
Practical Tips Worth Knowing
- Save bones as you go. Keep a zip-lock bag in the freezer and add carcasses, wing tips, and necks as you accumulate them. When the bag is full, make stock.
- Vegetable scraps work too. Carrot peelings, celery leaves, onion ends, and parsley stems all belong in the pot. Keep a separate freezer bag for these.
- Don’t add liver or other offal — they make the stock bitter and murky.
- A splash of apple cider vinegar (about 1–2 tablespoons) added at the start can help draw minerals from the bones. The effect on flavor at these quantities is minimal, but it doesn’t hurt.
- Use the widest, tallest pot you have. A wide base means more evaporation per hour, which concentrates flavor as the stock simmers.
Don’t toss that leftover bread while your stock simmers — Homemade Croutons: The Easy Guide to Perfect Results is a great way to turn stale slices into something worth saving alongside your broth.
Putting It to Work
Once you have homemade stock in the freezer, you’ll find yourself reaching for it constantly. It transforms risotto from starchy to silky. It gives pan sauces a body and sheen that water or commercial stock can’t replicate. Soups taste like something simmered all day even when they haven’t. Braised vegetables absorb the flavor and become genuinely interesting.
The difference between a homemade stock and a carton from the supermarket isn’t just taste — it’s what the stock does in the pan. Good stock clings, coats, and reduces. It behaves. That quality, built from nothing more than bones, water, and time, is worth the occasional Sunday afternoon.
If you use a pressure cooker or slow cooker mentioned above, note that specific brands vary in capacity and performance — always check the manufacturer’s maximum fill line before loading your pot.
If you’ve got a batch of fresh stock ready and want to put it to immediate use, Simple Marinades for Chicken: 7 Recipes That Actually Work shows how a good liquid base can transform simple chicken before it hits the pan.
Once you’ve got a batch of stock ready, put it to use as the base for a pan sauce or soup finished with How to Make a Basic Vinaigrette: 6 Ratios & Flavor Tips for a bright, balanced dish.