How to Roast a Whole Chicken: Crisp Skin Starts With Prep

Roasting a whole chicken is one of those kitchen skills that pays dividends every single week. Master it once and you have a centerpiece dinner, leftover meat for salads and sandwiches, and a carcass ready for the richest stock you’ve ever made. Yet a surprisingly large number of home cooks still pull pale, flabby-skinned birds out of the oven and wonder where they went wrong.
This guide cuts through the noise. You’ll learn exactly how to prepare, season, and roast a whole chicken so the skin crackles, the breast stays juicy, and the thighs cook all the way through — without sacrificing one for the other.
Choosing the Right Bird
Before you even think about the oven, the chicken you buy matters more than almost any technique.
Size: A 3.5 to 4.5 lb (1.6–2 kg) bird is the sweet spot for most home ovens and family meals. Larger birds — above 5 lbs — take longer, increasing the window where breast meat can dry out before the thighs are done. Smaller birds cook faster but leave little room for error.
Quality: Pasture-raised or air-chilled chickens tend to have drier skin right out of the package, which is a genuine advantage for roasting. Water-chilled supermarket birds absorb extra moisture during processing, which means more steam and slower browning. Neither is disqualifying, but if you have access to a farmers’ market or a good butcher, the flavor difference is real.
Fresh vs. frozen: A fresh bird is marginally easier to work with, but a fully thawed frozen chicken roasts just as well. The critical rule: whatever you buy, it must be completely thawed and — ideally — dried out in the fridge uncovered for at least a few hours before cooking.

How to Prepare a Whole Chicken for Roasting
Preparation is where most recipes skim over crucial details. Don’t rush this stage.
Dry the Skin
Moisture is the enemy of crispy skin. Pat the bird all over — including the cavity — with paper towels. If time allows, place it uncovered on a wire rack set over a baking sheet in the refrigerator for anywhere from 4 hours to overnight. The cold, circulating air pulls surface moisture away and gives you a head start on browning.
Season Generously — Including Under the Skin
Salt is your most important ingredient. Use kosher salt at roughly ¾ teaspoon per pound of bird. Season:
- Under the breast skin: Use your fingers to gently separate the skin from the breast meat without tearing it. Push salt — and butter or flavored compound, if using — directly onto the flesh.
- Inside the cavity: Season the inside generously. It flavors the meat from within as it roasts.
- All over the exterior: Coat the skin evenly, including the back and legs.
For deeper flavor, do this salting step the night before and let the bird rest uncovered in the fridge. The salt draws out a little moisture initially, then gets reabsorbed into the meat — a process similar to dry-brining a steak.
Aromatics in the Cavity
Stuffing the cavity with aromatics doesn’t dramatically alter the meat’s flavor, but it perfumes the drippings and the surrounding steam. Half a lemon, a halved head of garlic, a few sprigs of thyme or rosemary, and a quartered onion are all reliable options. Don’t overstuff — you want some airflow through the cavity.
To Truss or Not to Truss
Traditional roasting involves trussing (tying the legs together and tucking the wings). It creates a neater presentation and helps the breast and thigh cook more evenly since the legs don’t splay out and expose more surface area.
That said, some cooks skip trussing intentionally. Leaving the legs untied exposes more of the thigh skin to direct heat, which can actually help the dark meat cook faster — closing some of the temperature gap between thigh and breast. Both approaches work; pick one and commit.
Roasting Techniques: Temperature, Time, and Position
This is where opinions diverge sharply, but the science is clear enough to navigate.
The High-Heat Method
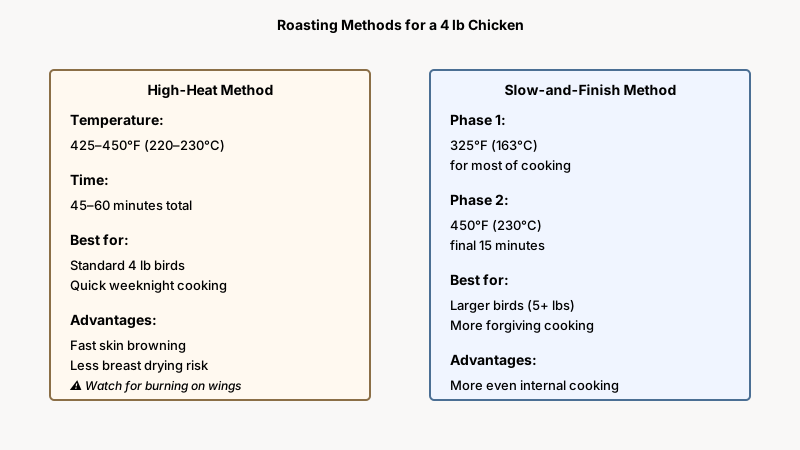
Roasting at 425–450°F (220–230°C) for roughly 45–60 minutes (for a 4 lb bird) is the most popular method among restaurant-trained cooks — and for good reason. High heat drives fast evaporation of surface moisture, leading to rapid Maillard browning on the skin. The shorter cook time also reduces the window for breast meat to overcook.
The tradeoff: you need to watch it. High heat can tip into burning on thin parts like the wings if you’re not careful. Tucking the wing tips under the body before roasting prevents scorching.
The Slow-and-Finish Method
Start at 325°F (163°C) for the bulk of the cooking, then blast the heat to 450°F (230°C) for the final 15 minutes. This gives more even internal cooking and is more forgiving for larger birds. The skin crisps at the end. The downside is that the skin sometimes doesn’t achieve the same deep golden color as the pure high-heat method.
The Spatchcock (Butterfly) Method
Removing the backbone and flattening the bird — a technique called spatchcocking — is arguably the fastest route to evenly cooked chicken. With the bird butterflied and flat, the dark meat (which needs to reach 165°F/74°C) and white meat cook closer to the same rate. Total roasting time drops to about 40–45 minutes at 425°F. The only sacrifice is presentation: a spatchcocked bird doesn’t look as dramatic on a platter.
What Temperature Is Actually Safe?
The USDA recommends poultry reach an internal temperature of 165°F (74°C). Use an instant-read thermometer inserted into the thickest part of the thigh, without touching bone. Many experienced cooks also check the breast, aiming for at least 155°F (68°C) — safe when held at that temperature for a short period, and noticeably juicier than at 165°F if you pull it right away.
Do not rely on timing alone. Oven calibration varies, bird shape varies, and a thermometer costs less than a ruined dinner.

Resting the Bird
This step is non-negotiable. After the chicken comes out of the oven, tent it loosely with foil and let it rest for 10–15 minutes. During roasting, the muscle fibers tighten and push juices toward the center. Resting lets those fibers relax and reabsorb the liquid — cut too soon and that juice runs straight onto the board instead of staying in the meat.
Pan Choice and Setup
The vessel you roast in affects browning, drippings, and ease of carving. Here’s how the main options compare:
- Cast iron skillet: Excellent heat retention, great for searing-style browning on the bottom of the bird. Best for smaller birds.
- Roasting pan with rack: Lifts the bird off the pan floor so hot air circulates underneath. This prevents the bottom from steaming and gives you the most even all-around browning. The rack also catches drippings cleanly for making pan sauce or gravy.
- Sheet pan with wire rack: Functionally similar to a roasting rack setup but lighter, easier to maneuver, and great for the spatchcock method.
- Dutch oven: Starting the chicken breast-side down in a Dutch oven with the lid on creates a self-basting steam environment, then remove the lid to crisp. This is a particularly good method for guaranteed juiciness if you’re nervous about drying out the breast.
Flavoring Variations Worth Knowing
Once you have the basic roast down, the recipe becomes a template.
Classic Herb Butter: Mix softened butter with minced garlic, thyme, rosemary, lemon zest, salt, and pepper. Push under the breast skin and rub over the exterior. This is the foundational approach — learn it first.
Za’atar and Lemon: Swap the herb butter for a paste of za’atar, olive oil, garlic, and lemon juice. Rub it all over. Roast as usual. The result is intensely aromatic and works beautifully with a simple cucumber-tomato salad.
Paprika and Garlic: Mix smoked paprika, garlic powder, olive oil, cumin, and a pinch of cayenne. Rub over the dried chicken. This produces a deep brick-red skin that’s hard to argue with.
Simple Salt and Pepper: Seriously. A well-sourced, dry-brined chicken roasted hot with nothing but salt, pepper, and a little olive oil is genuinely hard to beat. Don’t underestimate it.
If you’d rather flavor the bird before it ever sees the oven, Simple Marinades for Chicken: 7 Recipes That Actually Work is a great place to start.
Making the Most of the Drippings
The liquid gold left in the pan after roasting is often poured down the drain, which is a minor tragedy. Here’s what to do with it:
- Deglaze for pan sauce: Pour off excess fat, put the pan over medium heat, add a splash of white wine or chicken stock, and scrape up all the browned bits. Reduce by half, taste, adjust seasoning, and you have a sauce.
- Save the fat: If you skim the fat off the drippings, that clarified chicken fat (schmaltz, essentially) is extraordinary for roasting vegetables or frying eggs.
- Make stock from the carcass: After carving, put the bones in a pot, cover with cold water, add a halved onion, a few peppercorns, a bay leaf, and any vegetable scraps. Simmer for 2–3 hours. Strain. Freeze in portions. This is why roasting a whole chicken makes far more economic and culinary sense than buying boneless breasts.

If you end up with a generous layer of fat in the pan, don’t toss it — How to Render Chicken Fat: Step-by-Step Guide to Schmaltz shows how to turn it into a rich cooking fat you’ll want to keep on hand.
Common Mistakes — and How to Fix Them
Pale, soggy skin: Almost always caused by surface moisture. Dry the bird more thoroughly and rest it uncovered in the fridge longer before roasting. Also check your oven temperature with an oven thermometer — many home ovens run 25–50°F lower than the dial suggests.
Dry breast meat: The breast is done well before the thighs and continues to cook during resting. Pull the bird when the thigh reads 160°F — carryover cooking will finish both zones. Alternatively, try the spatchcock method or start the bird breast-side down for the first 20 minutes.
Undercooked thighs: Usually a problem with large birds at moderate temperatures. Either push the oven higher or confirm your thermometer is accurate. If the breast is done but the thigh isn’t, remove the chicken, cut the thigh joint slightly to expose it, and return just the leg quarters to the oven for another 5–10 minutes.
Burning on top: Tent a piece of foil loosely over the breast for the final 15 minutes of cooking if it’s browning faster than you want.
Conclusion
Roasting a whole chicken well is less about following a single recipe to the letter and more about understanding why each step works. Dry skin browns. Salt drawn into the meat seasons deeply. High heat drives the Maillard reaction. Resting preserves juice. Once those principles are internalized, you can adapt to any bird, any oven, any flavor profile.
The first time might be imperfect. The second time will be noticeably better. By the third or fourth roast, you’ll stop measuring and start cooking by feel — which is exactly where you want to be.