Crispy Fried Chicken at Home: The Stovetop Method

A perfectly fried piece of chicken — shatteringly crisp skin, juicy meat all the way to the bone — is one of those things that seems like it belongs only in a commercial kitchen. Heavy equipment, industrial fryers, gallons of oil. But you don’t need any of that. A deep, heavy-bottomed pot, a reliable stovetop, and the right technique will get you there every time.
This guide covers the full process from the brine to the finished fry, including the common mistakes that turn crispy into soggy.
Why the Stovetop Method Works So Well
Deep fryers maintain a fixed temperature and have baskets that make lifting easy. What they lack is nuance. On a stovetop, you control the flame directly. You can nudge heat up when a cold piece of chicken drops the oil temperature, and back down once it recovers. That responsiveness is actually an advantage once you understand what you’re managing.
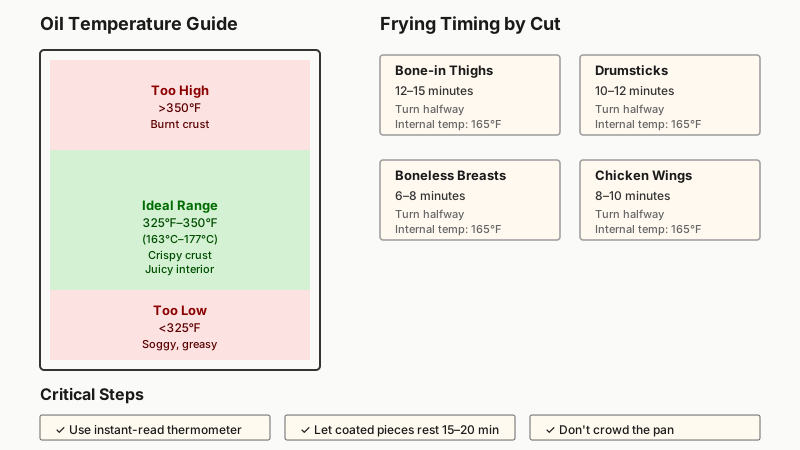
The key variable in frying is oil temperature. For most cuts of chicken, you want to fry between 325°F and 350°F (163°C–177°C). Too low and the coating absorbs fat and goes limp. Too high and the crust burns before the interior cooks through. A good instant-read thermometer is non-negotiable — not a gadget, a genuine necessity.
A cast-iron skillet or a heavy Dutch oven is the ideal vessel. Cast iron holds heat well, so the temperature doesn’t plummet as dramatically when the chicken goes in. A 12-inch skillet works for smaller batches; a 5- to 6-quart Dutch oven lets you fry with more oil, which means more stable heat and less crowding.

The Brine: Don’t Skip It
Dry, rubbery fried chicken usually traces back to skipping the brine. A simple saltwater soak — even for just four hours — makes a measurable difference in moisture retention during the high heat of frying.
If you want to experiment beyond buttermilk, Simple Marinades for Chicken: 7 Recipes That Actually Work offers plenty of other flavor directions to try before frying.
Basic Buttermilk Brine
Buttermilk is the classic choice, and for good reason. The mild acidity helps tenderize the outer layer of the meat without turning it mushy, and it clings to the surface, giving the flour coating something to grip.
For about 3–4 lbs of chicken pieces:
- 2 cups buttermilk
- 1 tablespoon kosher salt
- 1 teaspoon black pepper
- 1 teaspoon garlic powder
- Optional: a few dashes of hot sauce
Combine everything in a large zip-lock bag or bowl, add the chicken, and refrigerate for a minimum of 4 hours. Overnight (up to 24 hours) is better. When you pull the pieces out, let the excess drip off — don’t rinse.
If You Don’t Have Buttermilk
Add 1 tablespoon of white vinegar or lemon juice to 1 cup of regular whole milk, stir, and let it sit for five minutes. It curdles slightly and behaves almost identically to buttermilk in this application.
Building the Coating
The coating is where most of the texture comes from, and it’s also where most people under-season. Your flour mixture needs to be assertively seasoned on its own — it coats the outside of the chicken, so it carries all the flavor you taste in that first bite of crust.
The Flour Dredge
For 3–4 lbs of chicken:
- 2 cups all-purpose flour
- 1 teaspoon kosher salt
- 1 teaspoon black pepper
- 1 teaspoon smoked paprika
- 1 teaspoon garlic powder
- ½ teaspoon onion powder
- ½ teaspoon cayenne (adjust to taste)
- ½ teaspoon dried thyme or oregano
Whisk everything together in a wide, shallow dish.
How to Dredge for Maximum Crispiness
Take each piece directly from the buttermilk marinade and press it firmly into the flour mixture, coating every surface. Shake off any loose excess, then press again. That double-press matters: it compacts the coating so it doesn’t flake off in the oil.
For an even crispier crust, try this: after the first dredge, dip the piece briefly back in the buttermilk (just a quick coat, not a full soak), then dredge in the flour a second time. This builds thickness and creates more surface area for crunchy nooks.
Let the coated pieces rest on a wire rack for 15 to 20 minutes before frying. This rest period allows the coating to hydrate and adhere. Skipping it means patches of your crust will slide off in the oil.

Frying: Temperature, Timing, and Technique
Choosing Your Oil
Use a neutral oil with a high smoke point. Peanut oil is the traditional choice for fried chicken — it has a smoke point of around 450°F (232°C), meaning it handles frying temperatures without breaking down or imparting off-flavors. Refined vegetable oil or canola oil both work well. Avoid extra-virgin olive oil; it smokes at too low a temperature.
Fill your pot with enough oil to submerge the chicken at least halfway — ideally two-thirds of the way up. For a 12-inch cast-iron skillet, that’s roughly 1.5 to 2 inches of oil.
If you’d rather fry in a traditional, flavorful fat, our guide to How to Render Chicken Fat: Step-by-Step Guide to Schmaltz shows you how to render your own from scratch.
The Frying Process
-
Heat the oil to 350°F (177°C) over medium to medium-high heat. This may take 8–12 minutes. Don’t rush it on high heat — the oil needs to heat evenly.
-
Test the oil if you don’t have a thermometer: drop a small pinch of flour into the oil. At 350°F it should sizzle immediately and float to the surface. If it sinks and sits there, the oil is too cold. If it burns within seconds, it’s too hot.
-
Add chicken carefully, placing it away from you to avoid splatter. Don’t crowd the pan — leave at least an inch of space between pieces. Crowding drops the oil temperature sharply and creates steam, which is the enemy of crispiness. Fry in batches if needed.
-
Monitor the temperature continuously. When cold chicken hits the oil, the temperature will drop, sometimes by 20–30 degrees. Raise the heat slightly, then ease back once it climbs to 325°F–340°F. You’re managing a narrow band, not locking in a single number.
-
Fry times by cut:
- Bone-in thighs and drumsticks: 12–14 minutes total
- Bone-in breasts: 14–16 minutes total
- Wings: 8–10 minutes total
- Boneless thighs: 8–10 minutes
-
Flip once, about halfway through the estimated time. Flipping too often disturbs the crust before it sets.
-
Check for doneness with a meat thermometer. The internal temperature should reach 165°F (74°C) at the thickest point, not touching bone. A visually golden-brown crust alone isn’t a reliable indicator — dark meat especially can look done while still undercooked.
-
Drain on a wire rack, not paper towels. This is an important distinction. Paper towels trap steam underneath the chicken, softening the very crust you worked to build. A wire rack lets air circulate on all sides.
Keeping the First Batch Warm
If you’re frying in batches, keep finished pieces in a 200°F (93°C) oven on the wire rack. They’ll stay warm and crispy for 20–30 minutes without drying out.

Common Problems and How to Fix Them
Coating falls off in the pan: The pieces weren’t patted dry before dredging, or the flour rest was skipped. Make sure the coating has time to adhere.
Crust is pale and greasy: Oil temperature was too low. Always verify with a thermometer before adding the first piece.
Outside burns, inside raw: Oil too hot, or pieces are too thick. Use a Dutch oven, which insulates heat more gently, and consider starting large pieces at a lower 325°F.
Meat is dry: Brine was skipped, or the chicken was overcooked. Pull at exactly 165°F — carryover heat will take it a few degrees higher as it rests.
Crust is pale on one side: The pan wasn’t hot enough before adding the chicken, or the piece wasn’t flipped.
Serving and What Goes With It
Fried chicken is one of those dishes that can go in almost any direction. Classic pairings include coleslaw (the cool crunch is a textural counterpoint), honey or hot sauce on the side, and a soft white roll. For a more Southern table, add collard greens, mac and cheese, or pickled jalapeños.
For a lighter approach, serve over a simple salad with a sharp vinaigrette — the contrast cuts through the richness well.
Leftover fried chicken reheats best in a 375°F oven on a wire rack for 12–15 minutes. The microwave turns the crust irreparably soft.
A Few Notes on Safety
Hot oil requires basic precautions. Keep a lid nearby — if the oil catches fire, a lid smothers it immediately (never use water). Dry the chicken pieces as much as possible before they go in, because water and hot oil produce violent spattering. Use long tongs, not a fork, to add and turn pieces. And never leave hot oil unattended on the stovetop.
Final Thoughts
The stovetop fry is forgiving once you understand the temperature curve. The brine makes the meat; the double dredge makes the crust; the wire rack preserves both. Get those three things right, and the technique mostly takes care of itself. You don’t need special equipment or professional experience — just a heavy pot, a thermometer, and a willingness to fry a batch or two until the method feels natural.
Once it does, you’ll wonder why you ever settled for anything less.