Roasting Vegetables for Perfect Caramelized Edges

Why Most Roasted Vegetables Come Out Steamed Instead of Caramelized
The difference between vegetables with crisp, deeply browned edges and a pile of soft, steaming ones usually comes down to a handful of decisions made before the pan goes in the oven. High heat alone doesn’t guarantee caramelization — moisture management, pan geometry, and cut size all play equal roles.
This guide covers every variable, with specific guidance per vegetable type, so you can dial in perfect caramelized edges consistently.

The Science Behind Caramelization and the Maillard Reaction
Two separate chemical processes give roasted vegetables their browned, complex flavor:
Caramelization happens when natural sugars are exposed to dry heat — typically above 320°F (160°C) for fructose, which is the dominant sugar in most vegetables. The sugars break down and re-form into hundreds of new flavor compounds with nutty, bitter, and sweet notes.
The Maillard reaction is distinct: it’s a reaction between amino acids and reducing sugars that also produces brown color and savory depth. In vegetables it’s less dramatic than in meat, but it’s still responsible for much of the roasted flavor in alliums, mushrooms, and brassicas.
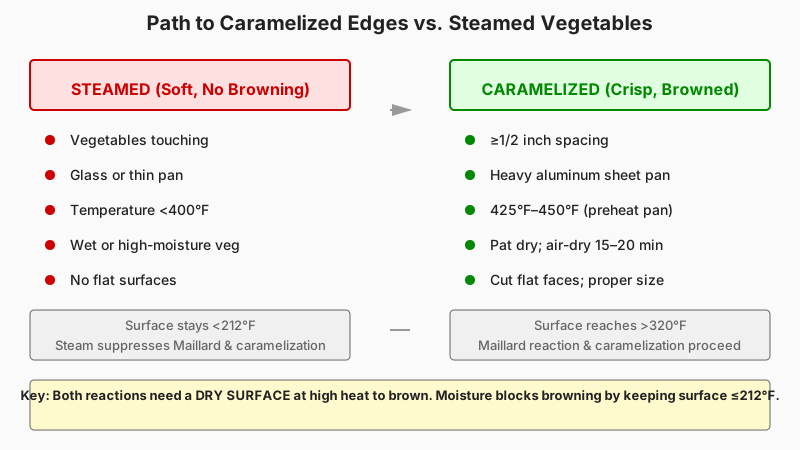
Both reactions require a dry surface. Steam — generated when moisture evaporates from the vegetable — suppresses browning and keeps the surface below 212°F (100°C) until that moisture is gone. Every practical tip in this article is ultimately about removing or blocking moisture so the surface can get hot enough to brown.
The Non-Negotiables: Pan, Temperature, and Spacing
Use a heavy rimmed sheet pan, not a glass dish
A thin, dark, heavy-gauge aluminum sheet pan conducts heat rapidly and stays hot when food is added. Glass or ceramic bakeware is a poor conductor, and the trapped steam inside a deep dish guarantees soft vegetables. A rimmed half-sheet pan (18 × 13 inches) is the workhorse format — large enough that you can spread vegetables in a single layer without crowding.
Don’t crowd the pan
This is the single most common mistake. Vegetables release steam as they cook; if they’re shoulder to shoulder, the steam can’t escape and the pan becomes a braise. Leave at least half an inch of space between pieces — ideally more. If your vegetables don’t fit, use two pans. Overlapping is never a compromise worth making.
Temperature: 425°F–450°F (220°C–230°C) as the baseline
Most vegetables caramelize well in this range. Higher temperatures — up to 500°F (260°C) — work for dense root vegetables and brassicas and produce more char on the edges, which is desirable if controlled. Lower temperatures (below 400°F/205°C) produce soft vegetables with little browning. If your oven runs cool, measure with a thermometer — a 25°F discrepancy is common and explains a lot of failed batches.
Preheat the pan itself
Sliding vegetables onto an already-hot pan gives an immediate burst of bottom heat. It also makes it harder for moisture to pool under the vegetable before browning begins. Preheat the oiled sheet pan for 5–10 minutes before loading it. Use oven mitts — it will be genuinely hot.

How to Cut, Dry, and Coat Vegetables for Maximum Browning
Cut for surface area and flat sides
Every flat, exposed surface is a potential caramelized edge. Halving Brussels sprouts, cutting cauliflower into planks rather than florets, and slicing carrots on the bias all maximize the area that will contact the hot pan or circulate in dry heat. Odd-shaped chunks with no flat face produce uneven results.
Size matters too: pieces that are too thick won’t cook through before their surface overcooks; pieces that are too thin dry out before they caramelize. A general rule:
- Dense roots (beets, turnips, carrots): 3/4 inch to 1 inch thick
- Brassicas (broccoli, cauliflower): florets about 1.5 inches across, or 3/4-inch planks
- Alliums (onions, fennel): 1/2-inch wedges
- Zucchini and eggplant: 1/2 inch or slightly thicker (they’re high-moisture — see below)
Pat dry, especially high-moisture vegetables
Washing vegetables right before roasting adds surface moisture. Pat them dry with a kitchen towel or paper towel, and if possible, let them air-dry for 15–20 minutes on a rack. For eggplant and zucchini — which contain significant free moisture — salting and draining for 20–30 minutes before roasting makes a real difference in the final texture.
Mushrooms are the extreme case: they’re largely water. Spreading them on a dry pan at high heat and not stirring them for the first 8–10 minutes lets the bottom side brown while moisture escapes upward. Stirring early causes steaming and mushiness.
Oil: enough to coat, not to pool
Oil transfers heat to the vegetable surface and helps browning, but excess oil pools in the pan and effectively fries the bottom while leaving the rest greasy. About 1–2 tablespoons of oil per pound of vegetables is a reasonable range — toss to coat thoroughly. The surface should glisten, not drip.
For high-heat roasting, neutral oils with high smoke points (avocado oil, refined sunflower, or light olive oil) are more stable than extra-virgin olive oil, which can begin to smoke and turn bitter around 375°F–405°F. That said, extra-virgin olive oil at 425°F is a common practice and produces only mild off-flavors that many people don’t notice — it’s a personal call.
Salt before, not just after
Salting before roasting draws out a small amount of surface moisture initially, but that moisture evaporates in the oven and the salt concentrates on the surface, promoting browning. Salt added only at the end never penetrates and leaves vegetables tasting flat. Use a generous pinch per pound — roasting concentrates flavors and can dull saltiness, so season a bit more aggressively than you would for a stovetop dish.
Per-Vegetable Guide to Caramelized Edges
Root vegetables (carrots, parsnips, beets, sweet potatoes)
These are high in natural sugars and caramelize readily at 425°F. The main challenge is getting the interior cooked through without over-charring the exterior. Cut them uniformly — variation of more than 1/4 inch within the same batch causes uneven cooking. Beets benefit from pre-roasting loosely wrapped in foil for the first 20 minutes if large, then finishing uncovered to brown. Parsnips go sweet and almost jammy at their cut edges; 30–40 minutes at 425°F usually does it.
Brassicas (broccoli, cauliflower, Brussels sprouts)
Brassicas tolerate and arguably require the highest heat — 450°F and above. The charred, almost bitter tips on broccoli florets are a feature, not a flaw; they provide textural contrast to the tender stem. Brussels sprouts should be cut flat-side down on the pan so that cut surface makes full contact with the hot metal. Do not stir Brussels sprouts until the cut side is deeply browned, around 15–18 minutes in at 450°F.
Cauliflower cut into 3/4-inch steaks or planks rather than florets gives more flat surface area and produces uniform browning across the piece rather than just on random edges.
Alliums (onions, shallots, fennel)
Onions and shallots caramelize quickly because of their high sugar content; at 425°F they can char on the outside before the interior softens if cut too large. Wedges (1/2 inch) work better than thick rounds. Fennel behaves similarly but needs slightly longer because of its denser cell structure.
If you love what caramelization does to alliums, How to Roast a Head of Garlic: Sweet Caramelized Cloves From Your Oven shows how the same low-and-slow browning turns a whole head into a sweet, spreadable treat.
Zucchini and eggplant
High-moisture vegetables are the hardest to caramelize without turning them to mush. For zucchini: cut into 1/2-inch rounds or half-moons, salt and drain for 20 minutes, pat dry, roast at 425°F on a preheated pan, and do not flip until the bottom is visibly brown — roughly 12–15 minutes in. For eggplant: the salting step is more important. After draining, the eggplant will absorb less oil and brown more readily. Roasting at 450°F often gives better results than 425°F.
Mushrooms
Roast whole or in large halves at 450°F. Do not oil too heavily. Leave undisturbed for 8–12 minutes. They should emerge browned and slightly concentrated, not pale and wet. Shimeji and oyster mushrooms crisp at the edges almost like chips at this temperature.

Common Mistakes and How to Fix Them
Vegetables came out soft and pale: Pan was too full, or oven temperature was too low. Use two pans next time, preheat the pan, and verify oven temperature with a thermometer.
Edges burned before the interior cooked: Pieces were too small or too thin, or the temperature was too high for that particular vegetable. Cut larger, or start at a moderate temperature (400°F) for the first half and raise to 450°F for the final 10 minutes.
Bottom is browned but the top is barely colored: Don’t flip too early — but do flip at the halfway point for most vegetables. The top side needs exposure to the dry, circulating oven heat to brown.
Greasy result: Too much oil, or the pan was too small, causing pooling. Reduce oil and use a larger pan.
Shrinkage and mushiness (eggplant, zucchini): Skipped the salting step, or started on a cold pan. Both fixes matter.
If steaming rather than roasting is a recurring problem, it helps to understand the opposite technique too, and How to Blanch Vegetables Properly: Stop Overcooking Before Freezing explains how deliberate, controlled steaming works before freezing.
Frequently Asked Questions
Does convection (fan-assisted) mode make a difference for roasting?
Yes — meaningfully so. Convection moves hot air actively across the vegetable surface, which accelerates moisture evaporation and browning. If your oven has a convection setting, reduce the listed temperature by about 25°F (15°C) or keep the same temperature and reduce roasting time by roughly 20%. Pan spacing matters a bit less in convection because the fan does some of the work that spacing normally provides.
Can I roast vegetables on parchment paper and still get caramelized edges?
Parchment is fine for the bottom surface and makes cleanup easier, but it does slightly insulate the underside of the vegetable from the pan’s direct heat. To compensate, preheat the pan with the parchment already on it, and accept that the bottom browning may be slightly less intense than on bare oiled metal. Silicone mats insulate more and are generally worse for this purpose.
Do I need to flip vegetables, and when?
For most vegetables, yes — flip once at the halfway point. The goal is to expose both sides to direct pan heat. Exception: mushrooms benefit from not flipping until the bottom is fully browned, and some very small pieces (like trimmed green beans) don’t need flipping because they have enough exposed surface area in all directions.
Why do my vegetables taste bitter after roasting?
Bitter off-flavors usually come from one of three sources: oil that has broken down due to smoke (switch to a higher smoke point oil or lower the temperature slightly), brassicas that have been overcooked past charring, or olive oil’s natural polyphenols becoming more perceptible at high heat. Tasting before plating and finishing with a squeeze of lemon or a small drizzle of fresh olive oil often counteracts this.
Can I roast different vegetables together on one pan?
Yes, but match them by density and cooking time, not just flavor. Pair fast-cooking vegetables (zucchini, asparagus) separately from slow-cooking ones (beets, carrots). If you want everything on one pan, par-cook the dense items first for 15–20 minutes before adding the faster-cooking ones.
Bringing It Together
Perfect caramelized edges aren’t a function of a single trick — they emerge from a set of conditions that work together: a dry surface, a hot and uncrowded pan, the right cut size, and the patience not to stir too early. Get those four things right and the specific vegetable almost doesn’t matter; get even one of them wrong and the best oven won’t save the batch.
For a practical starting point: 425°F, preheated heavy sheet pan, vegetables patted dry and cut to expose flat surfaces, 1–2 tablespoons of oil per pound, flip once at the halfway point. Adjust from there based on what you observe.