How to Trim a Dog's Nails Safely: Avoiding The Quick While Clipping

Trimming your dog’s nails is one of those tasks that makes both owners and dogs tense up — but it doesn’t have to. With the right tools, a calm approach, and an understanding of what’s actually happening inside the nail, you can make the whole process routine rather than a small drama.
This guide walks you through everything: choosing clippers, reading the nail anatomy, handling a reluctant dog, and knowing exactly what to do if you cut too deep.
Why Nail Length Actually Matters
Long nails aren’t just a cosmetic issue. When a dog’s nails touch the floor with every step, they push the toe joints backward and upward, subtly altering gait over time. Veterinary orthopedic specialists note that chronically long nails can contribute to joint stress, particularly in older dogs whose posture is already compensating for arthritis.
The practical test is simple: if you hear a clicking sound when your dog walks across a hard floor, the nails are too long. On a healthy schedule, most dogs need a trim every three to four weeks, though active dogs who walk on concrete may naturally wear their nails down and need trimming less often.
Dewclaws — the higher-up, often vestigial nails on the inner leg — never touch the ground and can curl into the skin if ignored. Always include them.

Understanding Nail Anatomy Before You Cut
The single biggest fear owners have is cutting the quick — the living tissue inside the nail that contains blood vessels and nerve endings. Cut it, and the nail bleeds and the dog yelps. Avoid it consistently, and the whole experience stays calm.
Identifying the Quick
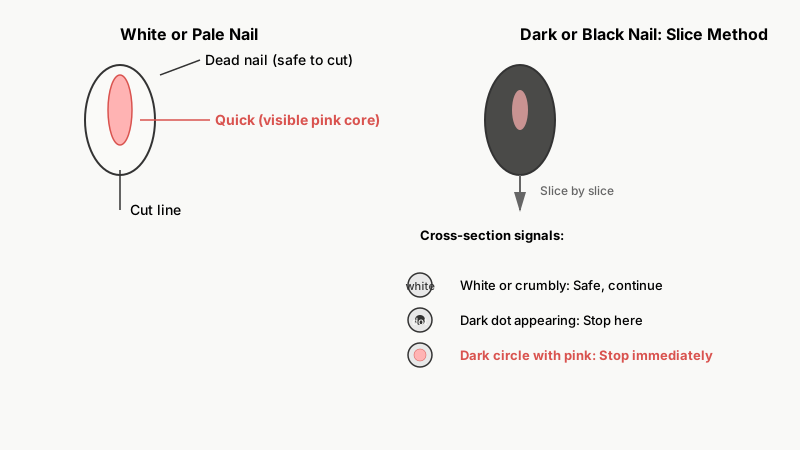
On white or pale nails, the quick is visible as a pink core running through the center. You can see exactly where living tissue ends and the dead, cuttable nail begins.
On dark or black nails, you cannot see the quick directly. Instead, cut in small, thin slices from the tip and look at the cut surface after each slice:
- White or crumbly gray cross-section: safe, keep going.
- Dark center dot starting to appear: you’re close to the quick. Stop here.
- Moist, dark circle with a slightly pink hue: you’re at or very near the quick. Stop immediately.
This slice-by-slice technique is standard advice from veterinary behaviorists and groomers and is by far the safest approach for dark nails.
How the Quick Responds to Trimming Frequency
If nails have been neglected and grown very long, the quick grows with them — extending further toward the tip. You cannot remove all the excess length in one session without hitting the quick. Instead, trim a small amount every one to two weeks; over several sessions the quick recedes and you can eventually get the nails to a proper length.
What You Need: Tools and Setup
You don’t need much, but quality makes a real difference.
Clippers
Scissor-style (Miller’s Forge type): Best for medium to large dogs. They give good leverage and a clean cut.
Guillotine-style: The nail goes through a hole and a blade slices across. Works well for small dogs; the blade dulls faster and should be replaced regularly.
Dremel or rotary grinder: Grinds the nail down rather than cutting. Produces no quick-cutting risk if done carefully, though the vibration and noise need an acclimation period. Useful for dogs who panic at the snap of clippers.
Whatever tool you choose, keep it sharp. A dull clipper crushes rather than cuts, which is painful and more likely to cause cracking.
Styptic Powder
Keep styptic powder (or a styptic pencil) within reach every single session. If you nick the quick, press a pinch of the powder firmly against the nail tip for 30 seconds. It stops bleeding quickly. In a pinch, cornstarch or a bar of plain soap pressed against the nail also works, though styptic powder is faster.
The Setup
Good lighting matters — especially for dark nails. Natural light or a bright lamp lets you see the nail cross-section clearly. Have treats ready. Work on a non-slip surface so your dog feels stable and doesn’t spend energy trying to balance.

The Step-by-Step Trimming Process
Step 1: Desensitize Before You Ever Cut
If your dog is new to nail trims or has had a bad experience, don’t start by cutting. Spend a few sessions just handling the paws, touching each nail, pressing gently on the toe pads (which extends the nail), and rewarding with high-value treats throughout. Introduce the closed clippers near the paw. Click them near the nail without cutting. This conditioning phase takes days or weeks depending on the dog, but it fundamentally changes the experience.
Step 2: Get a Comfortable Position
Small dogs can sit in your lap or on a table. For larger dogs, having a second person is genuinely helpful — one person holds and reassures while the other trims. Alternatively, a corner position (dog against a wall and your body) limits movement without restraining forcefully.
Hold the paw firmly but not tightly. Squeeze gently on the toe to extend the nail forward.
Step 3: Make the Cut
Position the clipper blade perpendicular to the nail (not at a steep angle). Cut in one confident, swift motion. Hesitating and squeezing slowly is what causes crushing and discomfort. Aim to take off small amounts — 1 to 2 millimeters at a time on dark nails, slightly more if you can see clearly on pale nails.
For dark nails, look at the cut surface after each slice before proceeding.
Step 4: Finish with a File
A quick pass with a nail file or emery board smooths sharp edges that could scratch furniture or snag on fabric. This step also gives you a moment to reward the dog before moving to the next paw.
Step 5: Reward Generously
End every session — even a partial one — on a positive note. If your dog has a hard limit and you’ve only done two paws, that’s fine. Two paws today, two tomorrow. Consistent positive endings are what build tolerance over time.
Handling a Reluctant or Anxious Dog
Some dogs are reliably difficult about nail trims regardless of conditioning. A few approaches help:
Nail scratch boards: A board covered with sandpaper placed flat on the floor. Train the dog to paw at it for treats. Over sessions, the scratching naturally files the front nails. It doesn’t replace full trimming, but it helps maintain length between sessions.
Peanut butter or lick mats: A lick mat spread with xylitol-free peanut butter stuck to a wall or held by another person gives the dog something to focus on during the trim. The licking itself is calming — it activates a mild stress-reducing response.
Short, frequent sessions: Five nails, then done. Or even one nail and done. Frequency beats duration for anxious dogs.
Veterinary support: If a dog is genuinely phobic — shaking, snapping, panicking — talk to your vet. Some dogs benefit from a mild sedative given before grooming appointments, and there’s no shame in that. A traumatic nail trim experience compounds fear; a calm one breaks the cycle.

If your dog’s nervousness around clippers reminds you of how they react to loud noises, How to Keep Pets Calm During Fireworks: Start Days Before, Not Hours offers similar desensitization strategies worth trying.
What to Do If You Cut the Quick
It happens to every owner eventually. Here’s the sequence:
- Stay calm — your dog reads your reaction.
- Apply styptic powder immediately and hold firm pressure for 30 seconds.
- Let the dog rest. Avoid walking on hard floors for a few minutes.
- Check again after five minutes. Minor quick cuts stop bleeding quickly. If bleeding continues beyond 10–15 minutes, call your vet.
- Don’t abandon the session dramatically — this teaches the dog that bleeding ends all grooming. If the dog is calm, finish the remaining nails in a low-key way, or at minimum give treats and end neutrally.
When to See a Professional Groomer or Vet
There’s no obligation to trim at home. Professional groomers and veterinary technicians handle difficult dogs regularly and have the positioning experience to do it efficiently. Many vets offer nail trim appointments as a standalone service, sometimes in the exam room to avoid the waiting area stress for anxious animals.
If a nail is cracked, broken, or growing in an unusual direction, that’s a vet visit — not a home trim. Broken nails can expose the quick and become infected.
Building a Routine That Sticks
The dogs with the most relaxed nail trim experiences are almost always the ones whose owners started handling their paws as puppies and kept at it regularly. But even adult dogs with no prior conditioning can learn to tolerate, or even accept, nail trims if the approach is patient and consistent.
Mark the calendar. Three to four weeks goes faster than you think, and staying ahead of nail length means each session stays simple — just a small trim, not a major excavation project.
With the right tools within arm’s reach, decent lighting, and a treat your dog genuinely cares about, most nail trims can be done in under five minutes. That’s a reasonable investment for your dog’s comfort and joint health over a lifetime.
Nail trimming pairs naturally with other grooming habits, so once you’ve got a rhythm going, our guide How to Bathe a Dog at Home: Skip The Grooming Bill Forever can help you round out a full at-home care routine.