Remove Mold & Mildew from Bathroom Surfaces Safely

Bathroom mold is almost guaranteed to appear at some point — not because your cleaning routine is failing, but because bathrooms are built for warmth and moisture, which is exactly what mold spores need to take hold. The good news: most bathroom mold is surface-level and removable without calling a contractor, as long as you act promptly and use the right method for the right surface.
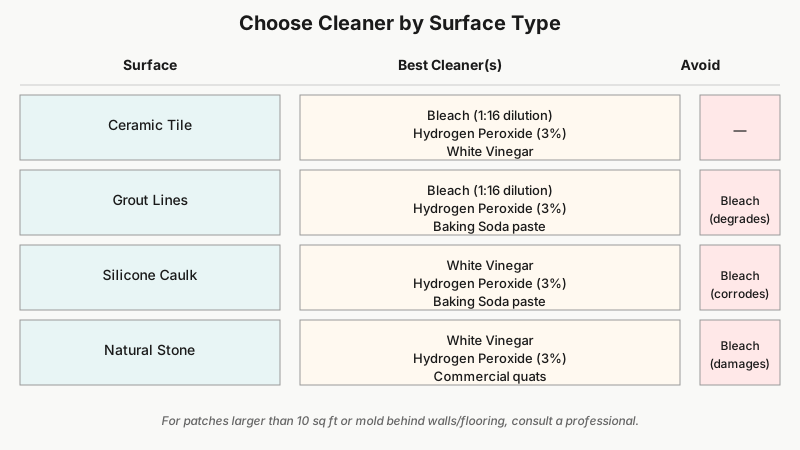
This article covers every major bathroom surface separately, because what works on ceramic tile can destroy a natural stone counter, and bleach that clears grout lines will ruin a silicone sealant over repeated use. You’ll also find safety protocols, a rundown of effective cleaners, and a clear line between a DIY job and a professional remediation case.
Why Bathroom Mold Keeps Coming Back
Mold and mildew aren’t the same thing, though people use the words interchangeably. Mildew is a surface fungus — typically powdery and grey or white — that grows on damp surfaces and is easy to wipe away. Mold is a deeper fungal growth, often black, green, or pink, that penetrates porous materials like grout, caulk, and drywall.
Both thrive under the same conditions:
- Humidity above 60% — showers and baths spike bathroom humidity dramatically.
- Poor ventilation — without an exhaust fan or open window, moisture lingers on cold surfaces for hours.
- Organic material — soap scum, skin cells, and shampoo residue are all food sources.
- Temperature between 60–80°F (15–27°C) — the typical bathroom range.
Removing existing mold without fixing the environment just delays the next outbreak. After you clean, run an exhaust fan for at least 20–30 minutes after every shower, squeegee tiled walls, and leave shower curtains spread open to dry.

Safety First: Protect Yourself Before You Start
Mold releases spores when disturbed. Inhaling them can trigger respiratory irritation, and people with asthma or mold allergies may react strongly even to common household species.
Minimum protective gear for any mold removal job:
- N95 respirator or better — a cloth mask or surgical mask does not filter mold spores effectively.
- Nitrile gloves — latex can tear; vinyl is too porous for bleach solutions.
- Safety glasses or goggles — especially when using spray cleaners overhead.
- Old clothing or disposable coveralls — mold spores and bleach both stain.
Ventilate aggressively. Open windows, turn on the exhaust fan, and if possible prop the bathroom door open to create cross-airflow. Never mix bleach with ammonia-based cleaners or vinegar — the reaction produces toxic chloramine or chlorine gas.
For patches larger than roughly 10 square feet (about 1 square meter), or any mold you suspect has penetrated behind drywall or under flooring, stop and consult a certified mold remediation professional. Surface cleaning cannot fix structural mold.
Effective Cleaning Solutions: What Actually Works
Before diving into surface-specific methods, here’s a plain-language breakdown of the most common mold-fighting products:
If you’d rather stick to plant-based ingredients, Natural Cleaning Solutions for Bathroom Tiles: 7 Recipes That Work offers several tested recipes for tackling grime without harsh chemicals.
Chlorine Bleach (Sodium Hypochlorite)
A diluted solution — typically 1 cup bleach per gallon of water (about 1:16 ratio) — kills mold on non-porous surfaces like ceramic tile and glass effectively. It also whitens grout. Downsides: it’s corrosive to metals, will degrade silicone and rubber sealants over time, and the fumes are harsh. Not suitable for natural stone.
White Vinegar
Undiluted distilled white vinegar (around 5% acetic acid) kills a wide range of mold species on contact and is safe for most surfaces including natural stone. Research published through the EPA has noted vinegar’s efficacy against many common mold genera. It won’t whiten grout or remove staining, but it’s gentler and leaves no toxic residue. The smell dissipates within an hour.
Hydrogen Peroxide (3%)
The standard drugstore concentration (3%) is an effective antifungal on porous and semi-porous surfaces. It bubbles on contact with organic material, which helps lift mold physically. Safe on grout, caulk, and fabric shower curtains. Avoid prolonged exposure on colored grout — it can bleach.
Baking Soda
Alkali-based and mildly abrasive. Works best as a scrubbing paste rather than a standalone mold killer. Useful for mildew on shower curtains and as a follow-up scrub after vinegar or peroxide treatment.
Commercial Mold Sprays
Products containing quaternary ammonium compounds (quats) or benzalkonium chloride kill mold and leave a residual antimicrobial film. Brands like RMR-86 (sodium hypochlorite-based) or Concrobium Mold Control (a quat-based formula) are widely used. Follow label directions precisely — many require dwell time of 5–10 minutes before scrubbing.
Removing Mold Surface by Surface
This is where generic advice falls apart. Here’s what actually works — and what to avoid — on each bathroom surface.
Ceramic and Porcelain Tile
Ceramic and glazed porcelain tile are non-porous on the surface, making them the easiest to clean.
Method:
- Spray a diluted bleach solution (1:16 ratio) or undiluted white vinegar directly onto the affected tile.
- Let it dwell for 10 minutes.
- Scrub with a stiff-bristled brush or a grout brush for edges.
- Rinse thoroughly with water.
- Dry with a cloth or squeegee.
Avoid: Abrasive steel wool or scouring pads — they scratch the glaze, creating microscopic pits where mold re-establishes more easily.
Grout Lines
Grout is cement-based and highly porous. This is where mold digs in and discolors, often permanently if left too long.
Method:
- Make a paste of baking soda and hydrogen peroxide (roughly 2:1 ratio).
- Apply directly to the grout line with an old toothbrush or grout brush.
- Let sit for 15–20 minutes.
- Scrub vigorously in small circular strokes.
- Rinse and dry.
For severe black discoloration, a bleach gel product (not liquid) applied with a small brush and left for 20 minutes can lift deep staining. If the discoloration doesn’t respond after two treatments, the mold has penetrated beyond surface level — the grout likely needs regrouting.
After cleaning: Seal the grout with a penetrating grout sealer once fully dry. This dramatically slows future mold penetration.

Caulk and Silicone Sealants
Caulk around the tub edge, shower base, and where tile meets fixtures is a notorious mold haven. The silicone matrix is semi-porous and the interior of old caulk beads frequently harbors mold that no cleaner can reach.
Method for surface mold:
- Apply undiluted hydrogen peroxide or a commercial mold spray.
- Dwell for 10–15 minutes.
- Scrub with a soft toothbrush.
- Rinse and dry fully.
When to replace, not clean: If black or green mold is visible inside the caulk (the discoloration is under the surface, not just on it), cleaning is pointless. Remove the old caulk with a plastic caulk removal tool and a utility knife, let the substrate dry for 24–48 hours, then apply fresh mold-resistant silicone caulk. Mold-resistant formulas contain fungicide additives that slow re-colonization.
Do not use bleach repeatedly on silicone caulk — it degrades the silicone over time, making the material more porous and prone to future mold.
Natural Stone (Marble, Travertine, Slate)
Natural stone is both porous and acid-sensitive. Bleach will etch and discolor it; vinegar will dissolve the calcium carbonate in marble and travertine. Most standard bathroom mold cleaners will damage natural stone.
Method:
- Use a pH-neutral stone cleaner with antifungal properties (look for products specifically labeled safe for natural stone).
- Apply per the product label, typically a short dwell time.
- Scrub gently with a soft-bristled brush or nylon pad — never steel wool.
- Rinse with clean water and dry immediately.
Alternative: Undiluted 3% hydrogen peroxide is generally safe on most natural stone in small amounts, but test on an inconspicuous area first, as some darker stones can lighten. Leave for no more than 10 minutes.
Critical maintenance step: Natural stone in wet areas must be sealed regularly (typically once per year with a penetrating stone sealer) to reduce porosity and resist mold uptake.
Shower Curtains and Liners
Fabric curtains and plastic liners both develop mildew, often as pink or black spots at the bottom hem.
Fabric curtains:
- Machine wash on a warm cycle with regular detergent plus ½ cup of white vinegar added to the rinse cycle.
- Do not machine dry — hang to air-dry fully spread out.
Plastic or vinyl liners:
- Machine wash on a gentle cycle with warm water, a small amount of detergent, and ½ cup of baking soda.
- Alternatively, lay flat and scrub with a hydrogen peroxide solution, rinse, and hang dry.
- If mildew is embedded in the plastic folds and won’t scrub out, the liner is cheap enough to replace — it’s not worth the effort.
Bathroom Walls (Painted Drywall)
Mold on painted walls is more serious because it typically indicates moisture penetrating the paint and potentially the drywall behind it.
Surface-level (paint only):
- Mix a diluted bleach solution (1:16 ratio) and apply with a sponge.
- Let dwell for 10 minutes.
- Wipe clean and allow to dry fully.
- Repaint with a mold-resistant bathroom paint — these contain antifungal additives and a more moisture-resistant sheen.
If the mold keeps returning in the same spot: The moisture source is behind the wall — a plumbing leak, inadequate vapor barrier, or water intrusion from outside. Surface cleaning will not fix this. You need to locate and resolve the moisture source, which may require cutting into the drywall.
Bathroom Grout on the Floor
Floor grout is exposed to standing water, tracked-in soil, and soap residue — a combination that accelerates mold growth compared to wall grout.
Method: Same as wall grout (baking soda/peroxide paste), but use a long-handled scrub brush to avoid kneeling on wet surfaces. Floor grout typically needs more passes because contamination is heavier. Seal after cleaning.
When to Call a Professional
DIY mold removal has real limits. Call a certified mold remediation specialist if:
- The moldy area exceeds 10 square feet.
- Mold is visible on ceiling tiles, inside wall cavities, or under subflooring.
- You notice a persistent musty odor after cleaning (hidden mold elsewhere).
- A household member has a mold allergy, asthma, or compromised immune system.
- The mold returned within days of a thorough cleaning — this usually signals a moisture source, not a cleaning failure.
Professional remediators follow IICRC S520 standards, which include containment, HEPA vacuuming, and post-remediation testing.

Long-Term Prevention: Stop Mold Before It Starts
The most effective mold control is environmental:
- Exhaust fan: Run it during and for 20–30 minutes after every shower. If your fan is undersized or noisy, it’s worth upgrading — look for CFM (cubic feet per minute) ratings appropriate to your bathroom’s square footage.
- Squeegee tiled walls after every shower — this removes 75–80% of surface moisture.
- Leave the shower curtain or door open after use so the enclosure dries.
- Fix leaks immediately — even a slow drip under a faucet provides constant moisture for mold.
- Regular cleaning: A weekly spray-down of tile and grout with white vinegar or a diluted disinfectant keeps mold colonies from establishing.
- Grout and stone sealing: Reseal grout annually and stone per the product’s recommendation.
- Dehumidifier: In extremely humid climates, a small bathroom dehumidifier can make a measurable difference.
For a deeper dive into keeping humidity and spores under control long after cleaning day, check out How to Keep a Bathroom Free of Mold: Cut Humidity, Stop Spores.
Frequently Asked Questions
Can I use bleach on every bathroom surface?
No. Bleach is effective on ceramic tile and glass but will damage natural stone (marble, travertine), degrade silicone caulk over time, and is too harsh for painted drywall at high concentrations. Match the cleaner to the surface.
Is pink mold in the shower dangerous?
The pink or orange slime common in showers is usually Serratia marcescens — actually a bacterium, not a mold. It’s an opportunistic pathogen and a particular risk for people with compromised immune systems. Clean it with a diluted bleach solution and rinse thoroughly. Recurring pink buildup means the shower isn’t drying between uses.
How long does white vinegar need to sit to kill mold?
At least 60 minutes for maximum efficacy, though many sources recommend a minimum of 10 minutes for light surface mildew. Longer dwell times matter more for porous surfaces like grout.
Does mold come back after cleaning with bleach?
Often, yes — especially on grout. Bleach kills surface mold but can drive deeper colonies further into porous material. More importantly, if ventilation and moisture conditions haven’t changed, new spores will re-colonize the clean surface. Cleaning without addressing ventilation is a short-term fix.
When is bathroom mold a health hazard?
Common surface molds (Cladosporium, Penicillium, Aspergillus) cause respiratory irritation and allergy symptoms in sensitive individuals. Black mold (Stachybotrys chartarum) produces mycotoxins and requires professional handling. If household members experience persistent coughing, eye irritation, or worsening asthma symptoms correlated with time spent at home, have the mold professionally identified before attempting DIY removal.
Conclusion
Removing bathroom mold safely comes down to three things: using the right cleaner for the specific surface, protecting yourself from spore exposure while you work, and addressing the moisture conditions that made mold possible in the first place. Ceramic tile responds well to bleach or vinegar; natural stone needs pH-neutral, acid-free products; caulk that’s moldy on the inside needs replacing, not scrubbing. Clean properly once, seal porous surfaces, and fix the ventilation — that combination makes recurring mold far less likely than any single cleaning product can on its own.