How to Deep Clean Baseboards and Trim: A Room-by-Room Guide

Baseboards and trim collect more grime than almost any other surface in a home — and they do it quietly, over months, until a low-angle glance reveals a ridge of dust, pet hair, and scuffed paint that somehow became part of the wall. The good news: a thorough deep clean takes less time than you expect, and the results change how a room feels instantly.
This guide walks through the full process — tools, technique, surface-specific considerations, and how to keep things cleaner longer — so you don’t have to tackle it blind.
What You Need Before You Start
Gather supplies before you touch a single baseboard. Stopping mid-room to find a bucket kills momentum.
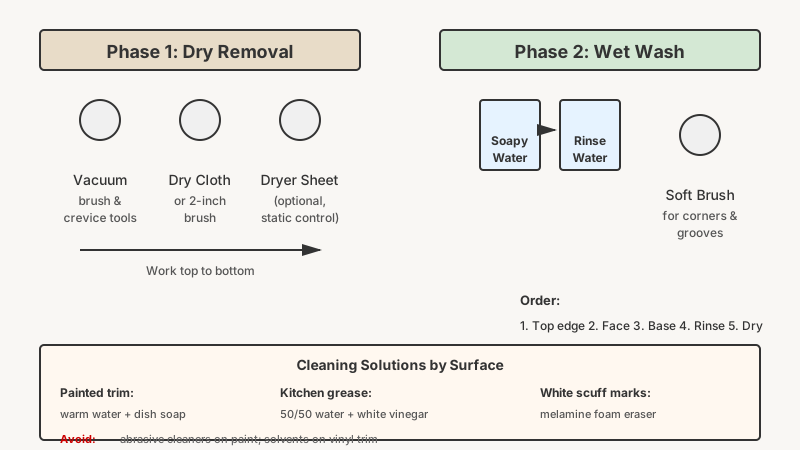
Dry tools (Phase 1 — dust and debris):
- Vacuum with a brush attachment (a narrow crevice tool is a bonus)
- Dry microfiber cloth or a clean paintbrush (a wide 2-inch trim brush is ideal for profiles with deep grooves)
- Dryer sheets — optional, but useful for the static trick discussed below
Wet tools (Phase 2 — washing):
- Two buckets: one for cleaning solution, one for rinse water
- Microfiber cloths or a pack of cheap terry-cloth rags
- A soft-bristle toothbrush or detail brush for grooves and corners
- A flat mop with a thin pad (helpful for long straight runs without bending)
Cleaning solutions: For most painted trim, warm water with a few drops of dish soap is all you need. For built-up grease (kitchen trim especially), add a small splash of white vinegar. For scuff marks on white trim, a melamine foam eraser (the generic version works identically to name brands) removes them with almost no effort. Avoid anything abrasive on painted surfaces or anything solvent-based on vinyl trim, which can cloud or warp.

Phase 1: Remove Loose Dust and Debris
Skipping this step and going straight to a wet cloth is the most common mistake. Wet dust turns into a muddy smear that’s harder to remove than the original mess.
Vacuum first. Run the brush attachment along the top edge of the baseboard — that’s where dust settles into a compressed ridge — and then along the base where the trim meets the floor. For baseboards with decorative profiles (raised center bead, stepped edges), use the crevice tool to pull dust from the recesses.
Follow with a dry cloth or brush. A 2-inch paintbrush reaches grooves a cloth can’t. Work top to bottom, floor to ceiling if you’re doing door and window casings alongside baseboards.
The dryer sheet trick: After vacuuming, wipe down flat sections of baseboard with a used dryer sheet. The anti-static agents in the sheet reduce the static charge that makes dust cling to painted trim. The effect is real but mild — it helps most in dry climates and during winter heating season. Don’t expect it to replace regular cleaning; think of it as a small friction-reducer between sessions.
Phase 2: Wash the Trim
With dry debris cleared, washing goes quickly.
- Dip your cloth in the soapy water, wring it nearly dry. You want damp, not wet — excess water can seep under the paint and raise wood grain over time, or wick into drywall behind vinyl trim.
- Wipe along the top edge first, then the face, then the base. This order keeps clean water running down, not re-dirtying what you’ve done.
- For corners and profiles, use the toothbrush with soapy water. Even on baseboards that look clean from standing height, corners often hold months of compacted dust.
- Rinse with a second damp cloth (plain water). Soap residue left on trim attracts dust faster. This step takes thirty seconds but matters.
- Dry with a clean cloth before moving on, especially near radiators or forced-air vents where temperature changes can affect paint adhesion over time.
Kitchen Trim: Grease Is the Problem
In kitchens, standard dust builds up on a foundation of airborne grease. Soap and water alone may not cut it. A 50/50 solution of warm water and white vinegar loosens grease films on painted trim. For stubborn buildup, a very small amount of dish soap added to the vinegar solution works well. Apply, let it sit for 30–60 seconds, then wipe. Always rinse with plain water after.
Avoid orange-oil or citrus-based cleaners on oil-based painted trim — they can soften the finish if the paint hasn’t cured fully (common in rentals or recently repainted spaces).
Once the trim is grease-free, you might want to tackle the source of the mess with How to Deep Clean Kitchen Appliances Step by Step.
Bathroom Trim: Soap Scum and Mildew
Bathroom baseboards, especially near the tub or toilet base, collect a combination of soap scum, mineral deposits from water splashes, and in poorly ventilated spaces, early-stage mildew. Look for gray or pinkish discoloration — that’s usually mildew, not just dirt.
For soap scum and mineral deposits: undiluted white vinegar applied with a cloth, left for a minute, then scrubbed with a toothbrush. Rinse thoroughly.
For mildew on painted trim: a diluted bleach solution (roughly 1 tablespoon bleach per quart of water) will kill it, but test a hidden spot first — bleach can dull some paint finishes and will strip any tinted trim color. Ventilate the room well, wear gloves, and rinse completely. If mildew keeps returning, the fix is ventilation, not more bleach.
For the tile and grout nearby that often shares the same soap scum problem, check out How to Clean Grout Between Tiles: Matching Grime Level To Method.
Living Room and Bedroom Trim: Pet Hair and Scuffs
In pet-owning homes, dog and cat hair wraps itself into the groove between the baseboard and the floor, embedding in carpet fibers at the joint. A stiff-bristle brush or the edge of a plastic spatula can dislodge it before vacuuming; otherwise it just relocates.
Scuff marks from shoes, vacuum cleaner heads, and furniture are the main cosmetic issue on living room trim. Melamine foam erasers remove most scuff marks from semi-gloss and gloss painted trim with light pressure. Use a light touch — scrubbing hard can dull the sheen on a small patch of otherwise glossy paint, creating an obvious matte spot.

Stair Risers and Handrail Trim
Stair trim gets foot traffic scuffs on risers and handprint accumulation on the rail profile. Treat the risers the same as baseboard trim. For handrails, the underside collects hand grease that widens to a dull stripe over time. A degreasing dish soap solution applied with a cloth works well here. Dry completely — a damp rail is a slip hazard.
On open-stringer staircases (where you can see the side of each stair), the trim detail at the nosing edge catches paint chips and dust in a notch that rarely gets noticed. A toothbrush is the right tool for that gap.
Window and Door Casings
Casings are often the dirtiest trim in a home on a per-square-inch basis, because hands touch them constantly, usually near the bottom where the door stop meets the casing. Grease, fingerprints, and light crayon marks (in family homes) concentrate here.
The same soap-and-water process applies, with extra toothbrush work around the mitered corners at the top of the casing where two pieces of trim meet. Dust collects in that V-shaped joint. After cleaning, a small amount of paintable caulk can fill a gap that’s opened up — it will eliminate the dust trap going forward.
How to Keep Trim Cleaner Between Deep Cleans
A deep clean every 2–3 months in high-traffic or pet-heavy rooms is a realistic maintenance schedule; once or twice a year works for low-traffic bedrooms. A few habits reduce how much effort each session takes:
- Add baseboards to your regular vacuum pass. Running the brush attachment along the top edge during your normal floor vacuuming adds maybe 90 seconds per room and prevents the dust ridge from building.
- Wipe kitchen trim monthly. Grease film is easy to remove when fresh and difficult once it’s accumulated multiple layers.
- Check bathroom trim after any plumbing leak or flooding. Water that sits under baseboard trim causes paint bubbling, wood rot (on wood trim), and mold that can travel behind the drywall. Catching it early is far cheaper than fixing it later.
- Touch up paint as needed. A clean baseboard with one scuffed patch where paint is missing collects dirt in the raw material underneath the paint. Keeping paint sealed is partly a cleaning strategy.

Frequently Asked Questions
How often should you deep clean baseboards?
For most homes, every 3–6 months for a proper wet-wash is reasonable. Kitchens and bathrooms typically need more frequent attention — monthly wipe-downs in addition to a quarterly deep clean. High-pet or high-traffic areas follow the kitchen cadence. Low-traffic guest rooms can go 6–12 months between full washes if you’re vacuuming them during regular floor cleaning.
What is the easiest way to clean baseboards without bending over the whole time?
A flat microfiber mop with a thin pad lets you wipe long straight runs of baseboard while standing. You’ll still need to crouch for corners, above-door casings, and detailed profiles — but it cuts the bending time significantly. Some people wrap a microfiber cloth around a wide floor squeegee for a similar effect.
Can you use a Magic Eraser (melamine foam) on all trim types?
Melamine foam is safe on hard, smooth-finish painted trim (semi-gloss and gloss specifically) and on sealed wood. It is mildly abrasive — light pressure only. Avoid it on flat or matte paint finishes, where it will create obvious shiny patches. Don’t use it on unfinished or raw wood, as it can roughen the grain. On vinyl trim, test a hidden corner first.
Why do my baseboards get dusty so fast after cleaning?
Painted surfaces, especially in dry or low-humidity environments, build up a static charge that actively attracts airborne dust. Wiping with a used dryer sheet after cleaning reduces this temporarily. If the problem is severe, it sometimes traces back to forced-air HVAC systems with dirty or inadequate filters pushing fine dust particles through the home constantly — checking and upgrading the air filter is worth doing.
Is it worth caulking gaps between the baseboard and the wall after cleaning?
Yes, and cleaning is actually the best time to do it — the surface is already prepared. Gaps wider than about 1/8 inch between the top of the baseboard and the drywall, or between baseboard pieces at corners, collect dust that’s impossible to remove without a brush. A thin bead of paintable acrylic latex caulk fills the gap, can be painted once dry, and eliminates that dust trap. It also gives trim a crisper, finished look.