How to Tell When Steak Is Done: Reading The Five-Degree Margin

Pulling a steak off the grill at exactly the right moment is one of those cooking skills that sounds simple and keeps tripping people up. The difference between medium-rare and medium can be less than five degrees Fahrenheit — and that gap shrinks fast over a hot fire. Here’s how to read the signs correctly, whether you have a thermometer in hand or not.
Why Internal Temperature Is the Ground Truth
Before getting into touch tests and color checks, it’s worth being clear: a calibrated instant-read thermometer is the most reliable method, full stop. Everything else is an estimation technique — useful, sometimes impressive at a dinner party, but ultimately a proxy.
That said, thermometers aren’t always handy, steaks vary in thickness, and sometimes you just want to cook without reaching for a gadget. So the methods below work from most to least precise.
Just as steak doneness depends on trusting real signals over guesswork, How to Caramelize Onions Properly: A No-Shortcut Guide makes the same case for why patience beats shortcuts in the kitchen.
Target Temperatures by Doneness Level
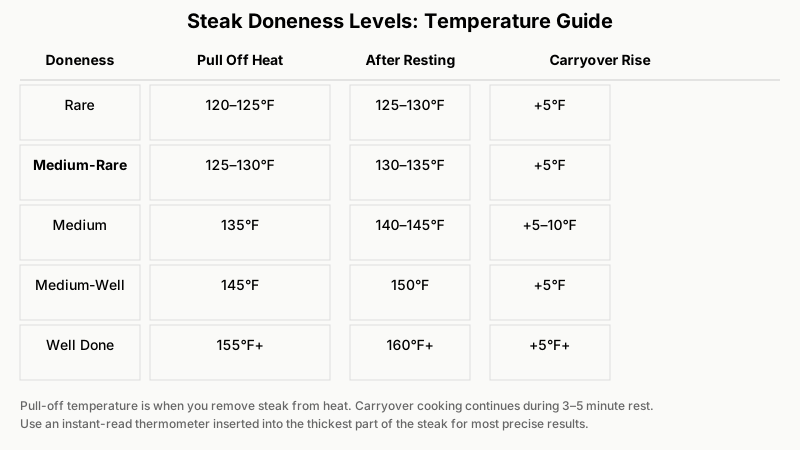
These are the internal temperatures you’re aiming for when you pull the steak off the heat — before resting. Carryover cooking will raise the temperature another 3–5°F while the steak rests.
| Doneness | Pull-Off Temp | Final Rested Temp |
|---|---|---|
| Rare | 120–125°F (49–52°C) | 125–130°F |
| Medium-Rare | 125–130°F (52–54°C) | 130–135°F |
| Medium | 135°F (57°C) | 140–145°F |
| Medium-Well | 145°F (63°C) | 150°F |
| Well Done | 155°F+ (68°C+) | 160°F+ |
The USDA recommends a minimum safe internal temperature of 145°F for whole muscle beef steaks, followed by a three-minute rest. For cuts like ground beef the minimum is 160°F — but that’s a patty, not a steak.
Method 1: The Instant-Read Thermometer
Insert the probe into the thickest part of the steak, avoiding bone and fat pockets. On a steak thinner than an inch, angle the thermometer in from the side so the probe tip sits near the center of the meat rather than poking straight down.
What to look for: A stable number on the display — not a climbing one. If the reading is still rising quickly, give it another 30 seconds and check again.
Good instant-read thermometers (brands like ThermoWorks Thermapen or the more affordable ThermoPop) give a reading in two to three seconds. Cheap dial thermometers can lag by 15–20 seconds and may not be accurate enough to catch a five-degree window.
Method 2: The Finger-Touch Test
This is the method chefs demonstrate on cooking shows, and it works — once you’ve calibrated it against a thermometer enough times to trust your own hands.
The idea: the firmness of cooked steak correlates with the firmness of the fleshy pad below your thumb when you touch different fingers together.
- Rare: Touch your index finger to your thumb. The pad feels soft and yielding.
- Medium-Rare: Touch your middle finger to your thumb. A little more resistance.
- Medium: Ring finger to thumb. Noticeably firmer.
- Well Done: Pinky to thumb. Quite firm, almost tense.
The honest caveat: This works best on similarly sized steaks you’ve cooked dozens of times. A 1-inch sirloin and a 1.5-inch ribeye won’t feel the same at the same temperature — thickness and fat content change the texture. Use this as a sanity check, not a primary method.
Method 3: The Nick-and-Peek
Make a small incision near the center of the steak with a paring knife and look at the color of the interior. It’s not elegant, and yes, it lets juices escape — but it gives you a genuine visual read.
- Bright red and cool center: Rare
- Warm red-pink throughout: Medium-rare
- Pink center with grayish-brown edges: Medium
- Mostly gray-brown with a hint of pink: Medium-well
- Uniformly gray-brown: Well done
The trick here is lighting. Kitchen lighting and grill-side shadows make it genuinely hard to judge color accurately. If you’re going to do this, take the steak somewhere with decent light before you cut.
Also know that some steaks — particularly grass-fed beef or those treated with certain marinades — can look pinker than expected even when fully cooked. Color alone can mislead; temperature won’t.

Method 4: The Timer Method
Timing alone is a rough guide, not a recipe for precision. But it’s useful when you’re cooking multiple steaks on a consistent heat source and you know your equipment well.
For a 1-inch-thick steak cooked over high heat (around 450–500°F surface temperature):
- Rare: About 2–3 minutes per side
- Medium-Rare: About 3–4 minutes per side
- Medium: About 4–5 minutes per side
- Well Done: 6+ minutes per side
These are starting points, not guarantees. A thicker steak, a cast-iron pan instead of a grill, a windier day outdoors — all of these shift timing. Always verify with another method if the result matters.
Method 5: The Shrinkage and Juice Test
As a steak cooks, it contracts and pushes moisture toward the surface. Watching this process gives indirect clues:
- Rare to medium-rare: Very little surface moisture, the steak hasn’t shrunk much
- Medium: Juices start beading on the top surface, slight shrinkage visible
- Well done: Significant shrinkage, lots of juice pooled on the surface or dripped away, edges have pulled away from where they started
This method works better as a supporting indicator than a standalone one. If you see heavy juice pooling and clear shrinkage, you’re at least at medium, likely beyond.
Method 6: The Rest-and-Check
After you pull the steak off the heat, carryover cooking continues for several minutes. This isn’t just a chef’s tip — it’s physics. The outer layers are hotter than the center, and heat equalizes inward as the steak rests.
A practical use: if you pull the steak at 127°F (just below your medium-rare target), let it rest loosely tented under foil for 5 minutes, then check with the thermometer again. It will likely have climbed to 132–134°F — right in the medium-rare window.
Resting also redistributes moisture. A steak cut immediately after cooking loses significantly more juice than one rested properly. Aim for at least 5 minutes for a 1-inch steak, 8–10 minutes for anything thicker.
Special Cases Worth Knowing
Very Thick Steaks (2 Inches or More)
For thick cuts like a bone-in ribeye, tomahawk, or a Porterhouse, the surface can char before the center reaches temperature. The reverse-sear method handles this well: start the steak in a low oven (250°F) until the internal temp reaches about 10–15°F below your target, then sear hard in a cast-iron pan or over high grill heat for a crust. This gives you far more control over doneness.
Carryover on Very Thin Steaks
Thin steaks (under 3/4 inch) cook so fast that carryover is minimal. Pull them right at your target temperature rather than 5°F early — there’s not enough mass to keep cooking significantly.
Frozen or Cold-Center Steaks
Cooking a steak straight from the refrigerator means the center starts much colder than a steak brought close to room temperature first. This isn’t dangerous — you just need to account for it. Either let the steak sit out for 20–30 minutes before cooking, or plan for a longer cook time and verify with a thermometer.

Putting It Together: A Simple Decision Tree
If you want a practical workflow:
- Have a thermometer? Use it. Pull 5°F below target and rest.
- No thermometer, but experienced? Combine the touch test with the timer and use a nick-and-peek only if you’re unsure.
- New to cooking steak? Use the timer as a starting guide, do a small nick-and-peek, and invest in a thermometer before next time.
The touch test gets more reliable the more steaks you’ve cooked. The thermometer is reliable from the first use. That’s the honest trade-off.
If you want to apply this same doneness-checking discipline to another cut entirely, Pan-Seared Salmon: How to Cook It Perfectly Every Time shows how the timing and temperature principles translate to fish.
Conclusion
Telling when a steak is done isn’t a single skill — it’s a cluster of techniques you layer depending on what you have available and how much precision you need. A thermometer gives you numbers. Touch gives you feel. Color gives you a visual cue. None of them are useless; none of them (except the thermometer) are foolproof on their own.
For everyday cooking, the combination of a quick thermometer read and a proper rest covers 95% of situations perfectly. The rest of the methods are worth knowing because they sharpen your instincts — and because at some point, you’ll be standing over a hot grill without your gadgets, and you’ll want to have something to go on.