Reading a Tape Measure Accurately Every Time

A tape measure is one of those tools that looks simple until you’re three cuts into a project and nothing fits right. Misreading by even a sixteenth of an inch can mean a wasted board, a cabinet that won’t close, or a tile gap that refuses to be uniform. The good news is that every mark on the blade follows a logical, learnable system — and once you see it, you don’t forget it.
Understanding the Blade: The Fraction System
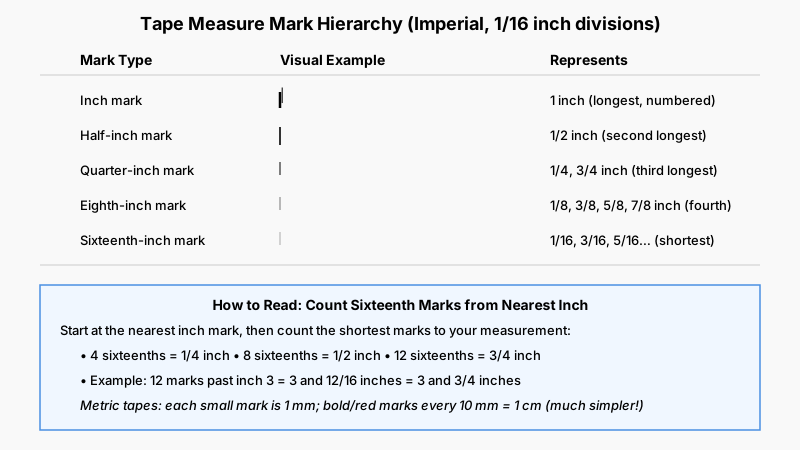
Most tape measures sold in North America are imperial (feet and inches), divided into fractions down to 1/16 of an inch, with some precision tapes going to 1/32. The marks decrease in length as the fractions get smaller, creating a visual hierarchy:
- Longest mark — the inch mark, often numbered
- Second longest — the half-inch (1/2)
- Third — the quarter-inch (1/4 and 3/4)
- Fourth — the eighth-inch (1/8, 3/8, 5/8, 7/8)
- Shortest marks — the sixteenth-inch divisions
The key insight: count the shortest marks from the nearest inch mark to the measurement point, and you’re reading sixteenths. Four sixteenths equals one quarter, eight sixteenths equals one half, and so on. You can always reduce the fraction mentally — if you land on the 12th sixteenth mark past an inch number, that’s 12/16 = 3/4 of an inch past that number.
Metric tapes use millimeters and centimeters, which are far more forgiving — each small mark is 1 mm, groups of five are sometimes highlighted, and the red or bold marks every 10 mm indicate a full centimeter.

The Hook: Why the First Inch Lies (and Why That’s Intentional)
The metal hook at the end of the tape is supposed to slide slightly. If yours wiggles a fraction of an inch, that is a feature, not a flaw. The hook’s thickness equals its travel distance — when you hook the tape over the outside of an object, the hook extends outward by that amount, keeping the effective zero correct. When you push the hook against an inside surface (an inside measurement), the hook slides inward, again preserving the zero.
What this means practically:
- Outside measurement (hook over edge): The hook automatically compensates — no adjustment needed.
- Inside measurement (hook pushed flush): Same — the sliding does the work.
- Worn or bent hooks: This is where real error creeps in. A hook that’s bent inward by 1/16 inch will cause every measurement to be off by 1/16 inch. Check your tape periodically: hook it over a known straight edge, mark a point, then flip and take an inside measurement between the same two points. The numbers should agree.
Taking Measurements Without Errors
Hook, Push, and Burn an Inch
For most measurements, hooking or pushing the tape onto the object is more reliable than trying to hold the zero end free-floating in the air. When a hook isn’t practical — say, measuring from a wall corner to a stud — many carpenters use a method called burning an inch: start the tape at the 1-inch mark instead of zero, then subtract one inch from the final reading. This eliminates the guesswork around the hook.
Locking and Reading at Eye Level
Lock the blade before reading. Trying to read a flapping tape leads to parallax errors — your eyes aren’t directly above the mark, so you see a slightly different position depending on viewing angle. Get your eye directly over the mark you’re reading, not at an angle to it.
The Pencil Mark Technique
Once you have a measurement, mark it with a sharp pencil rather than a thick marker. A thick marker line is itself 1/32 of an inch wide — which side of the line are you cutting to? A sharp pencil gives you a hairline reference. When marking for a cut, add a small ’V’ pointing to the exact measurement point; a line alone can drift.

Reading the Red Numbers and Special Marks
Most North American tapes print certain numbers in red or bold them at 16-inch intervals — 16, 32, 48, and so on. These correspond to standard stud spacing in North American framing. Black diamonds (or stud marks) appear every 19.2 inches on many tapes — that’s the spacing for five studs across an 8-foot sheet of OSB or plywood. If you’re framing, these marks save you from doing arithmetic on the job site.
Metric vs. Imperial: Switching Between Systems
Some projects require working in both systems, or your tape only has one. The key conversions worth memorizing:
- 1 inch = 25.4 mm exactly
- 1 foot = 304.8 mm
- 25 mm ≈ 1 inch (off by less than 2%, fine for rough checks)
For precision work, avoid mental conversion mid-project — pick one system for the whole job. Conversion rounding is a genuine source of accumulated error on multi-step measurements.
Common Mistakes and How to Fix Them
Measuring twice from different starting points: If you measure twice but start from opposite ends, any hook wear or blade bow compounds. Always measure from the same end.
Letting the tape arc: A long tape sags under its own weight. Longer steel blades have a slight curve (the case is designed to project several feet unsupported), but beyond 6–7 feet without support, the blade can bow sideways and add real length to your measurement. Use a second person, a block, or a laser distance meter for long spans.
Misreading the foot mark: On a 12-foot measurement, it’s easy to read “12 feet, 3/4 inch” when you actually mean “1 foot, 2-and-3/4 inches” — the tape is showing 1′ 2 3/4″. The number before the foot mark tells you feet; always identify the nearest foot mark first, then count the remaining inches.
Trusting a damaged tape: Kinks in the blade or a bent hook mean every subsequent measurement is suspect. A good-quality tape measure costs between $15 and $40 for most home use — if yours is visibly compromised, replace it rather than compensate mentally.

Choosing the Right Tape for the Job
Not all tapes are equal for all tasks:
- 25-foot, 1-inch-wide blade — the standard all-around choice for home projects. Wide blades stand out farther unsupported.
- 16-foot, 3/4-inch blade — lighter, fits in a pocket, good for trim and furniture work.
- Metric-only or dual-scale tapes — useful if you work in both systems or follow metric plans.
- Laser distance meters — accurate over long spans but give you a single number, not a physical reference point. Good for rooms; less useful for marking boards.
- Long cloth or fiberglass tapes — used for surveying and large outdoor areas; not suitable for fine woodwork.
For most homeowners, a 25-foot Stanley FatMax or a similar wide-blade tape with clear fraction markings is the practical go-to. The blade width and rigidity matter far more than the brand label.
Frequently Asked Questions
Why does my tape measure read differently than my neighbor’s, even when measuring the same thing?
Hook wear is usually the culprit. If two tapes have hooks in different states of wear — one slightly bent inward, one outward — readings can differ by up to 1/8 inch. Both may have been accurate when new. The verification test described above (hook-then-push on the same span) will tell you which tape, if either, is still reliable.
What does the black diamond on a tape measure mean?
Black diamonds appear every 19.2 inches. That spacing divides an 8-foot (96-inch) sheet into exactly five equal parts — the spacing for engineered lumber layout and some floor-truss systems. It’s mostly used by framers; for general home projects, you can safely ignore it.
How do I measure an inside dimension accurately (like the inside of a door frame)?
Extend the tape into the opening, push the hook flat against one side, and note the point where the tape exits the case on the other side. Most tape cases have their length printed on them (often 3 inches). Add the case length to the tape reading. For a clean result, double-check with a second measurement from the opposite end.
Can I use a tape measure to check if a surface is level or square?
Not for level (use a spirit level or laser level), but you can use it to check square with the 3-4-5 rule: measure 3 feet along one wall, 4 feet along the adjacent wall, and if the diagonal between those two points measures exactly 5 feet, the corner is square. Scale it up (6-8-10, 9-12-15) for larger rooms.
Is there a rule for reading sixteenths faster without counting every mark?
Yes. Identify the nearest inch below your measurement. Then look at the mark height: if it reaches the half-inch level, add 8/16 (= 1/2) to your count. If it only reaches the quarter level, you’re at 4 or 12 sixteenths. Count just the remaining short marks from there. With practice, you’ll stop counting individual marks and start pattern-matching — experienced carpenters read the blade almost the way you read analog clock hands.
Tape measure accuracy is mostly habit: same starting method every time, a sharp pencil, and a periodic hook check. Get those three right, and measurement errors become rare rather than routine.