How to Caramelize Onions Properly: A No-Shortcut Guide

Caramelized onions are one of the most transformative things you can do with a humble vegetable. Raw, they’re sharp and pungent. After a long, slow cook, they collapse into something jammy, deeply sweet, and almost savory-dark — a completely different ingredient. The problem is that most recipes lie about how long it takes, and that lie ruins the result.
This guide covers everything: the right pan, the right heat, the right onions, and why your caramelized onions probably aren’t caramelized at all — just softened.
Why Most Home Cooks Get It Wrong
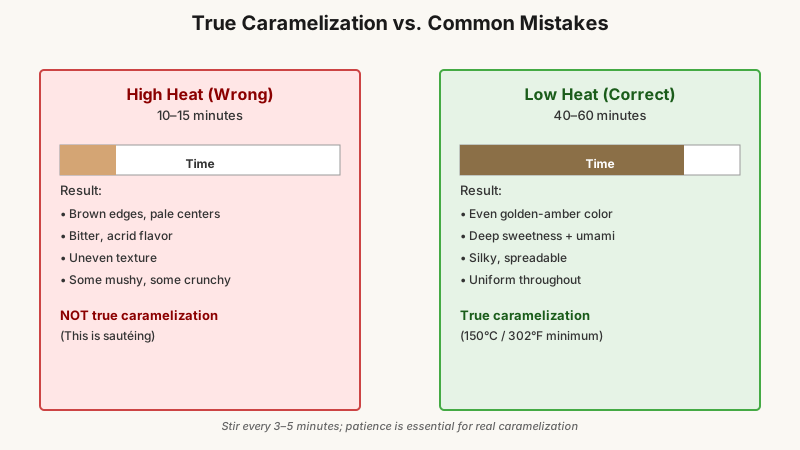
The single biggest mistake is heat that’s too high and a timeline that’s too short. A staggering number of recipes say “caramelize onions in 10–15 minutes.” That’s not caramelization — that’s sautéing. Real caramelization takes 40 to 60 minutes of patient, low-to-medium heat. Some French chefs push it to 90 minutes for onion soup.
The chemistry matters here. True caramelization involves the breakdown of sugars in the onion at temperatures above 150°C (302°F). Alongside that, the Maillard reaction — a separate but related process — browns proteins and creates hundreds of new flavor compounds. You can’t rush either reaction without burning the outside before the inside transforms.
When you blast onions on high heat, you get:
- Brown edges but pale, crunchy centers
- A bitter, slightly acrid flavor
- Uneven texture — some pieces mushy, some still raw-crisp
Slow heat gives you:
- Even collapse and golden-amber color throughout
- Deep sweetness balanced by savory umami
- A silky, almost spreadable consistency

Choosing the Right Onions and Equipment
Which Onions Work Best
Yellow onions (also called brown onions) are the standard choice, and for good reason — they have a balanced sugar content that produces a rich, complex flavor without going cloyingly sweet. Sweet onions like Vidalia or Walla Walla caramelize faster but can turn almost candy-like, which works well for burgers and flatbreads but can overwhelm a French onion soup.
Red onions caramelize beautifully and add a mild sharpness that holds up well. White onions are fine but tend to be milder and slightly less complex in the final result.
How many onions? Always use more than you think. A large pan piled high with raw onion slices will reduce to roughly one-fifth that volume. For two servings as a topping or side, start with 4–5 medium onions.
The Right Pan Makes a Real Difference
A wide, heavy-bottomed pan is essential. Cast iron and stainless steel are the top choices — both retain heat evenly and allow fond (the brown bits that stick to the pan) to develop properly. Nonstick pans technically work but inhibit fond formation, which means you lose some of the deepest flavor.
A 12-inch (30 cm) skillet handles 4–5 onions comfortably. If you’re making a large batch for a crowd or batch cooking, use a Dutch oven — the higher sides help manage moisture as it steams off.
Fat: Butter, Oil, or Both?
Butter adds richness and a mild nuttiness, but it has a lower smoke point and can burn before the onions finish. A neutral oil like vegetable or sunflower oil is more forgiving on low heat. The classic French approach uses unsalted butter; many professional cooks use a 50/50 split of butter and olive oil to raise the effective smoke point while keeping the flavor.
Use roughly 1 tablespoon of fat per large onion — enough to coat without drowning.
Step-by-Step: How to Caramelize Onions Properly
1. Prep the Onions
Slice off the stem end and halve through the root. Peel and slice into half-moons about 3–4 mm (⅛ inch) thick. Consistent thickness matters — uneven slices mean some burn while others are still raw. A mandoline slicer gives you perfect uniformity, though a sharp chef’s knife works fine with care.
Leave the slices slightly thicker than you think necessary. They’ll shrink dramatically.
2. Start with Medium-Low Heat
Heat your pan over medium-low heat and add your fat. Once the butter foams or the oil shimmers, add all the onions at once. Don’t worry about the pile — they’ll wilt quickly.
Add a generous pinch of salt immediately. Salt draws out moisture, which actually helps the onions steam and soften before the real browning starts. Some cooks also add a pinch of baking soda at this stage (¼ teaspoon per large batch), which raises pH and speeds up the Maillard reaction — a legitimate shortcut that shaves 10–15 minutes off the process without sacrificing flavor.
3. Stir Occasionally, Not Constantly
This is where patience earns its keep. Stir every 3–5 minutes. You want the onions to sit in contact with the hot pan long enough to brown, but you also want to prevent burning. If you see the fond getting too dark or the onions sticking aggressively, add a splash of water (about 2 tablespoons) to deglaze and scrape up the browned bits — this adds flavor back into the onions.
Your heat should stay between medium-low and medium throughout. If you hear aggressive sizzling, turn it down.
4. Watch for Color Stages
- 10–15 minutes: Onions are wilted and translucent, releasing a lot of liquid. Still no color.
- 20–30 minutes: Liquid has mostly evaporated. Onions start to look pale gold at the edges.
- 35–45 minutes: Deep amber color developing. The kitchen smells unmistakably sweet.
- 45–60 minutes: Rich mahogany color, silky texture, volume reduced to a fraction. This is caramelized.
If you’re making French onion soup, push to 60–70 minutes for maximum depth.
5. Optional Deglazing for Extra Flavor
Once fully caramelized, you can deglaze the pan with a splash of dry white wine, dry sherry, balsamic vinegar, or beef broth. Add 2–3 tablespoons, scrape up every last bit of fond, and let the liquid cook off. This adds another layer of complexity — especially useful if your onions are going into a soup or a savory tart.

Flavor Additions and Variations
Basic caramelized onions are wonderful on their own, but a few additions can shift the flavor profile:
- Fresh thyme or rosemary: Add a sprig in the first 20 minutes. The herbs will wilt and meld into the onions. Remove before serving.
- Garlic: Add 3–4 minced cloves in the last 10 minutes to avoid burning.
- A pinch of sugar: If your onions are very pungent (late-season yellow onions can be quite sharp), a half-teaspoon of brown sugar at the 30-minute mark helps coax them along.
- Bay leaf: A single leaf adds a subtle background note that works well for French onion soup.
- Red wine: Deglazing with red wine near the end gives a deeper, more savory finish — excellent with steak.
If you’re looking to put those sweet caramelized onions to work in other quick, high-heat dishes, our guide How to Season a Stir Fry Properly: Why Timing Beats Your Sauce Recipe shows how to layer flavor without overcooking everything else in the pan.
How to Use Caramelized Onions
Once you have a batch, the applications are almost endless. A short list of places where they genuinely transform a dish:
- French onion soup — the classic, non-negotiable use. Don’t attempt it without properly caramelized onions.
- Burgers and sandwiches — far superior to raw or grilled onions.
- Pizza and flatbreads — pair with goat cheese and walnuts, or with Gruyère and mushrooms.
- Pasta — toss with pasta, ricotta, and black pepper for a fast weeknight dinner.
- Tarts and quiches — a caramelized onion and Gruyère tart is a French bistro staple for a reason.
- Spread on toast with sharp cheddar and a fried egg.
- Stirred into mashed potatoes or polenta.
For more ideas on weaving a batch of caramelized onions into dinner tonight, check out 15 Easy Weeknight Dinner Recipes Ready in 30 Min.
Storing and Batch Cooking
Caramelized onions keep well in the fridge in an airtight container for up to a week. They also freeze beautifully — portion them into ice cube trays, freeze solid, then transfer to a zip-lock bag. Each cube is roughly one serving worth, ready to drop into soups, sauces, or sandwiches straight from frozen.
Given that they take an hour, batch cooking makes real sense. Double or triple the recipe and freeze in portions. You’ll thank yourself on a Tuesday night.

Common Mistakes to Avoid
| Mistake | Why It’s a Problem | Fix |
|---|---|---|
| High heat | Burns exterior, raw center | Keep heat at medium-low |
| Too little onion | Ends up with almost nothing | Start with 2× more than you think |
| Skipping the salt | Slower moisture release | Add salt at the start |
| Stirring constantly | Prevents browning | Stir every 3–5 min |
| Stopping too early | Pale, sweet, not complex | Wait for deep amber color |
| Using nonstick | No fond development | Use cast iron or stainless steel |
The Patience Payoff
Caramelizing onions properly is not difficult — it just requires time and the willingness to leave them mostly alone. The hour you spend standing near a stove (doing other kitchen prep, reading, or just listening to them quietly sizzle) produces something that store-bought condiments have never managed to replicate.
Get the heat right, use more onions than you think, and resist every urge to turn the flame up. The result is one of the most useful, versatile preparations in a home cook’s repertoire — and once you’ve tasted the real thing, you’ll find it almost impossible to settle for anything less.