Homemade Ricotta: Fresh, Creamy, Done in 30 Minutes

Ricotta made from scratch takes roughly half an hour and uses ingredients you probably already have. The result tastes noticeably brighter and creamier than most tub ricotta from the supermarket — not because store-bought is bad, but because fresh curds haven’t had time to dry out or pick up off-notes from stabilizers.
This guide walks through the full process: which milk to use, why the acid matters, what can go wrong, and how to adapt the basic method for richer or lighter results.

The Core Method
At its heart, ricotta is just warm milk pushed past its tipping point with acid. The acid (lemon juice, white vinegar, or citric acid) causes milk proteins — primarily casein — to unfold and clump together, forming soft curds. Heat speeds and completes that process. You drain off the liquid whey, and what’s left in the strainer is ricotta.
Here’s the basic recipe that reliably yields about 1½ cups of fresh ricotta:
Ingredients
- 1 litre (about 1 quart) whole milk
- ½ cup (120 ml) heavy cream (optional but recommended for richness)
- ½ teaspoon fine sea salt
- 3 tablespoons fresh lemon juice, OR 2 tablespoons white wine vinegar, OR ¼ teaspoon citric acid dissolved in 2 tablespoons water
Equipment
- Heavy-bottomed saucepan
- Instant-read or candy thermometer
- Fine-mesh strainer or colander
- Cheesecloth (or a clean, damp muslin cloth)
- Large bowl
Steps
-
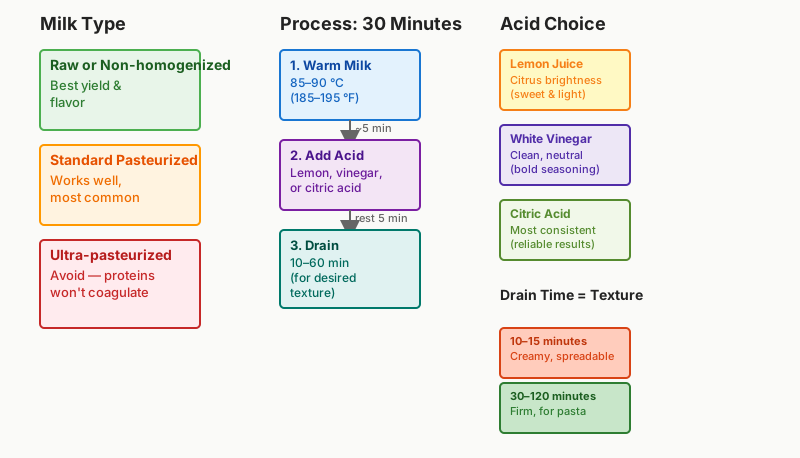
Warm the milk. Pour the milk (and cream, if using) into the saucepan with the salt. Heat over medium heat, stirring occasionally to prevent scorching. You’re aiming for 85–90 °C (185–195 °F). Small bubbles will appear around the edges — the milk should steam steadily but not reach a full rolling boil.
-
Add the acid. Remove the pan from the heat, pour in your acid, and stir gently once or twice. Then leave it completely undisturbed for 5 minutes. Agitating the curds too much at this stage makes them rubbery rather than pillowy.
-
Check for separation. After 5 minutes, you should see distinct white curds floating in yellowish whey. If the liquid still looks milky white, the acid wasn’t enough — add another tablespoon and wait another 2–3 minutes.
-
Drain. Line your strainer with two layers of dampened cheesecloth and set it over the bowl. Ladle or gently pour the curds in — avoid dumping everything in at once or the force will push curds through the cloth. Let gravity do the draining.
-
Decide on texture. For a creamy, spreadable ricotta: drain 10–15 minutes. For firmer, drier ricotta suitable for stuffing pasta or baking: drain 30–60 minutes, or up to 2 hours in the refrigerator.
-
Taste and finish. Season with a little more salt if needed. Transfer to an airtight container. Fresh ricotta keeps in the refrigerator for up to 4–5 days.
Choosing the Right Milk
This is where most failures happen, and where you have the most control over quality.
Whole milk is non-negotiable. Low-fat or skim milk produces meagre, grainy curds. The fat coats the proteins and contributes to that characteristic creaminess — skip it and the texture suffers.
Raw or non-homogenized milk gives the best yield and flavor, if you can source it. The natural fat globules are intact and produce a richer curd.
Standard pasteurized whole milk works perfectly well. This is what most people will use, and the results are consistently good.
Ultra-pasteurized (UHT) milk is the one to avoid. The ultra-high heat treatment used to extend shelf life alters the proteins significantly — they don’t coagulate the way you need. Many home cheesemakers have been frustrated by batches that stubbornly refuse to curd properly; UHT milk is almost always the culprit. Check the carton: anything labeled “Ultra Pasteurized” or “Extended Shelf Life” (ESL) won’t behave correctly.
Adding heavy cream raises the fat content and dramatically improves texture. Even a small amount — a quarter cup per litre of milk — makes a noticeable difference. If you want a ricotta that sits somewhere between cheese and clotted cream, go up to 50% cream to 50% milk.

Acid Choices and What They Change
The three common acids each leave a slight fingerprint on flavor:
-
Lemon juice adds a faint citrus brightness. It’s the classic choice and pairs well with sweet preparations (pancakes, cannoli, desserts) and lighter savory dishes. Use fresh juice rather than bottled — old juice has degraded acidity and inconsistent results.
-
White wine vinegar (or distilled white vinegar) gives a cleaner, more neutral flavor. Slight vinegar sharpness fades as the curds rest, making this a good choice when the ricotta will be seasoned boldly or cooked into sauces.
-
Citric acid is the most consistent option. The exact acidity doesn’t vary from batch to batch the way lemon juice does. Dissolve ¼ teaspoon in a couple of tablespoons of water before adding. It produces a neutral, clean-tasting curd — ideal for baking.
None is strictly better; it depends what you’re making with the ricotta.
Troubleshooting
Curds are tiny and grainy, not soft and pillowy Usually caused by too much acid, temperature too high, or stirring too aggressively after adding the acid. Next batch: use slightly less acid, pull the pan off heat at around 85 °C rather than higher, and resist the urge to stir.
No curds form Almost always UHT milk, or milk that wasn’t warm enough. The sweet spot is 85–90 °C — below 80 °C and the proteins won’t set fully. Check your thermometer calibration too; cheap dial thermometers can read 10 °F off.
Ricotta tastes rubbery Overstirring after adding the acid, or letting it sit too long before draining. Aim for gentle handling throughout.
Yield is very low Expect roughly 10–15% of the starting liquid volume as ricotta (so 1 litre of milk = ~100–150 ml of drained curd, around 1 to 1½ cups depending on draining time). If you’re getting much less, your milk fat content might be low, or the curds were too small to capture.
Ricotta is too dry Drained too long. Stir in a splash of the reserved whey to loosen it up.
Variations Worth Trying
Whole-milk ricotta with herbs: Stir chopped thyme, chives, or a little garlic into the finished curds. Spread on toasted bread or use as a pizza base.
Sheep’s milk ricotta: If you can source sheep’s milk, the higher fat and protein content produces a noticeably richer, slightly sweeter curd — closer to what you’d find in southern Italy. The method is identical.
Drained and pressed for cooking: Wrap the curds tightly in cheesecloth, press a small weight on top, and refrigerate overnight. The resulting firm block slices cleanly and holds up in baked pasta dishes without turning watery.
Using the whey: Don’t pour it down the drain. The leftover whey is mildly sweet and works well as a substitute for water or buttermilk in bread dough, pancake batter, or soup bases. It also contains residual protein — if you heat it again almost to boiling, a small second crop of very delicate curds sometimes appears.

For another quick homemade staple that transforms weeknight pasta, check out Homemade Pesto: 7 Secrets to Getting It Right.
How to Use Your Fresh Ricotta
Fresh ricotta works across a broad range of dishes. A few directions:
- Pasta filling: Mix with egg, parmesan, a pinch of nutmeg, and seasoning for classic ravioli or cannelloni stuffing. Make sure the ricotta is well-drained first, or the filling will weep during cooking.
- Desserts: Whip briefly with honey and lemon zest for a quick dessert base, or use directly in a no-bake cheesecake. Sicilian cannoli traditionally use sheep’s milk ricotta, but whole-milk works.
- Toast and flatbreads: A thick spread of barely-seasoned ricotta with olive oil and flaky salt is one of the simplest things you can make with it.
- Breakfast: Spoon over waffles or pancakes in place of sour cream or yogurt.
- Soup enrichment: A small dollop stirred into tomato or vegetable soup at serving adds body without heaviness.
If you’re topping a salad or soup with your ricotta, a batch of Homemade Croutons: The Easy Guide to Perfect Results adds the crunchy contrast that pairs perfectly with it.
Frequently Asked Questions
Can I make ricotta without a thermometer?
Yes, but with less precision. Heat the milk until you see small bubbles persistently forming around the edges and a steady steam rises from the surface — that’s roughly in the 85–90 °C range. The risk is overshooting without noticing, which causes tougher curds. A simple probe thermometer (inexpensive and widely available) removes the guesswork entirely.
Why did my curds turn out very small and disappear through the cheesecloth?
This happens when the milk is stirred too much after adding acid, or when the acid is added too forcefully. Tiny curds also result from UHT milk. Use a finer layer of cheesecloth and be gentler with both the acid addition and the initial stir.
Is homemade ricotta safe to eat?
Yes, when made with commercially pasteurized milk and standard kitchen hygiene. The heating step brings milk well above pasteurization temperature. Consume within 4–5 days and keep refrigerated. Pregnant individuals and those with compromised immune systems should avoid raw milk versions.
Can I freeze ricotta?
Freezing is possible but changes the texture noticeably — the curds become slightly grainy and watery after thawing. Frozen ricotta works in cooked applications (lasagna, baked pasta) where texture matters less, but it’s not ideal for fresh eating or delicate desserts.
What’s the difference between ricotta and cottage cheese?
Both are fresh, unaged white cheeses made by acid coagulation, but their textures and production differ. Cottage cheese typically uses a bacterial starter culture and/or rennet in addition to acid, is drained less thoroughly, and has a distinctly lumpy texture with more liquid. Ricotta is smoother, drier (when properly drained), and has a milder, slightly sweet flavor profile.
Wrapping Up
Making ricotta at home requires almost no equipment, no specialized ingredients, and not much time. What it does require is attention to two variables: the type of milk and the temperature. Get those right and the process is close to foolproof. Get them wrong and the batch refuses to curd — which is frustrating but fixable once you know why it happens.
Start with one litre of whole pasteurized milk, lemon juice, and a thermometer. The first batch is largely a learning exercise. By the second or third, you’ll have a feel for when the milk is ready and how long to drain for the texture you want — and you’ll rarely buy the tub version again.