How to Change a Furnace Air Filter: A Five Minute Fix

Changing your furnace air filter is one of the simplest home maintenance tasks you can do — and one of the most neglected. A clogged filter forces your furnace to work harder, drives up your energy bill, and can shorten the lifespan of the equipment. The good news: the whole job takes under five minutes once you know what you’re doing.
This guide covers everything from finding the right filter size to disposing of the old one properly, with practical tips that go beyond the basics.
Why the Air Filter Matters More Than You Think
Your furnace pulls air from inside your home, heats it, and pushes it back through the ducts. The filter sits at the intake point and catches dust, pet dander, pollen, mold spores, and other particles before they reach the blower motor and heat exchanger.
When the filter gets clogged:
- Airflow drops, so rooms don’t heat evenly.
- The blower motor strains, raising electricity consumption and accelerating wear.
- The heat exchanger can overheat, triggering safety shutoffs — or, in older units, cracking. A cracked heat exchanger can allow combustion gases to enter your living space, which is a serious safety issue.
- Indoor air quality worsens, because a saturated filter stops capturing particles and can even shed them back into the air.
The U.S. Department of Energy notes that replacing a dirty, clogged filter can lower your furnace’s energy consumption by 5–15 percent. That’s not a trivial saving over a heating season.
What You Need Before You Start
Find Your Current Filter Size
Filter sizes are printed on the cardboard frame of the existing filter — typically something like 16x20x1 or 20x25x4 (width × height × depth in inches). If the old filter is too dirty to read, check your furnace owner’s manual or look up the model number on the manufacturer’s website.
Buy the exact size. A filter that’s even half an inch too small allows unfiltered air to bypass it around the edges. A filter too large simply won’t fit.
Choose the Right MERV Rating
MERV (Minimum Efficiency Reporting Value) measures how well a filter captures particles. The scale runs from 1 to 16 for residential use:
| MERV Range | Best For |
|---|---|
| 1–4 | Basic fiberglass; minimal filtration, lowest restriction |
| 5–8 | Standard pleated; good for most homes |
| 9–12 | High-efficiency pleated; better for allergy sufferers, pet owners |
| 13–16 | Near-HEPA; hospitals and sensitive households |
A common mistake is buying the highest MERV filter available. Filters rated MERV 13 and above are very dense. In older systems, or systems not designed for high-restriction filters, they can reduce airflow enough to cause the same problems as a clogged filter. Check your furnace manual for the maximum MERV rating it supports — many residential systems are designed for MERV 8 to 11.
Tools and Supplies
- Replacement filter (have the size and MERV rating ready)
- A marker or pen
- A garbage bag
- Optionally: a vacuum with a brush attachment, work gloves
You don’t need any special tools. No screwdrivers, no wrenches.
Step-by-Step: How to Change a Furnace Air Filter
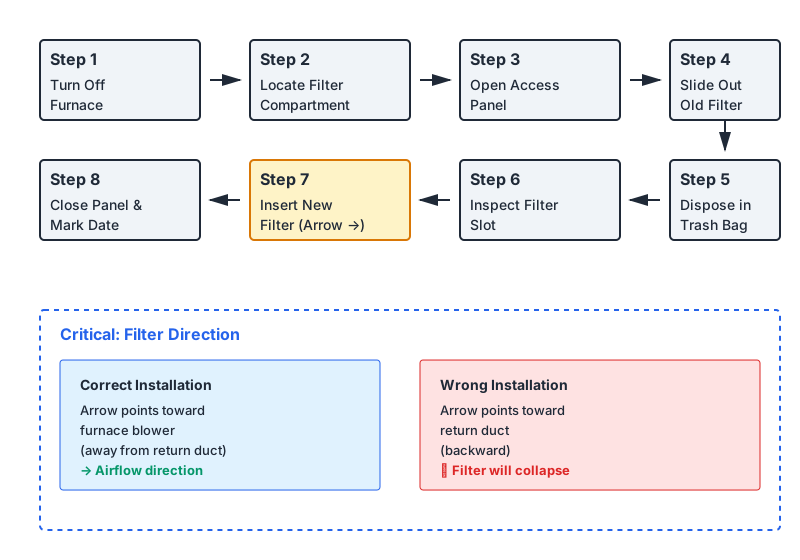
Step 1 — Turn Off the Furnace
Switch the thermostat to “Off” or set it to a temperature where the furnace won’t kick on mid-task. You don’t want the blower motor running while the filter slot is open — it will pull unfiltered air (and loose debris) straight into the system.
Step 2 — Locate the Filter Compartment
On most forced-air furnaces, the filter is in one of two places:
- Inside the furnace cabinet itself, usually at the bottom where the return air duct connects.
- In the return air vent on the wall or ceiling — the large louvered grille somewhere in your home, usually in a hallway.
If you’re not sure which applies to your setup, trace the large duct that feeds into (not out of) the furnace. That’s the return air side, and the filter will be somewhere along that path.
Step 3 — Open the Access Panel or Vent Cover
Furnace cabinet panels typically slide or pop off — no tools needed. Return air vent covers usually have two small latches or screws on the face of the grille. Open the cover fully and set it aside.
Step 4 — Slide Out the Old Filter
Note the direction the filter is facing before you pull it. There will be an arrow printed on the cardboard frame indicating airflow direction. Take a quick phone photo if it helps you remember.
Slide the old filter straight out. Try not to shake it — a loaded filter is essentially a bag of accumulated dust, pet hair, and allergens. If it’s been in place for a long time, it may be visibly gray, matted, or even slightly damp if there’s been humidity in the system.
Step 5 — Seal and Dispose of the Old Filter
Slide the old filter directly into a garbage bag and seal it before you carry it anywhere. This prevents the trapped particles from dispersing back into the air. Dispose of it in your regular household trash — there’s nothing hazardous in a standard air filter that requires special disposal.
Step 6 — Inspect the Filter Slot
While the compartment is open, shine a flashlight inside. Look for:
- Dust or debris buildup on the walls of the slot — wipe it out with a damp cloth.
- Any gaps, tears, or rust around the edges that might let air bypass the filter.
- Signs of moisture, which can indicate a condensate drain issue worth addressing separately.
A quick inspection takes 30 seconds and can catch problems early.
Step 7 — Insert the New Filter
This is where most DIY mistakes happen: the airflow arrow must point toward the furnace blower, not toward the return air duct.
The arrow on the filter frame shows which way air is flowing through it. Air moves from the return duct, through the filter, and into the furnace — so the arrow should point away from the return vent and toward the blower motor or furnace cabinet interior.
If you insert the filter backward, the filter’s structural support grid faces the wrong way, and it can collapse under the pressure difference the blower creates.
Slide the filter in fully so there are no gaps around the edges. If it doesn’t sit flush, double-check the size.
Step 8 — Close the Panel and Restore Power
Replace the access panel or vent cover securely. If the furnace has a door safety switch (many do — it’s a small button that prevents the furnace from running with the panel open), make sure the panel depresses that switch when closed.
Write the installation date on the edge of the new filter with a marker. That simple habit saves you from guessing when it’s due for replacement next time.
Turn the thermostat back to your preferred setting and listen: the furnace should start up normally, and you should notice slightly improved airflow from your registers within a few minutes.
How Often Should You Change It?
There’s no single universal answer, but here are practical guidelines:
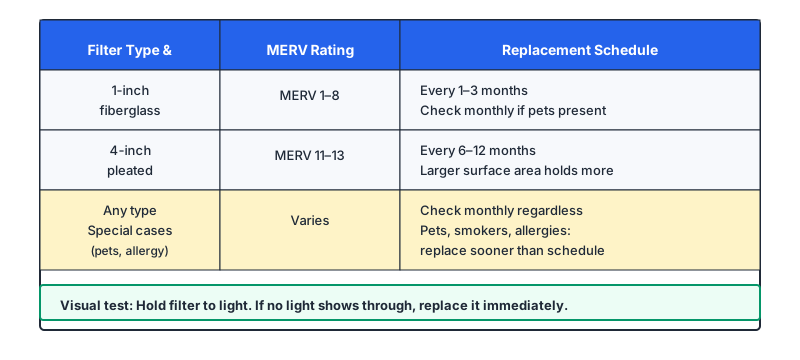
- 1-inch filters (MERV 1–8): Every 1–3 months. If you have pets or run the system heavily, check monthly.
- 4-inch thick filters (MERV 11–13): Every 6–12 months, because the larger surface area holds far more material before clogging.
- Households with pets, smokers, or allergy sufferers: Check filters monthly; replace sooner than the general schedule.
- Vacation homes or rarely occupied spaces: Filters last longer, but still check every six months — mold and pests can damage a filter even without heavy use.
The easiest visual test: hold the filter up to a light source. If you can’t see light through it, it’s time to replace it regardless of how long it’s been in.
Common Mistakes and How to Avoid Them
Buying the wrong size. Measure the old filter — don’t guess. Nominal filter dimensions are sometimes slightly different from actual dimensions, but as long as you match the number printed on the existing filter, you’ll be fine.
Skipping the replacement when the furnace seems to be running fine. A furnace can run while a filter is dangerously clogged — it will just run less efficiently and age faster. “It seems fine” is not a reliable indicator.
Using a high-MERV filter in a system not rated for it. As mentioned, this restricts airflow and can cause overheating. Stick to your furnace manufacturer’s recommended MERV range.
Forgetting to mark the date. A 30-second habit that prevents the common scenario of finding a filter that’s been in place for two-plus years.
Not checking whether your system has multiple filters. Some larger homes or systems with supplemental air handlers have two or more filter locations. Check both the furnace cabinet and any return air vents in the house.
While you’re on a home-maintenance streak, our guide to How to Clean a Keyboard Properly: The No-Disassembly Five-Minute Fix tackles another quick task that’s easy to put off but makes a noticeable difference.
A Note on Reusable Filters
Electrostatic washable filters are a real option — you rinse them out, let them dry completely, and reinstall them. They typically have lower MERV ratings (around 4–8) than quality disposable pleated filters, but they eliminate ongoing purchase costs. The critical caveat: they must be completely dry before reinstallation. A damp filter introduced into a furnace system invites mold growth inside the ductwork, which is expensive and unpleasant to remediate.
If you’re looking for another fast, money-saving fix around the house, How to Stop a Running Toilet: Fix It Fast & Save Water is a similarly satisfying five-minute job.
Conclusion
Changing a furnace air filter is genuinely easy — easier than most home maintenance tasks — but the impact of doing it regularly is disproportionately large. You protect your equipment, lower your energy costs, and keep the air in your home cleaner. The job itself takes five minutes. The habit of marking the date and setting a calendar reminder takes another thirty seconds. That’s a reasonable investment for a furnace that can cost thousands of dollars to repair or replace.
If you’re ever unsure whether your furnace has a second filter location, or whether a particular filter size is safe for your unit, pull up your furnace model number and check the manufacturer’s documentation — it’s almost always available as a free PDF download.