How to Store Leafy Greens So They Stay Crisp Longer

Limp, slimy lettuce is one of the more demoralizing things you can pull from the fridge. You buy a beautiful head of romaine or a bag of baby spinach with the best intentions, and three days later it’s a soggy mess. The good news: this almost always comes down to storage technique, not the quality of what you bought. Get the conditions right and most leafy greens will stay genuinely crisp for a week or more.
Why Leafy Greens Go Bad So Fast
Leafy greens are living tissue even after harvest. They keep respiring — consuming oxygen and releasing carbon dioxide — and they lose moisture through their cut surfaces and leaf pores. Two things accelerate their decline:
- Excess moisture on the leaves. Water trapped against leaf surfaces creates the perfect environment for bacterial rot and the slimy texture everyone hates.
- Ethylene gas. Fruits like apples, bananas, and avocados emit this ripening gas, which speeds cell breakdown in nearby vegetables. Store your greens away from fruit.
Temperature matters too. The sweet spot for most leafy greens is 32–40°F (0–4°C). The crisper drawer of a standard refrigerator typically sits right in that range, especially when set to high humidity.

The Core Method: Dry, Wrap, and Refrigerate
This approach works for loose-leaf lettuce, romaine, butter lettuce, baby spinach, arugula, and most salad mixes.
Step 1: Wash and Spin Dry First
Wash greens as soon as you get home — you’re more likely to actually use them if they’re already clean. The critical step most people skip: dry them thoroughly before storing. A salad spinner is the most efficient tool here. Spin the leaves, then dump the water and spin again. Even then, a little surface moisture remains.
After spinning, spread the leaves briefly on a clean kitchen towel or a layer of paper towels and let air move through them for five to ten minutes. This extra step makes a real difference.
Step 2: Line Your Container with Paper Towels
Place a few paper towels at the bottom of a large airtight container or a zip-lock bag. Lay the dried greens on top, then add another paper towel on top before sealing. The paper towels act as a buffer: they absorb any residual moisture and release it slowly, keeping the leaves hydrated without waterlogging them.
If you’re using a bag, squeeze out as much air as possible before sealing. Less air means less oxidation.
Step 3: Store in the Crisper on High Humidity
The crisper drawer’s humidity setting controls a small vent. High humidity (vent closed) slows moisture loss from vegetables — ideal for leafy greens. Low humidity suits fruits. Check that your fridge’s crisper is actually set correctly; many people never adjust the defaults.
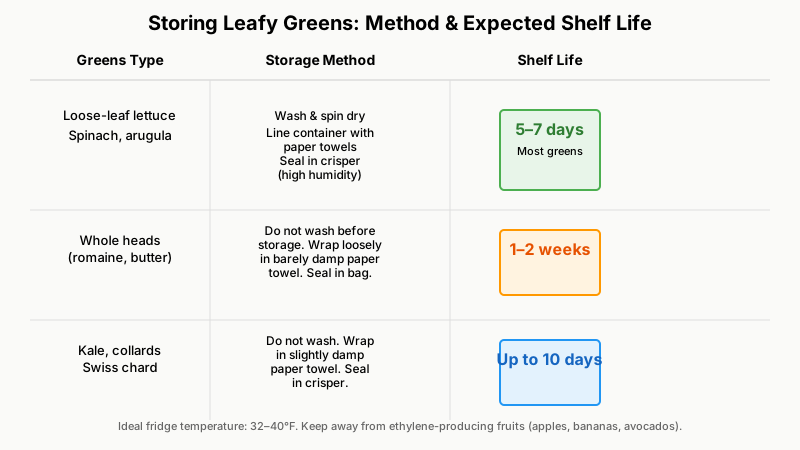
Tucked in a lined airtight container in a properly set crisper, most washed greens will hold for five to seven days. Sturdier greens like kale, Swiss chard, and collard greens can go up to ten days.
Storing Different Types of Greens
Not every leafy green is the same, and a few need slightly different handling.
Whole Heads of Lettuce (Romaine, Iceberg, Butter)
Don’t wash a whole head before storage — moisture in the inner leaves accelerates rot. Instead, remove any damaged outer leaves, wrap the head loosely in a barely damp paper towel, then place it in a zip-lock bag or produce bag with some air space. Wash only what you’ll use each time. Whole heads kept this way can last one to two weeks.
Herbs Treated Like Greens (Parsley, Cilantro, Basil)
Fresh herbs are a special case. Parsley and cilantro store well upright in a glass or jar with an inch of water — like flowers — with a loose plastic bag draped over the top. Change the water every couple of days. This method keeps them fresh for up to two weeks.
Basil is the outlier: it hates cold. Store basil at room temperature, stems in water, away from direct sunlight. Refrigerating basil turns the leaves black within a day or two.
For a deeper dive into keeping basil, parsley, and other tender herbs fresh, check out Best Ways to Store Fresh Herbs (So They Actually Last).
Kale and Hearty Cooking Greens
Kale, collards, and Swiss chard don’t need to be washed before storage. Remove any yellowing leaves, wrap the bunch in a slightly damp paper towel, and seal in a bag or container. The extra moisture (rather than fully dry) suits their thicker leaves. They’re also less sensitive to ethylene, so placement in the fridge is more flexible.
Pre-Washed Bagged Salad Mixes
These are already processed and cut, so they deteriorate faster than whole leaves. If you’ve opened the bag, seal it with a clip or transfer to an airtight container with a paper towel inside. Use within two to three days of opening. Don’t re-wash pre-washed mixes before storage — the extra moisture shortens their life.

If you’re also dealing with pre-chopped vegetables from meal prep, How to Store Cut Vegetables and Keep Them Fresh has helpful tips for keeping them crisp too.
Tools That Actually Help
You don’t need much specialized equipment, but a few things are worth having:
Salad spinner — The OXO Good Grips salad spinner is widely recommended for its efficient bowl-and-basket design, though any model with a well-fitted basket works. This is the single most useful tool for green storage.
Large airtight containers — Glass containers with snap-lock lids work particularly well because glass doesn’t absorb odors and allows you to see what’s inside. Rectangular shapes use fridge space efficiently.
Produce-specific bags — Products like Debbie Meyer GreenBags claim to absorb ethylene gas to slow ripening. The evidence on these is mixed; they help modestly, but they’re not a substitute for proper drying and temperature control.
Herb savers — Small containers designed to hold herbs upright in water (Prepara makes a popular model) are genuinely useful for cilantro and parsley, saving the improvised jar-with-a-bag setup.
Note: Product links to kitchen tools may include affiliate relationships on some sites.
Common Mistakes That Cause Limp Greens
Even with the right method, a few habits undermine everything:
- Storing wet greens. This is the most common mistake by far. Even if the container setup is perfect, wet leaves will start breaking down within a day.
- Using too small a container. Cramming greens into a too-small space bruises the leaves and restricts airflow. Give them room.
- Storing near apples or bananas. Ethylene is real. Keep fruit in a separate drawer or on the counter.
- Ignoring the fridge temperature. Many home refrigerators run warmer than they should, particularly when overpacked. Ideally, your fridge stays at or below 40°F (4°C). An inexpensive refrigerator thermometer (a few dollars at most kitchen stores) will tell you for certain.
- Leaving damaged leaves in the mix. One bruised or beginning-to-rot leaf will accelerate the decline of everything around it. Pull them out immediately.
Reviving Greens That Have Gone Limp
If your greens have wilted but aren’t slimy or off-smelling, there’s often a fix. Submerge them in a bowl of ice-cold water for 15–30 minutes. The cells reabsorb water and regain turgor, which is the internal pressure that makes leaves feel crisp. Drain and dry thoroughly before eating or storing again.
This trick works especially well for romaine, butter lettuce, and arugula. It won’t rescue greens that have already started to rot — those need to go in the compost.

A Note on the Crisper Drawer Setup
If your refrigerator has two crisper drawers, set one to high humidity for vegetables and the other to low humidity for fruits. Store your greens, fresh herbs, and cruciferous vegetables in the high-humidity drawer, and keep the fruit drawer on the other side of the fridge when possible.
Wipe the crisper drawer out with a damp cloth periodically — old residue and bacteria build up and will shorten the life of fresh produce stored there.
Conclusion
Crisp leafy greens aren’t a mystery. The variables that matter are simple: remove surface moisture before storage, wrap with paper towels to manage humidity, use an airtight container, set the crisper to high humidity, and keep greens away from ethylene-producing fruit. Do all five consistently and you’ll stop throwing away greens that went bad before you used them.
The extra three minutes it takes to dry and properly store your greens when you get home from the market pays off every time you open the fridge to an intact, fresh-looking salad ready to use.