Toast & Grind Whole Spices for Maximum Flavor

Whole spices sitting in a jar are essentially dormant — the volatile oils that carry flavor are sealed inside the seed, bark, or husk, waiting to be released. Toasting and grinding them yourself is the single highest-return habit a home cook can develop. The difference between pre-ground cumin from a big-box store and freshly toasted, freshly ground cumin is not subtle; it’s the difference between a hint and a shout.
This guide covers the full process: why it works, which spices respond best, how to avoid common mistakes, and how to handle specific spices and surface types so you get maximum flavor every time.
Why Toasting Transforms Spices
Raw whole spices contain aromatic compounds — primarily terpenes, aldehydes, and phenols — locked inside cell structures and seed coatings. Heat breaks open those structures and triggers the Maillard reaction in seed proteins, as well as pyrolysis of carbohydrates, generating hundreds of new flavor compounds that simply don’t exist at room temperature.
The result is a deeper, more complex aroma: earthier cumin, sweeter coriander, more resinous fennel. Simultaneously, grinding immediately after toasting ensures you capture those volatiles before they escape into the air. Pre-ground spices have already lost most of this complexity in the weeks (or months) since they were processed.
A useful analogy: grinding a whole spice and using it the same day is like brewing coffee from beans you just ground. Pre-ground spice is like instant coffee — technically the same ingredient, practically a different experience.

Which Spices Benefit Most From Toasting
Not every spice needs or survives high heat. Here’s a practical breakdown:
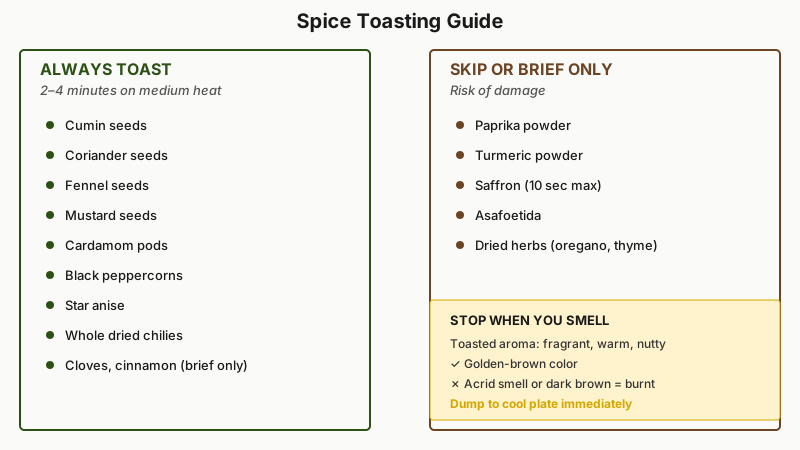
High-Benefit Spices (Always Toast)
- Cumin seeds — toasting turns a slightly musty seed into something smoky and rich
- Coriander seeds — heat releases citrusy, floral notes that raw seeds barely hint at
- Fennel seeds — sweetness intensifies; anise notes become warmer, less sharp
- Mustard seeds — need heat to pop and mellow their sharp, pungent bite
- Fenugreek seeds — toasting tames their bitterness considerably
- Cardamom pods — brief toasting deepens the eucalyptus-like top note
- Black peppercorns — often skipped, but a quick toast brings out a smoky depth most cooks have never tasted
- Whole dried chilies — a short dry-toast rehydrates the surface oils and adds a faint smokiness
- Star anise — warming amplifies the licorice-fennel complexity
- Cloves and cinnamon sticks — handle carefully (see below); short bursts only
Spices to Skip (or Toast Very Briefly)
- Paprika and turmeric powder — already ground; direct heat scorches them almost instantly
- Saffron — a quick 10-second warm in a dry pan is enough; more than that destroys delicate floral compounds
- Asafoetida (hing) — usually added to hot oil rather than dry-toasted
- Dried herbs (oregano, thyme) — technically not spices, and dry heat turns them dusty and bitter
The Dry-Pan Method: Step by Step
This is the most widely used technique and requires no special equipment beyond a heavy skillet.
What you need: A stainless steel or cast iron skillet (not non-stick — you want high heat), a wooden spoon or flat spatula, and a plate or bowl to dump spices onto immediately after toasting.
Steps:
- Start cold. Place spices in the pan before turning on the heat. Starting cold gives you more control over the ramp-up and prevents scorching.
- Use medium heat. Medium is almost always enough. High heat moves too fast; you’ll scorch the outside before the inside warms through.
- Keep them moving. Stir or swirl constantly. Spices toast unevenly if left still — seeds on the edges of a stainless pan receive direct conduction heat and brown much faster than those in the center.
- Trust your nose, not the clock. The moment you smell a distinct toasted aroma — fragrant, slightly nutty, clearly different from raw — you’re done. That window typically runs 2–4 minutes for seeds, slightly longer for whole pods.
- Dump immediately. Transfer spices to a cool plate the second they’re done. Leaving them in the hot pan continues cooking (and burning) them.
- Let them cool before grinding. Grinding hot spices traps steam inside your grinder, causing clumping and moisture absorption.
Signs you’ve gone too far: A sharp, acrid smell rather than a warm, toasted one; visible dark (not golden-brown) coloring; smoke. Burnt spices are genuinely ruined — no amount of extra cooking redeems them. Toss and start over; the lost spices cost less than the ruined dish.

Toasting Different Formats
Whole pods (cardamom, star anise): Toast until you can smell the aroma through the outer shell. The shell itself won’t brown noticeably — you’re heating through. For cardamom, crack the pod and grind the inner seeds only, discarding the papery hull if you want a cleaner flavor.
Hard bark and sticks (cinnamon, cassia): Break sticks into smaller pieces for more even heat contact. Toast at medium-low — these scorch faster than seeds because of their sugar content. 60–90 seconds is usually enough.
Dried whole chilies: Press the chili flat against the hot pan with a spatula for a few seconds per side. Watch for the skin to blister very slightly and the chili to become pliable and fragrant. Don’t let it blacken; a little char on the ribs is fine, full blackening is not.
Mixed spice blends: If a recipe calls for toasting a mix, toast similar-sized seeds together but add larger pieces or fast-burning items (cloves, cinnamon) partway through so nothing over-cooks.
How to Grind Whole Spices
Once toasted and cooled, grinding is straightforward — but the tool you use matters.
Dedicated Electric Spice Grinder
A small blade coffee grinder repurposed for spices is the fastest option. Dedicate one grinder solely to spices — coffee oils linger and cross-contaminate. Clean between uses by grinding a small handful of raw white rice to a powder, then wiping out the bowl. Pulse in short bursts rather than running continuously to avoid heating the spice through friction.
If you already own a burr or blade grinder for coffee, the timing principles in How to Brew Better Coffee at Home: Why Grind Timing Beats Bean Price explain why grinding just before use makes such a difference.
Mortar and Pestle
Slower, but gives you more control over texture — you can grind to a rough crumble or a fine powder depending on the dish. Stone mortars (granite or basalt) are far more effective than ceramic or wooden ones for hard spices. Use a rocking and pressing motion rather than straight up-and-down pounding, which just launches seeds out of the bowl. Some chefs prefer this method specifically for its hands-on control — you feel when the spice shifts from coarse to fine.
Microplane or Fine Box Grater
Useful for fresh whole nutmeg and dried turmeric root — not practical for seeds.
High-Speed Blender
Works in a pinch for large volumes (making a big batch of garam masala, for example), but inferior to a dedicated grinder for small quantities. The blades don’t reach seeds that cluster at the edges.
How Fine Should You Grind?
It depends on the application:
- Smooth sauces and curries: Grind to a near-powder so no gritty pieces remain.
- Rubs and dry coatings: A medium-coarse grind clings to meat surfaces and adds texture.
- Finishing and garnish (like chaat masala): Coarser grind; the visible flecks are part of the presentation.
Toasting in the Oven
For large batches — making a big supply of spice blends — the oven is more practical than a stovetop pan. Spread spices in a single layer on a rimmed baking sheet. Toast at 325°F (160°C) for 10–15 minutes, stirring once at the halfway mark. The lower temperature gives you a larger margin of error than stovetop toasting. Check by smell and color, not purely by time, since ovens vary.
Oven toasting is less precise for small amounts; you lose the ability to pull spices off heat instantly.
Building a Spice-Toasting Habit
The practical barrier to toasting and grinding spices is usually convenience — reaching for the pre-ground jar is faster. A few habits that reduce friction:
- Toast in small batches more frequently rather than making a huge batch that sits. Even freshly ground spice loses potency within a week or two if stored in open air.
- Store toasted, ground spices in airtight glass jars away from light and heat. Label with the grind date. Use within two weeks for peak flavor; within a month for most dishes.
- Prep spices while you prep other ingredients. Toast and grind while onions are caramelizing; the timelines align.
- Keep a small mortar on the counter rather than in a cabinet. Accessibility makes you more likely to use it.

Once you’ve toasted and ground a fresh batch, proper storage matters just as much, so check out How to Store Spices Right and Keep Their Flavor to keep that flavor from fading.
If you’re building out other flavor-boosting techniques in your pantry, our guide How to Cook Dried Mushrooms: Rehydrate for Maximum Flavor covers another easy way to deepen the taste of everyday cooking.
Frequently Asked Questions
Can I toast spices ahead of time and store them whole?
Yes — toasted whole spices keep better than toasted ground spices. Store them in an airtight container for up to a month and grind fresh as needed. You get most of the flavor benefit without grinding every single day.
Do I need to add oil when toasting spices in a pan?
For dry-toasting, no — a completely dry pan is correct. If you want to bloom spices in fat (a slightly different but equally valid technique), add oil or ghee and cook the spices in that; just keep the temperature moderate and the spices moving, because oil makes burning faster.
Why do my toasted spices sometimes taste bitter?
Bitterness almost always means over-toasting. Fenugreek is the exception — it’s naturally bitter — but for most seeds, a slightly bitter or acrid aftertaste is a sign the heat went too far. Reduce heat and cut your time next batch.
Can I toast ground spices the same way?
Briefly — 30 seconds max in a warm, not hot, dry pan. Ground spices have far more surface area exposed to heat and scorch almost instantly. It’s better practice to start with whole spices and grind after toasting.
Which is better for garam masala: pan-toasting or oven-toasting?
For a home-sized batch of garam masala (a tablespoon or two of each spice), pan-toasting gives better control and faster turnaround. For a large batch intended to last several weeks, oven-toasting at low heat is more consistent and hands-off. Both methods produce excellent results.
Conclusion
Toasting and grinding whole spices is one of the few kitchen techniques where the investment of effort — a few minutes of active attention — pays off dramatically and reliably in the finished dish. There’s no trick to it: gentle, steady heat, constant movement, and a quick transfer off the heat the moment the aroma blooms. After that, grind immediately or store whole and grind to order.
Once you develop the habit and the nose for it, reaching for a jar of pre-ground spice will start to feel like the inferior option it actually is.