How to Make Homemade Pickles: Crisp Dill Pickles In 48 Hours

Pickles are one of those kitchen projects that sound intimidating until you actually do them — and then you wonder why you waited so long. A jar of cucumbers transformed by salt, vinegar, and a handful of spices is genuinely one of the most satisfying things you can produce at home. Whether you want crisp, dill-forward refrigerator pickles ready in 48 hours or shelf-stable canned pickles that last through winter, this guide covers both methods with enough specificity to actually get you there.
Understanding the Two Core Methods
Before you slice a single cucumber, it helps to know what kind of pickle you’re making — because the process, timing, and equipment differ significantly.
Quick-Process (Refrigerator) Pickles
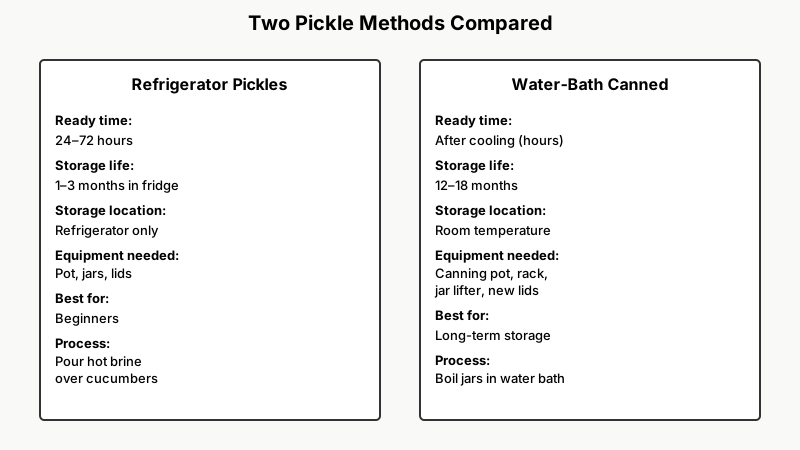
This method uses a vinegar brine poured over vegetables, which are then stored in the refrigerator rather than processed in a water bath. They’re ready in 24–72 hours, require no special canning equipment, and last 1–3 months in the fridge. The trade-off: they won’t keep at room temperature and they don’t develop quite the same depth of flavor as traditionally fermented or canned pickles.
Refrigerator pickles are the best starting point for beginners. The acidity of the vinegar keeps everything food-safe without needing to nail a precise pH or processing time.
Water-Bath Canned Pickles
This is the traditional shelf-stable method. Filled jars are submerged in boiling water for a set amount of time, which drives out air, creates a vacuum seal, and halts microbial activity. Done correctly, canned pickles keep at room temperature for 12–18 months. Done incorrectly — wrong acidity, improper processing time, or faulty seals — they can spoil or, in rare cases with low-acid foods, support dangerous bacterial growth.
The good news: cucumbers pickled in a vinegar-based brine are a high-acid food, which means water-bath canning (not pressure canning) is appropriate and the safety margin is generous as long as you follow a tested recipe.

Ingredients and Equipment You’ll Actually Need
Once you’ve mastered brines, you might also enjoy experimenting with 12 Homemade Salad Dressing Recipes Worth Making, which use similar acid-and-oil ratios to build bold flavor.
The Vegetables
Not every cucumber is a good pickling cucumber. Long, smooth English cucumbers work fine for refrigerator pickles but tend to go soft faster. For the best crunch — especially if you’re canning — look for Kirby cucumbers (also called pickling cucumbers): short, bumpy-skinned, and firmer-fleshed. They’re widely available at farmers’ markets in late summer and at most grocery stores year-round.
A few tips before you start:
- Use cucumbers within 24 hours of harvest if possible. Freshness is the single biggest factor in crunch.
- Trim about 1/16 inch off the blossom end (the end opposite the stem). This end contains enzymes that cause softening.
- Wash them thoroughly — scrub with a vegetable brush under cold water.
The Brine
A reliable all-purpose pickling brine is a 1:1 ratio of distilled white vinegar to water, with about 1 tablespoon of pickling salt per cup of liquid. That ratio creates a brine around 5% acidity — the minimum safe threshold for water-bath canning with most tested recipes.
Important: Use pickling salt (also called canning salt), not table salt or kosher salt by volume. Table salt contains iodine and anti-caking agents that cloud the brine and can affect flavor. Kosher salt is fine to substitute if you measure by weight rather than volume.
For apple cider vinegar fans: it works, but it adds a mild sweetness and turns brine slightly amber. Many people love it for bread-and-butter pickles.
Spices and Aromatics
A classic dill pickle brine typically includes:
- Fresh dill heads or dill seed
- Whole black peppercorns
- Mustard seed
- Garlic cloves (halved or smashed)
- Red pepper flakes (optional for heat)
For bread-and-butter pickles, add:
- Turmeric (for the yellow color)
- Celery seed
- Sugar (about 1 cup per quart of brine)
- Onion slices
Equipment
For refrigerator pickles, you need almost nothing: a pot to heat brine, wide-mouth mason jars with lids, and a cutting board. A mandoline makes uniform slices but a sharp knife does the job.
For water-bath canning, you’ll also need:
- A large stockpot with a rack to keep jars off the bottom (a dedicated canning pot works great, but a tall pasta pot with a folded dish towel on the bottom works in a pinch)
- New lids (not used ones — the sealing compound degrades)
- Jar lifter and canning funnel (inexpensive and worth it)
- A kitchen timer

Step-by-Step: Classic Refrigerator Dill Pickles
This recipe makes about two 1-quart jars.
Ingredients:
- 2 pounds Kirby cucumbers
- 2 cups distilled white vinegar
- 2 cups water
- 2 tablespoons pickling salt
- 4 cloves garlic, halved
- 4 heads fresh dill (or 2 teaspoons dill seed)
- 1 teaspoon black peppercorns
- 1 teaspoon mustard seed
- ½ teaspoon red pepper flakes (optional)
Instructions:
- Prep the cucumbers. Wash, trim the blossom ends, and cut into spears, coins, or leave whole if small enough to fit.
- Make the brine. Combine vinegar, water, and salt in a saucepan over medium heat. Stir until salt dissolves completely. Remove from heat.
- Pack the jars. Divide the garlic, dill, peppercorns, mustard seed, and pepper flakes between your jars. Pack the cucumbers in tightly — they’ll shrink slightly and you don’t want them floating around.
- Pour the brine. Ladle the hot brine over the cucumbers, leaving about ½ inch of headspace. Make sure all the cucumbers are submerged.
- Cool and refrigerate. Let the jars cool to room temperature, then seal and refrigerate. Start tasting at 48 hours; peak flavor usually hits around 3–5 days.
Step-by-Step: Water-Bath Canned Dill Pickles
This follows the same basic recipe but requires one extra processing step. Use a tested recipe from a source like the USDA Complete Guide to Home Canning or the Ball Blue Book — do not adjust vinegar ratios in canning recipes, as this affects pH safety.
Key additional steps:
- Sterilize your jars. Run jars through the dishwasher on a hot cycle, or submerge in boiling water for 10 minutes. Keep them hot until filling.
- Keep lids warm. Place lids in a small bowl of hot (not boiling) water.
- Pack and fill as above, then wipe the rim of each jar clean with a damp cloth — any residue prevents a proper seal.
- Place lids and rings — fingertip-tight only. Over-tightening prevents air from escaping during processing.
- Process in boiling water. Lower filled jars into boiling water, ensuring they’re covered by at least 1 inch of water. Process pint jars for 10 minutes (at sea level); quart jars for 15 minutes. Adjust time for altitude — add 5 minutes for every 1,000 feet above sea level.
- Remove and rest. Lift jars out and set them on a towel without tilting. Leave undisturbed for 12–24 hours. You should hear the satisfying pop of each lid sealing within a few hours.
- Check seals. Press the center of each lid — it should be concave and not flex. Any that didn’t seal go in the refrigerator and get eaten within a month.
Label each jar with the date. Wait at least 4 weeks before opening for best flavor development.
Troubleshooting Common Problems
Soft or mushy pickles: Almost always caused by not trimming the blossom end, old cucumbers, or brine that was too hot when poured (for refrigerator pickles). A grape leaf or oak leaf added to the jar — both contain natural tannins — can help maintain crunch.
Cloudy brine: Normal with fermented pickles; in vinegar pickles it usually means you used the wrong salt or starch from the cucumbers. It’s typically safe but worth evaluating if the jar smells off.
Lids that didn’t seal: Reprocess within 24 hours with a new lid, or move to the fridge. Don’t leave improperly sealed canned goods at room temperature.
Too sour or too salty: Refrigerator pickles are forgiving — you can dilute the brine with a splash of water for the next batch. For canning, don’t alter the ratios, but you can reduce salt slightly (it’s primarily for flavor in high-acid pickles, not safety, unlike in fermentation).

Beyond Cucumbers: Other Vegetables Worth Pickling
Once you’re comfortable with the brine-and-pack method, almost any firm vegetable is fair game.
- Jalapeños: Sliced into rings, pickled in a 1:1 vinegar-water brine with a touch of sugar. Ready in 24 hours in the fridge.
- Cauliflower and carrots: Excellent together with turmeric, coriander seed, and cumin — sometimes called giardiniera-style.
- Red onions: Thin-sliced, pickled in red wine vinegar, apple cider vinegar, or a mix. Incredibly fast — ready in 30 minutes for a quick fix, better in a few hours. Transform tacos, salads, and sandwiches.
- Green beans (Dilly Beans): Pack whole into jars with garlic and dill, process as you would cucumber pickles.
- Beets: Roast or boil until just tender, peel, slice, and pickle in a slightly sweeter brine. Refrigerator method is easiest here.
If you enjoy DIY condiments with a similarly short ingredient list, Homemade Applesauce: 7 Easy Steps to a Perfect Batch is another great way to preserve seasonal produce at home.
A Few Final Notes on Food Safety
Pickling is one of the safest home preservation methods because acidity is doing most of the work. Still, a few rules are worth keeping:
- Always use tested recipes for water-bath canning. Sources like the National Center for Home Food Preservation (nchfp.uga.edu) publish peer-reviewed recipes free of charge.
- Never reduce the vinegar in a canning recipe to make pickles less sour — substitute a milder vinegar like rice wine vinegar if you prefer, but keep the total acid volume the same.
- When in doubt, throw it out. A properly sealed pickle jar that smells off, shows mold, or spurts liquid when opened should go in the bin, not on your plate.
Conclusion
Homemade pickles reward curiosity more than perfection. Your first batch might be a little soft or a little sour, and that’s fine — you’ll adjust. The fundamentals are simple: fresh cucumbers, the right vinegar, enough salt, and a clean jar. From there, the spice combinations and vegetable varieties are entirely yours to explore. Start with a batch of refrigerator dill pickles this week; by the time you’ve finished that first jar, you’ll probably already be thinking about what to try next.