How to Make Homemade Nut Butter: From Whole Nuts To Creamy Spread

Making nut butter at home is one of those kitchen projects that sounds more complicated than it actually is. Once you do it the first time — watching a pile of plain roasted almonds slowly transform into glossy, creamy butter in your food processor — you’ll wonder why you ever paid four dollars extra for a jar with twelve ingredients you can’t pronounce.
This guide covers the full process: choosing and roasting your nuts, the actual blending technique, troubleshooting, flavor variations, and storage. By the end, you’ll have a reliable method you can apply to almonds, cashews, peanuts, hazelnuts, or any nut you like.
Why Make Nut Butter at Home?
The honest reason most people start making their own is control — over ingredients, texture, and cost. But there are a few specific advantages worth knowing:
Ingredient quality. Most commercial nut butters, even the “natural” ones, contain added palm oil to prevent separation. Homemade contains exactly what you put in: nuts, maybe salt, maybe a small amount of oil or sweetener.
Freshness. Nut oils go rancid over time. When you make a small batch at home from recently roasted nuts, the flavor is noticeably brighter and less bitter than a jar that has been sitting on a shelf or in a warehouse.
Cost. Buying nuts in bulk — especially almonds, peanuts, and cashews — and processing them yourself is typically cheaper per ounce than premium store-bought alternatives, particularly for nut butters made from expensive nuts like macadamia or pistachio.
Texture on demand. Want chunky? Pull out a few tablespoons of nuts before the final blend and stir them in at the end. Want it ultra-smooth? Blend longer. No guessing what “natural creamy” actually means on a label.

If you enjoy turning whole ingredients into homemade staples, our guide to How to Make Homemade Hummus: The Complete Step-by-Step Guide shares the same appeal of ditching store-bought jars for something fresher and more customizable.
What You Need: Equipment and Ingredients
Equipment
You have two realistic options:
Food processor (recommended for most people). A full-size food processor — 7 cups or larger — handles nut butter extremely well. The wide bowl and blade generate enough friction to break nuts down efficiently. Smaller mini choppers struggle and can overheat. If you only have one, check its capacity before you start.
High-speed blender. A blender like a Vitamix or Blendtec will make nut butter, but the technique is different. You need the tamper to push nuts toward the blade continuously, and you’ll typically need to work in shorter bursts. Results can be very smooth — almost silky — but cleanup is harder.
A standard countertop blender is not suitable. The dry mass of ground nuts doesn’t circulate properly and the motor risks burning out.
Ingredients
The base is simple:
- Nuts: Any variety works. Peanuts and cashews process fastest because of their higher fat content. Almonds take the longest — expect 10 to 14 minutes of processing. Hazelnuts should be peeled of their papery skin after roasting (rub them in a kitchen towel) or the butter will be bitter.
- Salt: Optional but recommended. Start with 1/4 teaspoon per cup of nuts and adjust.
- Oil (optional): A neutral oil like refined coconut oil or avocado oil — one to two teaspoons per cup of nuts — helps the blend along and produces a creamier result. It is not necessary if your nuts are fresh and well-roasted.
- Sweetener (optional): A teaspoon of honey or maple syrup per cup of nuts adds subtle sweetness without making it taste like dessert.
Step-by-Step: How to Make Nut Butter
Step 1: Roast Your Nuts
Roasting is not optional if you want good-tasting nut butter. Heat unlocks the natural oils and deepens flavor significantly. Even if your nuts are labeled “roasted” from the store, a quick oven pass often improves the result.
- Spread nuts in a single layer on a rimmed baking sheet.
- Roast at 325°F (160°C) for 10 to 15 minutes, depending on the nut and your oven.
- Stir or shake the pan halfway through.
- They’re done when the kitchen smells nutty and the color has deepened by a shade or two. Don’t push to dark-roasted — you’ll lose delicate flavors and risk bitterness.
- Let them cool for at least 10 minutes before blending. Warm nuts blend more easily than hot ones and won’t stress your machine.
Step 2: Process in Stages
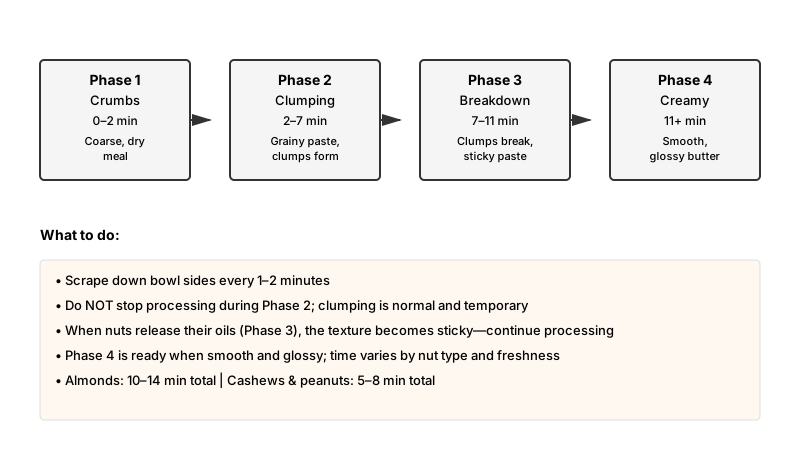
This is the part most first-timers don’t expect: nut butter doesn’t happen all at once. It goes through several phases, and you need to be patient and scrape down the sides regularly.
Phase 1 — Crumbs (0–2 minutes). The nuts break into a coarse, dry meal. Keep going.
Phase 2 — Clump (2–5 minutes). The meal starts to clump into a doughy ball that thumps around the bowl. This is normal and means fat is releasing. Keep going.
Phase 3 — Paste (5–8 minutes). The clump breaks down into a thick, grainy paste. Add salt and any optional oil here if you haven’t already.
Phase 4 — Butter (8–14 minutes). The paste loosens and becomes glossy, flowing nut butter. The oils have fully released. Stop when you reach the texture you want.
Scrape down the sides of the bowl every 60 to 90 seconds throughout. This isn’t just for thoroughness — unprocessed chunks near the edge will stay chunky while the center over-processes.

The same patience and food-processor technique for coaxing oils out of solids applies to Homemade Pesto: 7 Secrets to Getting It Right, another recipe where texture depends on how long you’re willing to keep blending.
Step 3: Add Flavors (Optional)
Once the butter is smooth and running freely, you can add extras:
- A tablespoon of cocoa powder for a chocolate almond butter
- A pinch of cinnamon and a drizzle of honey for a spiced version
- Vanilla extract (1/4 teaspoon per cup) for a subtly sweet finish
- A small amount of miso paste for a salty-umami peanut butter
Pulse a few times to incorporate rather than running the machine on full power, which can thin the butter more than intended.
Step 4: Jar and Store
Transfer the finished butter into a clean glass jar with a tight lid. Wide-mouth mason jars work perfectly and are easy to scoop from.
Troubleshooting Common Problems
“My nut butter is too thick and won’t get smooth.” Add neutral oil, one teaspoon at a time, while the machine is running. Alternatively, make sure your nuts were properly roasted — under-roasted nuts release less oil.
“The machine keeps stopping and overheating.” You’re pushing the processor too hard. Let it cool for five minutes, then continue in 60-second bursts. This is more common with almonds and harder nuts. Smaller batches also help — 1 to 2 cups of nuts is a manageable amount for most home machines.
“My nut butter tastes bitter.” Usually this means the nuts were over-roasted. Start over with a fresh batch and pull them from the oven earlier. With hazelnuts specifically, it means the skins weren’t removed thoroughly.
“There’s a pool of oil on top after a day.” That’s natural separation — a sign you haven’t added stabilizers. Just stir it back in. Storing the jar upside-down between uses helps redistribute the oil before you open it.
Best Nut Butters to Make at Home (and When Each Shines)
Almond butter. The most popular homemade option. Takes the longest to process but produces a complex, slightly sweet flavor that purchased versions rarely match. Pairs well with fruit and dark chocolate.
Peanut butter. The easiest — peanuts process in about 4 to 6 minutes. The flavor of freshly made peanut butter, especially from dry-roasted Virginia or Spanish peanuts, is noticeably richer than supermarket versions.
Cashew butter. Extremely creamy and mild, ready in about 5 to 7 minutes. Excellent as a base for savory sauces or as a dairy-free swap in desserts.
Sunflower seed butter. Technically not a nut, but the process is identical. A good allergen-free option with a slightly savory, earthy flavor. Add a teaspoon of lemon juice to prevent it from turning green (a harmless reaction between chlorogenic acid in sunflower seeds and baking soda or alkaline ingredients, but visually off-putting).
Hazelnut butter. Rich and floral — not to be confused with the chocolate-hazelnut spreads you buy in a jar. Pure hazelnut butter is earthy and pairs beautifully with coffee or cacao.

Storage and Shelf Life
Homemade nut butter kept in a sealed glass jar:
- At room temperature: 2 to 3 weeks. Fine if you go through it quickly.
- In the refrigerator: 1 to 2 months. The butter will firm up significantly when cold — leave it out for 15 minutes before using, or stir in a bit of warm oil.
- In the freezer: Up to 4 months. Freeze in small portions so you only thaw what you need.
Always use a clean, dry spoon. Introducing moisture or crumbs into the jar shortens shelf life considerably.
A Few Practical Notes Before You Start
Batch size matters. Processing less than one cup of nuts is inefficient and stresses the machine. Two cups is a sweet spot for most food processors. Scale up once you’re comfortable with the technique.
Fat content drives speed. Higher-fat nuts like macadamia and cashews process faster and produce silkier results with less effort. Lower-fat options like almonds take longer and benefit most from that optional teaspoon of added oil.
Don’t walk away. Unlike roasting or baking, nut butter processing needs occasional attention — scraping, checking texture, stopping if the machine gets too warm. It’s not labor-intensive, but it’s not fully hands-off either.
Conclusion
Homemade nut butter is about as rewarding as pantry staples get. The technique is simple once you understand the phases of processing, and the results — fresh, customizable, free of unnecessary additives — are meaningfully better than most things on a grocery shelf. Start with peanuts or cashews for an easy first batch, then work your way toward almonds or something more unusual like pistachio or pecan. The food processor does most of the work. You just have to be patient enough to let it finish the job.