How to Remove Candle Wax from Any Surface (12 Methods)

Candle wax drips at the worst possible moments — onto your favorite tablecloth right before guests arrive, across a hardwood floor you just refinished, or deep into carpet fibers you thought were safe. The frustrating part isn’t the wax itself; it’s not knowing which removal method applies to which surface. Use the wrong one and you risk staining, scratching, or warping the very thing you were trying to save.
This guide walks through proven techniques for the most common surfaces, explains why each method works, and flags the mistakes that make things worse.
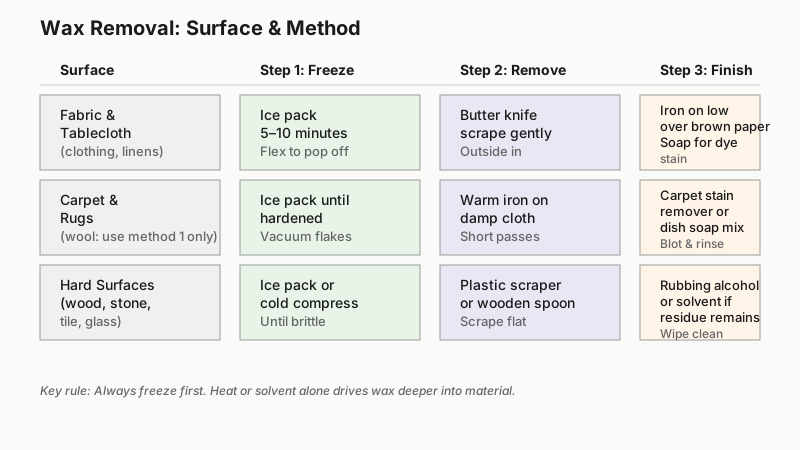
The Core Principle: Cold First, Then Heat (or Solvent)
Before touching a wax spill with anything, understand the two-phase approach most professional cleaners use:
- Freeze and lift the bulk wax — Hardened wax is brittle. Cold makes it contract and release its grip on fibers or a surface. You remove the majority of the wax before any heat or solvent goes near it.
- Address the residual stain — Once the bulk is gone, a thin oily or colored residue often remains. Heat (from an iron or hair dryer) or a solvent (rubbing alcohol, commercial cleaner) dissolves and lifts that final layer.
Skipping step one and going straight to heat just melts the wax deeper into the material. Skipping step two leaves a greasy halo. Both steps matter.

Removing Candle Wax from Fabric and Upholstery
Tablecloths, Clothing, and Linens
Fabric is the scenario most people encounter, and it’s actually one of the more forgiving surfaces if you stay patient.
What you need: An ice pack or bag of ice, a dull butter knife or credit card, paper towels, a brown paper bag or plain brown paper, an iron, and liquid dish soap or a pre-wash stain remover.
Steps:
- Place an ice pack on the wax for five to ten minutes until it hardens completely.
- Gently flex the fabric if possible — often the cold wax simply pops off in flakes.
- Use a butter knife or the edge of a credit card to scrape away as much wax as you can. Work from the outside of the drip inward to avoid spreading it.
- Lay a piece of plain brown paper (or a paper towel) over the remaining wax residue. Set your iron to low heat — no steam.
- Press the iron over the paper in five-second intervals. The heat melts the residual wax and the paper absorbs it. Move to a fresh patch of paper frequently; reusing a saturated piece just redeposits wax.
- If a colored stain remains from a dyed candle, apply a drop of liquid dish soap, work it in gently with your fingers, and launder as normal.
What to avoid: Don’t pour boiling water onto wax-covered fabric — it drives the wax further into the weave. Don’t use a hot iron directly on synthetic fabrics; check the garment label first and keep the heat very low.
If the wax left behind a colored stain from added dye, our guide How to Remove Common Stains from Clothes: Why Speed Beats Scrubbing explains how to tackle whatever discoloration remains.
Upholstered Furniture and Car Seats
The process mirrors fabric, but you can’t put upholstery in a washing machine. After freezing and scraping, blot the residue with a cloth dampened with rubbing alcohol (isopropyl alcohol, 70% or higher). Blot — don’t scrub — and work from the outside in. For delicate upholstery like velvet or silk, test on a hidden area first, and consider calling a professional if the piece is valuable.
Removing Candle Wax from Carpet and Rugs
Carpet holds wax stubbornly because the fibers trap it at multiple depths.
Steps:
- Let the wax harden completely — don’t touch it while it’s soft or you’ll press it deeper. Speed this up with an ice pack.
- Break and vacuum up what you can. A handheld vacuum works well here.
- Place a damp white cloth over the remaining spot (the moisture prevents heat scorching and keeps the wax from spreading to unaffected fibers).
- Run a warm iron — not hot — over the cloth in short passes. Lift and check the cloth frequently; you’ll see wax transferring onto it.
- Continue with a fresh damp section of cloth until no more wax transfers.
- For any residual color stain, apply a small amount of carpet stain remover or a mixture of one tablespoon of dish soap with two cups of warm water. Blot repeatedly until the stain lifts, then rinse by blotting with plain cold water.
A note on delicate rugs: wool and antique rugs can be damaged by heat and aggressive solvents. For those, the cold-and-scrape method only, followed by a call to a rug specialist, is the smarter path.

Removing Candle Wax from Hard Surfaces
Wood (Finished and Hardwood Floors)
Wood requires more caution than most people realize. The finish on wood — whether polyurethane, wax, or oil — can be softened or scratched by aggressive scraping or the wrong solvents.
Steps:
- Allow the wax to harden fully. On a warm floor, place a zip-lock bag of ice to help.
- Use a plastic scraper — not a metal knife — to gently lift the bulk of the wax. Hold the scraper nearly flat (a very shallow angle) so you’re sliding under the wax rather than gouging the wood.
- Buff off any remaining film with a soft cloth dampened with a small amount of mineral spirits or olive oil. Olive oil sounds counterintuitive, but it lubricates and lifts the waxy residue without stripping the wood’s finish.
- Wipe dry, then buff with a clean dry cloth.
- For dyed wax stains, a small amount of wood floor cleaner or a diluted dish soap solution works well.
What to avoid: Never use a metal scraper or knife on wood. Don’t pour boiling water on a wood floor — it can raise the grain, cause swelling, and damage the finish.
For other common blemishes on wooden surfaces, see How to Remove Water Stains from Wood Furniture: Erase Those Pesky Rings.
Glass and Mirrors
Glass is probably the easiest surface on this list.
- Let the wax harden, or chill it with an ice pack.
- Peel or flex the glass gently — wax on glass often lifts off in a satisfying single sheet.
- Scrape any remaining bits with a plastic scraper or your fingernail.
- Wipe away the last residue with a cloth dampened with a little rubbing alcohol or white vinegar. Finish with a standard glass cleaner.
Stone, Marble, and Tile
Natural stone like marble or limestone is porous and sensitive to acidic cleaners (including white vinegar). For these surfaces:
- Freeze and scrape carefully with a plastic tool.
- Wipe residue with warm water and a pH-neutral stone cleaner.
- Never use vinegar, lemon juice, or any acidic solvent on marble — even diluted acid etches the surface permanently.
GlaZed ceramic tile is much more forgiving: scrape, then clean with warm soapy water or a general-purpose cleaner.
Metal Candle Holders
One of the most common wax problems, and one of the easiest fixes: place the metal holder in the freezer for about 30 minutes. The wax contracts and usually pops out whole. If any residue remains, a bit of cooking oil on a soft cloth buffs it clean. Avoid abrasive scrubbers on polished or plated metals.
Removing Candle Wax from Walls and Painted Surfaces
Wax on a painted wall looks alarming but is usually removable without repainting.
- Let the wax harden, then peel off the bulk carefully by hand or with a plastic card.
- Warm the residue very gently with a hair dryer on low — keep it moving and never hold it in one spot. The wax should soften enough to wipe away with a clean cloth.
- If a greasy mark remains, mix a teaspoon of dish soap in a cup of warm water. Apply with a soft sponge, blot gently, and rinse with a barely damp cloth.
- For flat or matte paint finishes, test any solvent on an inconspicuous spot first — flat paint is notoriously easy to damage or leave a shiny patch on.

Solvents That Work (and When to Use Them)
Once the bulk wax is removed, a solvent can clear the last oily residue. Here are the main options and their appropriate uses:
- Rubbing alcohol (isopropyl alcohol): Effective on fabric, upholstery, and hard surfaces. Evaporates quickly and doesn’t leave residue. Safe for most finishes but test first on delicate materials.
- Mineral spirits: Good for wood and painted metal. Gentle enough not to strip most clear finishes, but use sparingly.
- Commercial adhesive removers (e.g., Goo Gone): Effective and widely available. Excellent on hard surfaces and linoleum. Follow the label instructions; some formulations can affect certain plastics.
- White vinegar: Useful on glass, tile, and some fabrics. Avoid on natural stone and unsealed grout.
- Olive or vegetable oil: Surprisingly effective on finished wood and metal for removing the last waxy film. Buff dry immediately.
Common Mistakes to Avoid
- Wiping wet wax: Spreading warm wax just creates a larger, thinner stain that’s harder to extract.
- Using a metal scraper on delicate surfaces: Metal edges scratch wood, marble, and glass with minimal force.
- Skipping the patch test: Solvents can lift paint, bleach dyes, or dull finishes. Always test in an inconspicuous area.
- Over-ironing fabric: Excessive heat can set a wax stain permanently or scorch synthetic fibers.
- Acidic cleaners on natural stone: One pass of undiluted white vinegar on marble can etch the surface in seconds.
Practical Summary
Almost every candle wax situation follows the same roadmap: freeze → scrape → absorb residue with heat or solvent → clean the stain. The details shift by surface, but the logic stays constant. The single most valuable habit you can build is not touching warm wax. Give it time to harden completely, and you’ve already won half the battle.
For a fresh spill on carpet or a tablecloth, getting to it within the first few hours (once hardened) is ideal before the dye from colored candles has time to bond with fibers. For dried, long-standing wax, extra patience during the iron-and-paper step makes the difference.