How to Organize a Messy Junk Drawer: Three Honest Piles Beat Chaos

If your junk drawer hasn’t been opened without a fight recently, you’re not alone. Most households have at least one — that sliding repository of batteries, rubber bands, takeout menus, and mystery keys. The good news is that organizing it doesn’t require a full weekend or a label maker fetish. It just requires a method.
This guide walks you through a practical, step-by-step process to sort, edit, and maintain a junk drawer that actually serves you — instead of mocking you every time you need a pen.
Step 1: Pull Everything Out — All of It
Don’t sort in the drawer. That approach leads to shuffling things around and calling it done. Instead, dump the entire contents onto a flat surface — a kitchen table or cleared counter works well.
Once everything is out, clean the drawer itself. A damp cloth picks up the dust, crumbs, and mystery grit that accumulate at the bottom over years. If there’s a liner, replace it. Starting with a clean shell matters more than it sounds — it resets your mental framing of the space.

Now look at what you’ve got spread out. Before you touch a single item, give yourself 30 seconds just to observe. You’ll notice patterns — way too many twist ties, six pairs of scissors, seventeen batteries of uncertain charge. That overview informs every decision that follows.
This empty-it-first approach isn’t unique to drawers, and our guide How to Organize a Linen Closet: Empty It Before You Sort applies the same principle to a much bigger space.
Step 2: Sort Into Three Honest Piles
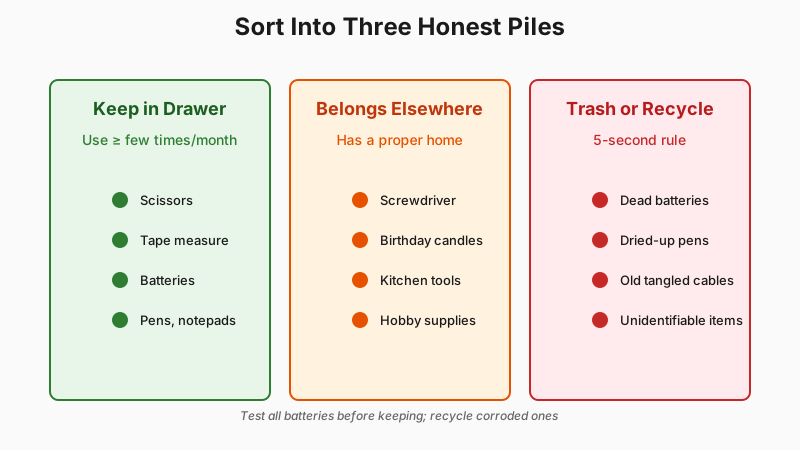
The classic “keep, donate, trash” framework works here with a small adjustment. For a junk drawer, your three piles should be:
1. Keep in this drawer — Items you reach for in the kitchen (or wherever the drawer lives) at least a few times a month. A tape measure, scissors, a notepad, the TV remote batteries.
2. Belongs elsewhere — Things that migrated here accidentally. A Phillips screwdriver belongs in the toolbox. A child’s birthday candle belongs with the baking supplies. These items have homes; they’re just squatting.
3. Trash or recycle — Dead batteries (check your local recycling program — many hardware stores and big-box retailers accept them), dried-up pens, expired coupons, tangled cables for devices you no longer own, and anything you genuinely cannot identify.
Be ruthless with pile three. A rule of thumb: if you had to think for more than five seconds about what something is, you probably don’t need it.
The Battery Test
Batteries deserve their own moment. A 9-volt battery can spark if it contacts metal — that’s a real fire hazard in a drawer full of loose change and paper clips. Test all batteries with an inexpensive battery tester (available for a few dollars at most hardware stores) before deciding what stays. Corroded batteries go straight to recycling, never back into the drawer.
Step 3: Define the Drawer’s Purpose
Before you put anything back, decide what this drawer is actually for. A junk drawer works best when it has an informal but honest job description. Some examples:
- The utility catch-all: scissors, tape, pens, a small flashlight, rubber bands, and nothing else.
- The kitchen command center: takeout menus (if you still use paper ones), a notepad, a pen, a phone charger cable, batteries, and small tools.
- The fix-it station: a multi-tool, measuring tape, a few screws, picture-hanging hardware, and a level.
Choosing a purpose prevents future drift. When someone drops something in the drawer that doesn’t fit the category, it’s easier to redirect — because there’s a category to redirect it to.
Step 4: Use Dividers, Not More Drawers
The single biggest upgrade you can make to a junk drawer is adding physical dividers. Without them, everything immediately re-tangles, and you’re back to square one within a month.
You don’t need to buy an expensive organizer. A few options, from cheapest to most tailored:
- Repurposed containers: Small cardboard boxes (think: a phone box, a tea box), shallow tins, or glass jars cut to size work perfectly. They cost nothing.
- Adjustable bamboo drawer dividers: Available at most home goods stores and online, these expand to fit the drawer and can be repositioned as your needs change. They’re durable and look clean. Prices typically run $10–$25 depending on size.
- Modular plastic drawer organizers: Sold in sets of various compartment sizes. IKEA’s SKÅDIS accessories and similar products from The Container Store or Amazon basics lines are popular choices. Budget $15–$40 for a good set.

The key measurement: drawer depth. Many organizers are designed for deeper drawers. Measure yours before buying — standard kitchen drawers are roughly 2.5 to 3.5 inches deep. Products that are taller than your drawer won’t sit flat.
Zone Your Categories
Once dividers are in, assign zones. Writing tools in one section, batteries in another, hardware odds and ends (thumbtacks, hooks, binder clips) in a third. Keep the items you grab most often near the front. It sounds obvious, but most people put things back where they fit rather than where they’ll be reached for.
The same zoning logic works wonders in other high-traffic spots, as shown in How to Organize Kitchen Cabinets: Assign Zones By Daily Habit.
Step 5: Label With Intention, Not Obsession
Labeling is helpful for shared households — it communicates a system to anyone who opens the drawer. But labeling every tiny compartment takes more time than it saves for a space this small.
Focus on sections that are ambiguous. “Batteries” and “tools” are useful labels. “Small stuff” is not. A label maker gives the cleanest result, but masking tape and a marker is perfectly functional and easier to update.
If you live alone or have a reliable visual memory, skip the labels entirely. The compartments themselves do the organizing work.
Step 6: Rehome Everything That Doesn’t Belong
Pile two — the “belongs elsewhere” items — needs to be dealt with immediately. Do not put them in a box “to sort later.” That box becomes a second junk drawer.
Walk each item to its actual home right now. Screwdriver to the toolbox. Birthday candles to the baking cabinet. The key that goes to something — hang it on a hook or put it with your other keys and figure it out today, not later.
For mystery items you’re genuinely unsure about, give them a 30-day quarantine: put them in a labeled bag with today’s date. If you haven’t needed or identified the item in 30 days, discard it without guilt.
Step 7: Build a 60-Second Maintenance Habit
The drawer will drift again. That’s normal and fine — as long as you have a reset mechanism.
Once a month (link it to a habit you already have, like paying bills or cleaning the kitchen on a Sunday), spend 60 seconds pulling out anything that doesn’t belong, tossing dead pens, and pushing things back into their zones. This prevents the cycle where a small mess becomes an overwhelming one.
Some households do a bigger quarterly reset — emptying and wiping the drawer, testing batteries, pruning anything that’s accumulated. Either cadence works; the point is that maintenance happens on a schedule rather than whenever someone finally snaps.

What to Do With Problem Items
A few specific categories deserve extra attention:
Old keys: If you can’t identify a key within a reasonable effort (try it on locks you own), it can be recycled. Many locksmiths accept old keys. Key donation programs like Keys for Hope accept metal keys to be recycled for charitable purposes.
Old or orphaned cables and tech accessories: E-waste shouldn’t go in the trash. Best Buy, Staples, and many municipal recycling programs accept old cables, chargers, and small electronics.
Manuals and warranties: Most product manuals are available as PDFs on manufacturers’ websites. Photograph or scan your receipts and warranty cards, store them digitally, and recycle the paper. One folder or cloud folder handles what used to fill a drawer.
Takeout menus: If you’re still using paper menus, keep three or four favorites. Otherwise, every restaurant you’d order from has an app or is on a delivery platform.
The Right Mindset for a Junk Drawer
Perfection isn’t the goal. A junk drawer serves a purpose — it’s a home for small, miscellaneous necessities that don’t fit neatly anywhere else. The aim is functional, not Instagram-ready. A drawer where you can find what you need in under ten seconds is a success, whether or not it has matching containers.
The biggest mistake people make is treating organization as a one-time event rather than an ongoing light habit. Spend an hour doing it properly once, then invest 60 seconds a month keeping it that way. That ratio is very manageable — and it means you’ll never dread opening the drawer again.
Quick-Reference Checklist
- Empty drawer completely and clean the interior
- Sort contents into Keep, Belongs Elsewhere, and Trash
- Test batteries; recycle dead or corroded ones properly
- Define the drawer’s purpose before restocking
- Add dividers or compartments (measure depth first)
- Zone by category, most-used items at the front
- Label ambiguous zones in shared households
- Immediately rehome everything from the “belongs elsewhere” pile
- Schedule a monthly 60-second reset