How to Organize a Linen Closet: Empty It Before You Sort

Why a Well-Organized Linen Closet Actually Matters
A chaotic linen closet is one of those everyday friction points that quietly costs you time — hunting for a matching pillowcase, unburying the spare blanket before a guest arrives, restacking a toppling pile of towels at 7 a.m. Getting it right once pays dividends every single day.
This guide walks through the full process: clearing out, sorting, folding, and setting up a system that holds over the long term — not just the afternoon after you tidy it.

Step 1: Pull Everything Out First
Before you buy a single basket or shelf divider, empty the closet completely. This is non-negotiable. You cannot see what you actually have when things are piled on top of each other.
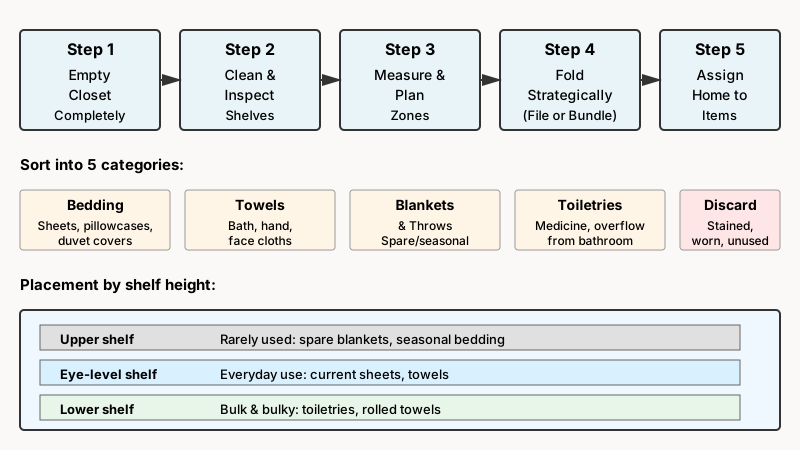
As you pull items out, sort them into rough categories on a bed or floor:
- Bedding (sheets, pillowcases, duvet covers, mattress protectors)
- Towels (bath, hand, face cloths)
- Spare blankets and throws
- Toiletries and medicine (if the closet doubles as a bathroom overflow)
- Miscellaneous (candles, gift wrap, old prescription bottles — the stuff that shouldn’t be there at all)
Now is the time to be ruthless. The average household holds about three to four times more linen than it actually needs. A good rule of thumb: two sets of sheets per bed, and two to three towels per person. Everything beyond that is clutter.
Ask yourself for each item:
- Is it stained, pilled, or fraying beyond reasonable use?
- Have I reached for this in the past year?
- Does it fit any bed or person in this house?
Donate usable extras to a local animal shelter (they almost always accept old towels and blankets) or a homeless outreach organization.
This same empty-it-out approach works wonders in other tight spaces too, as explained in How to Organize a Small Closet: Purge First, Then Map The Space.
Step 2: Clean the Closet Before Restocking
With the closet empty, wipe down every shelf with a damp cloth and a mild all-purpose cleaner. Check corners for dust build-up, and look for any signs of moisture or mold — particularly if the closet is near a bathroom. A mildew smell in stored linens usually traces back to moisture in the closet itself, not the linens.
If shelves are wire (common in older homes), consider lining them with a smooth shelf liner. This prevents fabric from snagging, keeps smaller items from falling through, and makes the whole thing easier to wipe down later.
Step 3: Measure and Plan Your Shelf Space
Not all linen closets are created equal. Some have deep shelves ideal for bulk storage; others are shallow and narrow. Measure:
- Shelf depth and width — dictates what size bins or baskets will fit without hanging over the edge
- Shelf height between levels — determines whether you can stack tall items like rolled towels or toilet paper
- Door clearance — deep items on the front of a shelf can stop the door from closing fully
Sketch a rough map of your shelves and assign categories to zones before you start putting things back. Upper shelves (harder to reach) suit rarely used items like spare blankets and seasonal bedding. Eye-level shelves should hold everyday towels and current-season sheets. Lower shelves work well for bulkier items or the toiletry overflow.

Step 4: Fold Strategically
How you fold matters as much as where you put things. Two folding approaches work particularly well in linen closets:
The File-Fold Method
Instead of stacking sheets flat on top of each other (which means unburying the bottom set every time), fold them so they stand upright in a pile — similar to how you’d file papers. This way, every set is visible and accessible without disturbing anything else.
The Sheet Bundle Method
Fold a full sheet set — flat sheet, fitted sheet, and pillowcases — and tuck everything inside one of the pillowcases. Each bundle contains a complete set, so you’re never hunting for a matching pillowcase at midnight. It also keeps the shelf neater, since sets don’t drift apart.
For towels, the choice is personal, but rolling (rather than flat-folding) has a practical edge: rolled towels take up less vertical space, look orderly on a shelf, and are easier to grab individually without collapsing the whole stack.
A note on fitted sheets: They’re notoriously difficult to fold neatly. The trick is to tuck one corner pocket inside the other to form a rough rectangle, then fold from there. It won’t be department-store perfect, but it will be flat enough to stack without unraveling.
Step 5: Assign a Home to Every Category
With your items folded and your shelves measured, it’s time to put things back — with intention. Work from most-used to least-used, top to bottom.
Suggested layout:
| Shelf Level | What Goes Here |
|---|---|
| Top shelf | Rarely used extras: spare blankets, seasonal duvets, overflow toiletries |
| Second shelf | Guest room or spare bed sheets |
| Third shelf (eye level) | Everyday sheets for main bedroom |
| Fourth shelf | Bath towels, hand towels, face cloths |
| Bottom shelf or floor | Bulky or heavy items: extra toilet paper, cleaning cloths |
This layout is a starting point, not a mandate. Adjust based on who uses the closet most and how frequently each category gets touched.
If you enjoy this kind of category-by-category planning, our guide How to Organize a Pantry: 9 Practical Steps That Last applies the same logic to another notoriously chaotic space.
Step 6: Add Containers That Actually Work
Containers are tools, not decorations. Before you buy anything, know your measurements (from Step 3) and your actual categories (from Step 1). Buying bins first and forcing your stuff to fit them is a common — and expensive — mistake.
What genuinely works:
- Shallow wicker or fabric bins for grouping hand towels or washcloths on a shelf — keeps them corralled without toppling
- Clear acrylic or plastic bins for toiletries and medicine — you can see contents at a glance
- Over-the-door organizers with pockets for smaller items: travel toiletries, medicine packets, first-aid supplies
- Shelf risers to double usable vertical space on deep shelves
- Labeled baskets or totes for seasonal bedding you don’t want to touch for months — vacuum storage bags work well here too, compressing bulky duvets to a fraction of their volume
Keep labels simple and functional: “Guest Bed,” “Hand Towels,” “Medicine” beats elaborate custom calligraphy that guests can’t read in a hurry.

Step 7: Deal With the Miscellaneous Problem
Every linen closet eventually becomes a catch-all. The only real fix is to give “homeless” items an actual home elsewhere — or accept that a small miscellaneous zone exists and contain it deliberately.
If your closet stores first-aid supplies, keep a small, clearly labeled bin in one fixed spot. If it stores gift wrap, hang a tall bag on the back of the door or the side wall. The moment you say “I’ll just put this here for now,” you’ve started the slide back to chaos.
One practical rule: if something doesn’t belong in the linen closet and there’s genuinely a better home for it, relocate it now. You shouldn’t solve a storage problem in the wrong room.
Step 8: Build a Rotation Habit
Organizing is a single event; maintenance is a system. A few small habits stop the linen closet from reverting:
- First in, first out: When you put freshly laundered sheets back, place them at the bottom of the stack or back of the bin. This rotates your linens evenly and prevents one set from wearing out faster than others.
- One-in, one-out: When you buy a new towel set or sheet set, retire an old one at the same time.
- A quarterly five-minute audit: Every few months, give the closet a quick scan. Remove anything that’s drifted in that doesn’t belong, replace labels that have faded, and check if any linens have crossed from “worn” to “done.”
The quarterly check is the single highest-leverage habit here. It takes almost no time when the baseline system is already in place.
Common Linen Closet Mistakes to Avoid
Buying organizers before decluttering. This is the most common error. You end up with expensive bins full of things you don’t need.
Overcrowding the shelves. A linen closet that’s 70–80% full is easy to maintain. One that’s packed to capacity falls into disorder within days of the first person grabbing a towel in a hurry.
Ignoring the door. The back of the door is genuine real estate. Over-door organizers can hold a surprising volume of small items without taking up any shelf space.
Mixing damp and dry linens. Putting a slightly damp towel back in the closet introduces the mildew smell that lingers for months. Always make sure towels and sheets are fully dry before storing.
Skipping labels. Even if you live alone, labels help. If you’re the only person who knows where the guest pillowcases are, that information lives in your head — and disappears the moment a guest tries to find something themselves.
If clutter tends to creep back into your other storage spaces too, How to Organize a Bookshelf: Cut Friction Before You Sort offers a similar decluttering approach worth applying next.
A Quick Word on Fragrance
Many people want their linen closet to smell fresh. A few options that work without overwhelming stored fabric:
- Cedar blocks or balls: Naturally repel moths and have a mild, clean scent. Replace or sand them lightly every year to refresh.
- Lavender sachets: Classic and effective; place one or two per shelf rather than one per basket.
- Unscented dryer sheets slipped inside folded sheet sets: Absorb odors without adding heavy perfume.
Avoid heavily scented plug-in diffusers near a closed linen closet — the concentration builds up and can be overpowering when you open the door.
Conclusion
A well-organized linen closet doesn’t require a renovation budget or a full weekend. It requires one committed clear-out session, a realistic sense of what you actually use, and a layout built around how your household actually functions — not a Pinterest ideal.
The steps above scale from a narrow apartment closet to a full walk-in. The principles are the same: declutter first, fold intentionally, assign homes deliberately, and do a brief check-in every few months. Get that right, and the system largely runs itself.