How to Organize Kitchen Cabinets: Assign Zones By Daily Habit

Disorganized kitchen cabinets are one of those slow-drain problems — every morning you dig past a stack of mismatched lids, every dinner you hunt for the right pan. The frustration is real, but so is the fix. Organizing kitchen cabinets isn’t about buying a perfect set of matching containers; it’s about understanding how you actually cook and building a system around that.
This guide walks you through a repeatable process: clearing out, sorting intelligently, choosing the right storage tools, and maintaining what you build. No filler, no magic products — just a method that works in real kitchens.
Step 1: Empty Everything and Do an Honest Audit
Before you buy a single organizer, pull everything out of your cabinets. Yes, everything. Stack it on your counters, kitchen table, or even the floor. This step feels chaotic, but it’s the only way to see what you actually own.
What to Look For During the Audit
- Expired food: Spices lose potency after about one to three years. Canned goods typically last two to five years, but check individual dates.
- Duplicates: Three wooden spoons? Two can openers? Keep the best one, donate the rest.
- Items that don’t belong in the kitchen: Batteries, rubber bands, takeout menus — they drift in and never leave.
- Things you never use: The waffle maker you’ve used twice, the fondue set from a gift exchange. Donate them.
Be ruthless. Every item you keep is an item you’ll need to house. A smaller inventory almost always means a better-organized result.
Sort Into Categories Before You Put Anything Back
Group like with like on your counter before a single item goes back in a cabinet:
- Baking supplies (flour, sugar, baking powder, mixing bowls)
- Pots and pans
- Plates, bowls, and everyday glasses
- Mugs and cups
- Food storage containers
- Small appliances
- Dry pantry goods (grains, canned goods, snacks)
- Spices and condiments
- Cooking tools and utensils
This grouping step reveals problems immediately. You’ll discover you have 14 mugs for a household of two, or that your baking supplies span three different cabinet zones with no logic connecting them.

Step 2: Assign Zones Based on How You Cook
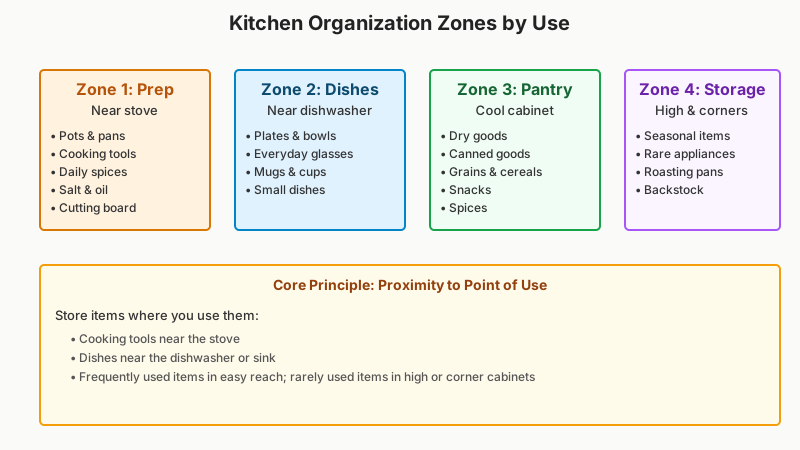
The single most important principle in kitchen organization is proximity to point of use. Items should live where you use them, not where they fit.
The Four Kitchen Zones
Zone 1 — The Prep Zone (near the stove and cutting area) This is where your most-used pots, pans, and cooking tools belong. Keep oils, salt, pepper, and your five or six go-to spices here. If you reach for something every day, it earns a front-row spot.
Zone 2 — The Dish Zone (near the dishwasher or sink) Plates, bowls, everyday glasses, and mugs belong closest to where you unload the dishwasher. It seems obvious, but many kitchens store dishes across the room from the dishwasher, which means every unloading session is a short relay race.
Zone 3 — The Pantry Zone (a dedicated cabinet or section) Dry goods, canned goods, snacks, and cereals. These don’t need to be near heat or moisture, so a cooler cabinet away from the stove is ideal. Group by category within this zone: grains together, canned goods together, snacks together.
Zone 4 — The Deep Storage Zone (high shelves, corner cabinets, awkward spots) Seasonal items, rarely used appliances, and backstock supplies go here. If you only pull out a roasting pan four times a year, it doesn’t deserve prime real estate.
A Note on Corner Cabinets
Corner cabinets are notorious space-wasters. A lazy Susan turntable is the most practical fix for most people — it makes the entire depth of the cabinet accessible with a spin. Pull-out shelving inserts are another option if you prefer a more structured layout. Avoid using corner cabinets for frequently accessed items unless you have a rotating or pull-out solution installed.
Step 3: Choose Storage Tools That Actually Help
Storage products only work when they match the problem. Buying organizers at random and hoping for the best is how you end up with unused drawer dividers in a junk drawer.
For Pots, Pans, and Lids
Stacking pots directly is fine, but the lids are almost always the real chaos. A vertical lid organizer — essentially a rack that holds lids upright like files in a folder — keeps them accessible without toppling. Alternatively, mount a small tension rod inside a cabinet door to hang lids flat.
For pans specifically, a vertical pan organizer (a rack that lets you slot each pan individually) is worth the investment if you cook regularly. It’s far easier to pull out a single skillet than to lift the entire stack to get to the one on the bottom.
For Pantry Cabinets
- Risers or step shelves: These create a second tier so you can see cans at the back without moving everything in front.
- Clear bins or baskets: Group snack pouches, sauce packets, or bread products in a bin so you can pull the whole bin out rather than rummaging.
- Turntables (lazy Susans): Excellent for spices or condiment bottles — one spin and everything is visible.
- Uniform containers: If you decant dry goods (pasta, rice, oats), use containers with the same footprint. This lets you stack them and use vertical space efficiently. It also makes it immediately obvious when you’re running low.
If your pantry cabinet needs a full overhaul rather than just better bins, see How to Organize a Pantry: 9 Practical Steps That Last for a complete walkthrough.
For Dishes and Glassware
Standard shelves work fine here, but a few additions help:
- Plate holders or stands: Storing plates vertically, like records in a crate, makes them easier to access and protects them from chipping.
- Non-slip shelf liners: These keep stacked items from sliding and protect cabinet surfaces.
- A dedicated mug hook or rail inside the cabinet: Hanging mugs by the handle frees up significant shelf space.
For Food Storage Containers
This is where most kitchens lose the battle. Mismatched containers and lids multiply in the dark. The fix:
- Consolidate to one or two container brands so lids are interchangeable.
- Store lids separately in a vertical holder or a simple bin.
- Nest containers by size.
If you have more containers than fit neatly, that’s your signal to cut the collection down — not to buy a bigger cabinet.

Step 4: Maximize Vertical Space
Most kitchen cabinets waste the vertical space between shelves. Factory shelf heights are generic; your items are specific. A few ways to reclaim that dead space:
- Add an extra shelf: Many cabinets accept a second shelf between existing ones. Hardware stores sell adjustable shelf pins and cut-to-size boards cheaply.
- Use shelf risers: Stackable risers double your usable surface in pantry and dish cabinets.
- Install under-shelf baskets: These wire or fabric baskets clip to the bottom of a shelf and hang down, creating a bonus layer for napkins, foil, or plastic wrap boxes.
- Use cabinet door space: Adhesive hooks, over-the-door organizers, or a simple spice rack mounted on the interior of a cabinet door can take dozens of small items off your shelves entirely.
Step 5: Label and Maintain the System
A system that isn’t maintained defaults to chaos within a month. Labeling is the most underrated step in the process.
Why Labels Work
Labels do two things: they tell you where something belongs, and they tell every other person in the household where it belongs. Even simple masking tape with a marker is enough. You don’t need a label maker — though they do make it easier to update labels when things change.
Maintenance Habits That Stick
- The one-in, one-out rule: When you bring a new item into the kitchen, something goes out. This prevents gradual creep.
- Monthly quick-check: Once a month, scan for items that have drifted into the wrong zone and reset them. Takes two minutes.
- Seasonal review: Every few months, pull out the deep-storage zone and donate or discard what you haven’t touched.
- Before grocery shopping: Check your pantry cabinet so you don’t buy duplicates of things you already have.
The goal isn’t a pristine cabinet for a photo shoot. It’s a system that’s easy enough to maintain that you actually keep it up.
Common Mistakes to Avoid
Buying organizers before auditing. Products bought in the abstract rarely fit the actual items or dimensions of your specific cabinets. Measure first; shop second.
Organizing for aesthetics over function. If a system looks beautiful but slows down your cooking, it’ll last about two weeks. Prioritize retrieval speed.
Ignoring cabinet dimensions. Before purchasing any insert, turntable, or organizer, measure the interior height, depth, and width of the cabinet. A turntable that’s two inches too wide is useless.
Putting rarely used items at eye level. Prime shelf real estate — between waist and shoulder height — belongs to your daily-use items. Seasonal and rarely used items go up high or in the back.
Not accounting for how cabinets fill back up. Leaving a bit of intentional slack in each cabinet (not packing every inch) makes it dramatically easier to put things back in the right place quickly.

For a related trouble spot that often gets neglected, check out How to Organize Under the Kitchen Sink: Map It, Then Buy Bins to apply the same zone-first thinking below the sink.
Conclusion
Organizing kitchen cabinets is less about finding the right bin and more about thinking clearly about how you use the space. Start with an honest audit, assign zones based on real cooking habits, choose tools that solve specific problems, and build in habits that make maintenance automatic.
A well-organized kitchen cabinet isn’t a static achievement — it’s a system you tend. Get it right once, keep it honest over time, and the daily frustration of the morning scramble disappears almost entirely.