How to Make Homemade Yogurt: No Machine or Additives Required

Making yogurt at home is one of those skills that looks complicated until the first time you actually do it — and then you wonder why you ever bought it from a store. The process is ancient, the equipment is minimal, and the results are reliably better than most commercial versions: creamier, tangier, and free of thickeners, stabilizers, or sweeteners you didn’t ask for.
This guide covers everything from the science behind fermentation to troubleshooting a batch that didn’t set properly.
What You Actually Need (No Yogurt Maker Required)
The barrier to entry is low. Here’s what you need:
- Whole milk — Full-fat milk produces the thickest, richest yogurt. 2% works fine. Skim milk produces a thinner result unless you add a boost (more on that below).
- A starter culture — A few tablespoons of plain yogurt with live active cultures. Check the label for Lactobacillus bulgaricus and Streptococcus thermophilus; these are the two classic strains. A store-bought plain yogurt works perfectly as your first starter.
- A heavy-bottomed pot — For heating the milk evenly without scorching.
- An instant-read thermometer — The single most useful piece of equipment. Yogurt bacteria are sensitive to temperature; guessing rarely works consistently.
- Clean glass jars or a bowl with a lid — For incubation.
- A warm spot or an oven with a pilot light — More on incubation methods below.
That’s genuinely it. No special machines, no exotic ingredients.

The Core Process: Four Steps
Step 1: Heat the Milk
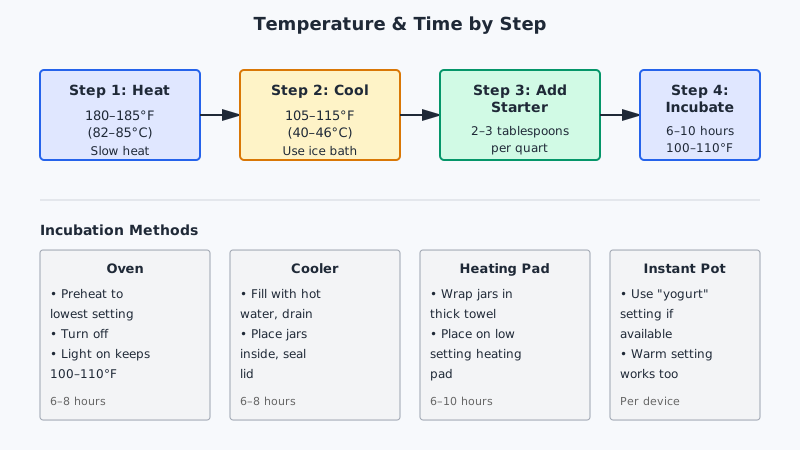
Pour your milk into the pot and heat it slowly to 180–185°F (82–85°C). This step isn’t about pasteurization — commercial milk is already pasteurized. It’s about denaturing the whey proteins so they don’t separate during fermentation, which gives you a thicker, smoother final texture. Stir occasionally to prevent a skin from forming on the bottom.
If you’re using whole milk and want an even thicker yogurt without straining, you can let it sit at 180°F for 20–30 minutes. The longer hold time increases protein concentration as some water evaporates.
Step 2: Cool the Milk to Inoculation Temperature
Once heated, take the pot off the heat and let it cool to 105–115°F (40–46°C). This is the sweet spot where your starter bacteria thrive. Above 120°F, you’ll kill the cultures. Below 90°F, fermentation becomes sluggish or stalls.
Speed up cooling by setting the pot in a sink of cold water and stirring. Check with your thermometer — don’t guess.
Step 3: Add Your Starter
Scoop out about half a cup of the warm milk into a small bowl and whisk in 2–3 tablespoons of your starter yogurt until smooth. Then pour this mixture back into the main pot and stir gently. Avoid vigorous stirring once the starter is in; you want the cultures distributed, not agitated.
For every quart (roughly 1 liter) of milk, 2 tablespoons of starter is enough. Using more doesn’t necessarily produce faster or thicker yogurt — it can actually make a slightly more acidic, grainy result by overcrowding the bacteria.
Step 4: Incubate
Transfer the inoculated milk to your jars or container and keep it undisturbed at around 100–110°F (38–43°C) for 6 to 10 hours. Movement during this phase breaks the gel structure as it forms, leading to grainy yogurt.
Incubation options:
- Oven method: Preheat your oven to the lowest setting, turn it off, then place the jars inside with the light on. The bulb holds it around 100–110°F in most ovens.
- Insulated cooler: Fill with hot water to warm the cooler, drain it, then place your jars inside and close the lid. Holds heat for 6–8 hours.
- Instant Pot or slow cooker: Use the “yogurt” setting if available. Otherwise the warm setting on some models works.
- Towel wrap: Wrap the jars in a thick towel and place them on a heating pad set to low.
After 6 hours, check for set by tilting a jar slightly — the yogurt should pull away from the side as a solid gel rather than sloshing like liquid. A longer incubation (up to 10–12 hours) makes it tangier and slightly more sour. Personal preference rules here.
Once set, refrigerate immediately. Cold-stopping the fermentation is what locks in the flavor and texture you want.

How to Make It Thicker
Commercial yogurt often uses added milk solids, gelatin, or pectin to get that thick, spoonable consistency. At home, you have better options:
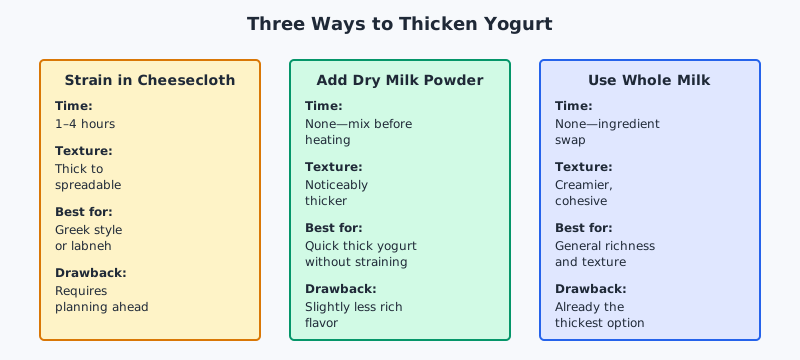
Strain it: Line a colander with cheesecloth or a clean cotton cloth and let the yogurt drain in the fridge for 1–4 hours. The longer it drains, the thicker it gets — Greek-style yogurt is simply yogurt strained of most of its whey. Strain it overnight and you get labneh, a thick, spreadable yogurt-cheese used across Middle Eastern cuisines.
Add dry milk powder: Whisk 2–4 tablespoons of non-fat dry milk powder into the milk before heating. This boosts the protein content and produces noticeably thicker yogurt without straining. It’s a technique used by home yogurt-makers long before Greek yogurt became mainstream.
Use higher-fat milk: Whole milk versus skim isn’t just about richness — the fat genuinely contributes to a creamier, more cohesive gel.
| Method | Time Required | Final Texture | Best For | Limitation |
|---|---|---|---|---|
| Strain in cheesecloth (1–4 hours) | 1–4 hours | Thick, spoonable to spreadable | Greek-style yogurt; labneh overnight | Requires planning; produces whey byproduct |
| Add dry milk powder (2–4 tablespoons per batch) | None (mixed before heating) | Noticeably thicker | Thick yogurt without straining | Slightly less rich flavor than whole milk alone |
| Use whole milk instead of skim | None (ingredient swap) | Creamier, more cohesive gel | General richness and texture | Already thickest option; cannot be made thinner |
Saving Your Starter for the Next Batch
This is one of the more satisfying parts of the whole process: your yogurt becomes the starter for the next batch. Set aside 2–3 tablespoons before you eat it, keep it in a small sealed container in the fridge, and use it within 7–10 days.
Over many generations, a homemade culture can drift — the bacterial balance shifts, and you might notice changes in flavor or texture. Most home yogurt-makers find their culture stays reliable for weeks or months. When it starts to underperform (slow set, off flavors), simply buy a fresh plain yogurt and start a new lineage.
Some enthusiasts use heirloom or specialty starter cultures ordered from small fermentation suppliers. These can include strains like Lactobacillus acidophilus, Bifidobacterium, or Bulgarian-style cultures with distinct flavor profiles — worth exploring once you’ve nailed the basics.
Troubleshooting Common Problems
Yogurt didn’t set / still liquid after 8 hours Most likely culprit: the milk was too hot when you added the starter (killed the bacteria), or the incubation temperature dropped too low. Also check that your starter yogurt actually contained live cultures — some ultra-pasteurized or heat-treated yogurts don’t.
Yogurt is too thin or runny Try adding dry milk powder, use whole milk, or extend your heat-holding time at 180°F. Also make sure you heated the milk all the way to 180°F — under-heating is a common cause of thin results.
Yogurt is grainy or stringy Over-acidification from too long an incubation, or the milk was curdled by adding the starter at too high a temperature. Aim for 110°F max when inoculating, and don’t leave it fermenting far beyond 10–12 hours at warm temperatures.
Lots of whey pooling on top This is normal — it’s called syneresis. Just stir it back in or pour it off. It doesn’t mean the yogurt failed. If there’s an unusual amount, it may indicate the incubation temperature fluctuated.
Yogurt tastes too sour Shorten your incubation time, or refrigerate sooner. Temperature matters here too — a slightly cooler incubation (closer to 100°F) produces milder yogurt; warmer temperatures accelerate acidity.
Yogurt tastes off or has pink/colored streaks Discard it. This indicates contamination. Make sure all equipment is thoroughly clean next time, and use a fresh starter.
Flavor Variations Worth Trying
Once the plain method is second nature, the starting point for variations is nearly endless:
- Vanilla bean yogurt: Steep a split vanilla bean in the milk while heating, then remove before inoculating. Far better than any vanilla extract shortcut.
- Honey yogurt: Stir in raw honey after refrigeration, not before — heat destroys the delicate flavor compounds in good honey.
- Coconut milk yogurt: Use full-fat canned coconut milk in place of dairy milk. You’ll need a starter rated for non-dairy fermentation, and the set is softer; adding agar or tapioca starch helps.
- Labneh with za’atar: Strain plain yogurt overnight, roll the result in za’atar and olive oil, and serve as a dip or spread. No recipe needed beyond that.

If you’re looking for other homemade staples to pair with your fresh yogurt, check out How to Make Homemade Energy Bars: 7 Tested Recipes for ideas that go beyond the usual granola bar.
A Few Notes on Milk Choice
Ultra-high-temperature (UHT) pasteurized milk — the kind in shelf-stable cartons — can be used for yogurt, but it sometimes produces a slightly thinner set because the proteins have been altered by the intense heat processing. Standard pasteurized whole milk from the refrigerated section is the most consistent choice.
Raw milk can carry harmful bacteria, so if you use it, the 180–185°F heating step is essential rather than optional. Many food safety authorities recommend pasteurized milk, and rules on selling raw milk vary by region.
Once you’ve got your dairy fundamentals down, you might enjoy branching out into other homemade condiments, like the options covered in 12 Homemade Salad Dressing Recipes Worth Making.
Conclusion
Homemade yogurt is genuinely low-effort once you understand what each step is doing. Heat the milk to denature proteins, cool it to a temperature where bacteria survive, add your starter, keep it warm, and wait. The science is old and proven; the only real variables are temperature precision and patience.
Start with a quart of whole milk and a good plain yogurt from the store. After one or two batches, you’ll have a feel for your kitchen’s quirks — which incubation method works best, how long your starter takes to set, how tangy you like it. From there, the whole thing runs on its own rhythm.