How to Make Bread Without a Machine: Just Flour Water Yeast And Hands

Making bread by hand is one of the most satisfying things you can do in a kitchen. There are no gadgets required, no expensive equipment, and no complicated setup — just flour, water, yeast, salt, and a little patience. If you’ve avoided bread-making because you assumed you needed a stand mixer or a bread machine, this guide will change that.
Hand-made bread is also more forgiving than people expect. Once you understand what’s happening at each stage — why you knead, why you rest the dough, why oven temperature matters — you can troubleshoot on the fly and adapt to whatever ingredients you have.
What You Actually Need Before You Start
You don’t need much. A large mixing bowl, a clean work surface, a loaf pan or a heavy baking sheet, and an oven. That’s it. A kitchen scale is genuinely useful because measuring flour by volume is inconsistent — a cup of flour can vary by 20–30 grams depending on how it’s scooped — but you can work with measuring cups if that’s all you have.
Core ingredients for a basic white loaf:
- 500 g (about 4 cups) strong bread flour (also called high-gluten or all-purpose with at least 11% protein)
- 320 ml (1⅓ cups) warm water (around 38°C / 100°F — comfortably warm to the touch)
- 7 g (1 packet / 2¼ tsp) instant yeast or active dry yeast
- 9 g (1½ tsp) fine salt
- Optional: 1 tsp sugar or honey to feed the yeast, 1 tbsp neutral oil for a softer crumb
If you’re using active dry yeast (the older style), dissolve it in the warm water with a pinch of sugar and wait 5–10 minutes until it foams. Instant yeast can go straight into the flour.

Mixing and Kneading: The Foundation of Good Bread
Step 1 — Combine the Ingredients
Add the yeast to the warm water (or mix them together if using active dry). Pour the liquid into the flour and salt mixture. Stir with a wooden spoon or your hands until a shaggy dough forms. Don’t worry if it looks rough and slightly sticky — that’s normal at this stage.
Step 2 — Knead the Dough
This is the step people dread, but it’s straightforward once you’ve done it once or twice. Turn the dough out onto a lightly floured surface.
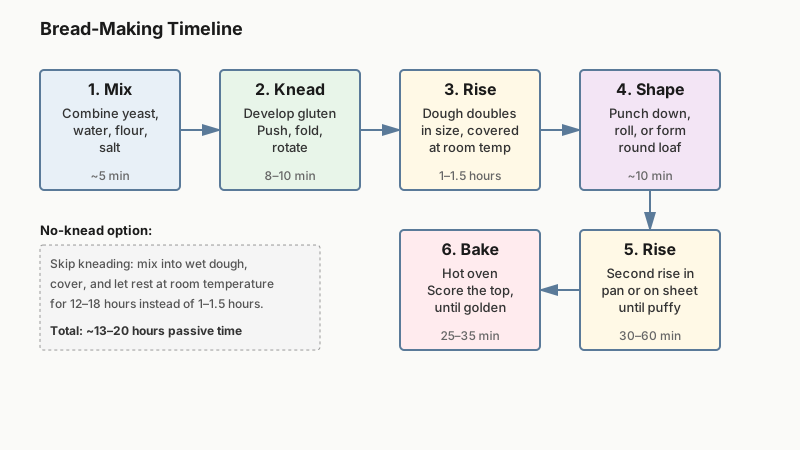
Use the heel of your palm to push the dough away from you, then fold it back over itself and rotate it 90 degrees. Repeat. That’s the whole motion. You’re developing gluten — the network of proteins that gives bread its chew and structure.
How long? For a standard white loaf, aim for 8–10 minutes of steady kneading. The dough is ready when:
- It feels smooth and slightly tacky (not wet or sticky)
- It springs back when you press it with a finger
- It passes the windowpane test: stretch a small piece thin enough to see light through without it tearing
If the dough keeps sticking to the counter, add flour one tablespoon at a time. Don’t dump in a lot at once — over-flouring makes the bread dense.
The No-Knead Alternative
If you’d rather skip the kneading entirely, the no-knead method (popularized by baker Jim Lahey) works well. Mix the ingredients into a wet, shaggy dough, cover the bowl with plastic wrap or a damp cloth, and leave it at room temperature for 12–18 hours. The long fermentation develops gluten passively. The trade-off is time: you need to plan ahead. But the results — especially for a rustic round loaf baked in a Dutch oven — are genuinely excellent.
If kneading still isn’t your thing even after trying this method, How to Make Homemade Tortillas: Flour & Corn Mastered shows how a completely different flour-based staple comes together without any of it.
The Rise: Giving Yeast Time to Work
First Rise (Bulk Fermentation)
Shape the kneaded dough into a ball, place it in a lightly oiled bowl, and cover with a clean damp cloth or plastic wrap. Let it rise somewhere warm until it has roughly doubled in size — typically 1 to 1½ hours at room temperature (around 22–24°C / 72–75°F).
A slightly warm oven works well: turn it on for 30 seconds, turn it off, and put the bowl inside. Don’t use anything hotter than about 38°C (100°F) or you’ll kill the yeast.
Signs the first rise is done: The dough has visibly puffed, feels airy when you press it gently, and a finger poke leaves an indent that fills in slowly.

Shaping the Loaf
Once the dough has doubled, punch it down gently — you’re releasing the carbon dioxide built up by the yeast. Then shape it.
For a sandwich loaf: Flatten the dough into a rough rectangle, roll it up tightly from one short end, and place seam-side down in a greased loaf pan.
For a round country loaf: Pull the edges toward the center and flip it upside down, then use cupped hands to drag it gently toward you across the counter — this creates surface tension and a neat dome.
Second Rise (Proofing)
Cover the shaped dough again and let it rest for 30–60 minutes. For a loaf pan, the dough should crown about 2–3 cm above the rim. For a freeform loaf, it should look noticeably puffier.
Don’t rush this stage. Under-proofed bread is dense; over-proofed bread collapses in the oven and can taste slightly sour. If you press the dough lightly and it springs back slowly and partially, it’s ready to bake.
Baking: Heat, Steam, and Timing
Preheat Your Oven Thoroughly
This matters more than most recipes stress. Preheat to 220°C (425°F) for at least 20–30 minutes before baking. A hot oven causes rapid initial expansion (called oven spring) that gives bread its lift and open crumb. A cold or lukewarm oven produces flat, pale, biscuit-like results.
If you have a baking stone or a heavy cast-iron skillet, put it in the oven during preheat — it will hold heat and give the bottom crust a better texture.
Scoring the Dough
Just before it goes in the oven, use a sharp knife or a razor blade (called a lame in professional baking) to cut one or two shallow slashes across the top. This isn’t decorative — it controls where the bread expands, prevents it from splitting unevenly along the sides, and allows a good crust to form.
Creating Steam
Professional deck ovens inject steam during the first few minutes of baking, which keeps the crust pliable so the bread can expand fully before setting. At home, you can mimic this by placing a small metal roasting pan on the oven floor, pouring about 120 ml (half a cup) of hot water into it right when you put the bread in, and quickly closing the door. The burst of steam makes a real difference to crust quality.
For the no-knead round loaf, a Dutch oven with the lid on for the first 20 minutes achieves the same effect and generally produces an extraordinary crust.
Baking Times
- Sandwich loaf (500 g dough): 25–30 minutes at 220°C (425°F)
- Freeform round loaf: 30–35 minutes
- No-knead Dutch oven loaf: 20 minutes covered, then 15–20 minutes uncovered
The bread is done when it’s deep golden brown and sounds hollow when you tap the bottom. An instant-read thermometer inserted into the center should read around 93–96°C (200–205°F).
Cool it before cutting. This is the hardest part. The crumb continues to set as steam redistributes through the loaf. Cut into it too early and the inside will be gummy. Wait at least 30–40 minutes for a standard loaf, or up to an hour for a large round.

Common Problems and How to Fix Them
Dense, heavy loaf — Most often caused by under-kneading, water that was too hot (killed the yeast), or cutting the rise short. Check that your yeast is active before you start.
Collapsed or sunken top — The dough over-proofed. Either reduce the second rise time or keep the dough in a cooler spot.
Pale, thick crust with doughy interior — Oven wasn’t hot enough, or the loaf was too large for the temperature used. Use an oven thermometer to verify your oven’s actual temperature, which often differs from the dial setting.
Dough too sticky to knead — Don’t panic and add a lot of flour. Let the dough rest for 5 minutes (autolyse); it will become easier to handle as the flour hydrates fully.
Crust too hard — Brush the top with melted butter immediately after baking, or add a tablespoon of oil to the dough. Both soften the crust significantly.
Beyond the Basic White Loaf
Once you’re comfortable with the basic technique, small adjustments open up a lot of variety:
- Whole wheat bread: Substitute up to half the bread flour with whole wheat flour. Add 2–3 extra tablespoons of water since whole wheat absorbs more liquid. Expect a slightly denser crumb and a nuttier flavor.
- Seeded loaf: Press sesame, sunflower, or poppy seeds into the shaped dough before the second rise, or roll the shaped loaf in seeds.
- Enriched dough (brioche-style): Add 2 eggs and 60 g of softened butter to the basic recipe for a richer, softer crumb — excellent for rolls and sandwich bread.
- Focaccia: Use a wetter dough (around 75% hydration), let it rise in an oiled baking pan, dimple it deeply with your fingers, drizzle generously with olive oil, and bake at 230°C (450°F) for 20–25 minutes. No shaping required.
Once you’re comfortable with straightforward yeasted loaves, you might enjoy the deeper challenge described in How to Bake Sourdough Bread from Scratch: One Living Starter, No Yeast.
Storing Your Bread
Homemade bread has no preservatives, so it stales faster than commercial bread. A cut loaf kept cut-side down on a wooden board at room temperature stays fresh for 2–3 days. Wrapping it in a cloth or paper bag (not plastic) keeps the crust from softening while slowing moisture loss.
For longer storage, slice the loaf, freeze the slices in a zip-lock bag, and toast from frozen — bread frozen within a day of baking tastes nearly as good as fresh.
Conclusion
Hand-made bread rewards attention more than effort. Once you understand the principles — gluten development, yeast activity, heat management — you’ll find you can adjust recipes intuitively and recover from most mistakes before they reach the table. Start with the basic white loaf, bake it two or three times, and you’ll quickly have a feel for what good dough looks and feels like. Everything else follows from there.