How to Make Homemade Energy Bars: 7 Tested Recipes

Making your own energy bars at home sounds straightforward until you bite into one that crumbles apart, sticks to the roof of your mouth, or tastes like sweetened cardboard. The good news: once you understand the underlying formula — a binder, a base, and a flavor layer — you can make bars that outperform most store-bought options on both taste and nutrition. No preservatives, no mystery ingredients, and you control the macros.
This guide breaks down the science, the core technique, and seven tested recipes across different goals: quick fuel, sustained energy, post-workout recovery, and low-sugar snacking.

The Formula Behind Every Good Energy Bar
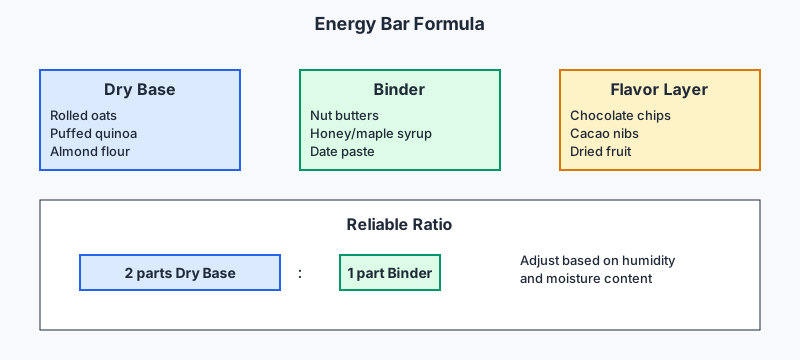
Every successful energy bar is built on three components:
- A dry base — this provides texture and bulk. Rolled oats are the most common, but alternatives include puffed quinoa, almond flour, desiccated coconut, or a blend of seeds.
- A binder — this holds everything together. Natural nut butters (almond, peanut, cashew), tahini, and date paste are the most effective. Honey or maple syrup adds binding power while contributing sweetness.
- A flavor layer — chocolate chips, vanilla extract, cacao nibs, dried fruit, spices, or protein powder. This is where you make the bar interesting.
The ratio that works reliably: roughly 2 parts dry base to 1 part binder. Tweak from there based on humidity, the moisture content of your nut butter, and how firm you want the final bar.
If you’re interested in the ratios and science behind clustered, chewy snacks, How to Make Homemade Granola: The Science Behind Every Ingredient breaks down how similar ingredient balances create texture and crunch.
The Role of Fat and Moisture
Fat (from nuts, nut butter, or coconut oil) makes bars cohesive and adds satiety. Too little fat and the bar turns dry and crumbly; too much and it won’t hold its shape at room temperature. A teaspoon of coconut oil added to your binder, melted together gently on the stovetop, often solves stubbornness in recipes that refuse to bind.
Moisture is trickier. Medjool dates are wetter than Deglet Noor; almond butter from a freshly opened jar is oilier than one that’s been sitting for a month. Always adjust dry ingredients by feel — the pressed mixture should hold together when you squeeze a small amount in your fist.
Equipment and Setup
You don’t need much:
- An 8×8 or 9×9-inch baking pan lined with parchment paper (the paper overhang makes removal easy)
- A food processor for date-based recipes
- A saucepan for warming binders
- A flat-bottomed cup or spatula to press the mixture firmly and evenly — this step is non-negotiable. Bars that aren’t pressed firmly will fall apart when sliced.
Refrigerating bars for at least 2 hours before cutting is also essential. Don’t skip this. Even 90 minutes makes the difference between clean slices and a pile of rubble.

7 Homemade Energy Bar Recipes
1. Classic Oat and Honey Bar (No-Bake)
Ingredients: 2 cups rolled oats, ½ cup peanut butter, ⅓ cup honey, ½ cup mini chocolate chips, 1 tsp vanilla extract, pinch of salt.
Method: Warm peanut butter and honey together in a saucepan over low heat until combined. Stir in vanilla and salt. Pour over oats and chocolate chips in a large bowl. Mix thoroughly. Press into lined pan. Refrigerate 2 hours, then slice into 12 bars.
Nutrition notes: High in simple carbs for quick energy — good pre-workout or as a mid-morning snack. The chocolate chips melt slightly on first cut, which is a feature, not a bug.
2. Date and Almond Protein Bar
Ingredients: 1 cup pitted Medjool dates, 1 cup raw almonds, 2 tbsp almond butter, 2 tbsp vanilla protein powder, 1 tbsp cacao powder, pinch of sea salt.
Method: Pulse almonds in a food processor until roughly chopped. Add dates, almond butter, protein powder, cacao, and salt. Process until the mixture clumps and holds together (about 60–90 seconds). Press into lined pan. Refrigerate 2 hours. Slice into 10 bars.
Notes: Dates function as both sweetener and binder here, so no added sugar is needed. Store in the fridge — these get sticky at room temperature if your kitchen is warm.
3. Seed and Coconut Bar (Nut-Free)
Ingredients: 1 cup sunflower seeds, ½ cup pumpkin seeds, ½ cup desiccated coconut, ¼ cup hemp seeds, ⅓ cup honey, 3 tbsp tahini, 1 tsp vanilla, pinch of cinnamon.
Method: Toast sunflower and pumpkin seeds in a dry pan for 3–4 minutes until fragrant. Cool slightly. Warm honey and tahini in a saucepan. Combine all dry ingredients, pour over binder, mix well. Press firmly. Refrigerate 2 hours. Cut into 12 bars.
Why it works: Great for school lunchboxes or nut-free workplaces. Hemp seeds add omega-3s and protein without any detectable flavor.
4. Peanut Butter and Banana Baked Bar
Ingredients: 2 ripe bananas (mashed), 1½ cups rolled oats, ¼ cup peanut butter, 2 tbsp maple syrup, ½ tsp cinnamon, ¼ cup raisins.
Method: Preheat oven to 180°C (350°F). Mix all ingredients together in a bowl. Spread into lined pan. Bake 20–25 minutes until golden and set. Cool completely before slicing into 10 bars.
Notes: Baked bars have a chewier, drier texture than no-bake versions — closer to a granola bar. These keep well at room temperature for 3–4 days because the banana acts as a natural humectant.
5. Chocolate and Oat Endurance Bar
Ingredients: 1½ cups rolled oats, ½ cup cashew butter, ¼ cup dark chocolate chips, 2 tbsp cacao nibs, 3 tbsp maple syrup, 1 tbsp chia seeds, 1 tsp espresso powder (optional but effective), pinch of salt.
Method: Warm cashew butter and maple syrup over low heat. Stir in espresso powder and salt. Combine with oats, chia seeds, and cacao nibs. Fold in chocolate chips off the heat (prevents total melt). Press into pan. Refrigerate 2 hours. Slice into 12 bars.
Notes: The espresso powder is subtle — it amplifies the chocolate flavor more than it adds caffeine, though it does contribute a small amount. Good for long runs or bike rides where you need slow-release fuel.
6. High-Protein Recovery Bar
Ingredients: 1 cup rolled oats, ½ cup vanilla whey protein powder, ¼ cup almond butter, 3 tbsp honey, 2 tbsp Greek yogurt, 1 tbsp flaxseed, ¼ cup dried cranberries.
Method: Combine oats, protein powder, and flaxseed. Mix honey, almond butter, and Greek yogurt separately, then combine with dry ingredients. Fold in cranberries. If the mixture seems dry, add 1 tsp milk at a time. Press into lined pan. Refrigerate at least 3 hours (the yogurt needs more time to set). Slice into 10 bars.
Notes: Protein powder absorbs a lot of moisture, which is why the yogurt is necessary here. These bars contain dairy and should be refrigerated and eaten within 4–5 days.
7. Low-Sugar Almond and Ginger Bar
Ingredients: 1 cup almond flour, ½ cup sliced almonds, ¼ cup desiccated coconut, 3 tbsp almond butter, 2 tbsp coconut oil (melted), 1 tbsp honey (just for binding — reduce or omit for strict low sugar), 1 tsp ground ginger, ½ tsp cinnamon, pinch of salt.
Method: Combine almond flour, sliced almonds, coconut, spices, and salt. Warm almond butter and coconut oil together; stir in honey if using. Mix wet and dry. Press firmly into lined pan. Refrigerate 3 hours — coconut oil needs time to solidify as the binder. Slice into 10 bars.
Notes: These are denser and more crumbly than oat-based bars. Store in the freezer for best results; they hold their shape better cold and can be eaten straight from frozen.

Storage, Shelf Life, and Portability
No-bake bars with nut butter and honey: Store in an airtight container in the fridge for up to 2 weeks, or freeze for up to 3 months. Wrap individually in parchment for grab-and-go convenience.
Baked oat bars: Room temperature for 4–5 days in a sealed container, or refrigerate for up to 10 days. Avoid storing with strong-smelling foods — oats absorb odors.
Date-based bars: Refrigerate for up to 2 weeks. If stacking, layer parchment between bars to prevent sticking.
Bars with dairy (yogurt, whey): Always refrigerate and consume within 5 days. These don’t freeze as well — the texture can become grainy after thawing.
For travel, individually wrapping bars in parchment or beeswax wrap keeps them from sticking together and makes portion control automatic.
For more tips on keeping homemade batches fresh without preservatives, Homemade Applesauce: 7 Easy Steps to a Perfect Batch offers useful storage principles that apply just as well here.
Customizing for Your Goals
Once you’re comfortable with the base formula, dialing in for specific needs is simple:
- Higher protein: Add a scoop of protein powder (note it absorbs moisture — compensate with a tablespoon of nut butter or a splash of milk). Pumpkin seed butter is higher in protein than almond butter if you want to boost it through whole ingredients.
- Lower sugar: Swap honey or maple syrup for mashed banana or unsweetened applesauce, which add binding without refined sweeteners. Use cacao nibs instead of chocolate chips.
- More fiber: Add 2 tablespoons of ground flaxseed, psyllium husk, or oat bran to almost any recipe without affecting the flavor.
- More sustained energy: Include a source of fat (nuts, nut butter, seeds) alongside complex carbs. Avoid bars that are almost entirely sugars — they spike blood glucose and leave you hungry faster.
- Vegan: Use maple syrup instead of honey, and skip whey protein (use pea or rice protein instead).
Common Problems and Fixes
Bars won’t hold together: Press harder, chill longer, or add a tablespoon of extra binder (nut butter or honey). Insufficient pressing is the most common cause.
Bars are too sticky: Reduce the binder slightly, or add more dry base. Dusting the parchment with a small amount of coconut flour before pressing helps.
Bars taste bland: Salt is often underdone in home recipes. A pinch more sea salt, a splash of vanilla, and a tablespoon of cacao powder are all reliable flavor rescuers.
Bars are too crumbly after chilling: This usually means the fat content is too low, or the mixture wasn’t pressed firmly enough. A tablespoon of melted coconut oil worked into the mixture before pressing fixes most cases.
The Bottom Line
Homemade energy bars aren’t complicated once you stop treating recipes as rigid formulas. Master the ratio — 2 parts dry to 1 part binder, plus flavor — and you have a framework that handles nearly any combination of ingredients in your pantry. Start with the classic oat and honey bar if you’re new to this, then branch out based on what you enjoy eating and what your body needs. The bars you make at home will almost always taste better than packaged versions, and you’ll know exactly what’s in them.