How to Clean a Washing Machine: Fixing That Musty Odor

Washing machines clean your clothes, but nothing cleans them back — not automatically, anyway. Over time, detergent residue, fabric softener, hard-water minerals, mildew, and body oils accumulate inside the drum, door seal, dispenser drawers, and drain filter. The result is a machine that smells musty, leaves marks on laundry, or simply stops working as well as it should.
This guide covers every part of the cleaning process, for both front-loaders and top-loaders, using methods that actually work.
Why Your Washing Machine Gets Dirty
It seems counterintuitive: a machine full of hot water and detergent should stay clean. The problem is modern laundry habits. Low-temperature washes — increasingly popular for energy saving — don’t kill bacteria or dissolve soap scum the way a hot cycle does. Combined with keeping the door or lid closed after each wash (trapping moisture), you get the ideal environment for mold and mildew.
Common culprits that build up inside machines:
- Detergent residue — especially from powder detergents or using too much liquid
- Fabric softener — leaves a waxy coating inside the drum and on the door seal
- Limescale — calcium and magnesium deposits from hard water settle on heating elements and drum walls
- Biofilm — a thin bacterial film that thrives in damp, warm conditions
- Lint and debris — accumulates in the drain filter and pump
Left unchecked, these build-ups shorten the machine’s lifespan, reduce cleaning performance, and can cause drainage issues or foul odors that transfer to your laundry.

What You’ll Need Before You Start
You don’t need expensive proprietary tablets to clean a washing machine effectively. Most of what you need is probably already in your cupboard:
- White distilled vinegar (at least 500 ml)
- Bicarbonate of soda / baking soda
- Chlorine bleach (optional, but effective for mold)
- A commercial washing machine cleaner (e.g., Affresh or Dettol Washing Machine Cleaner) — useful for monthly maintenance
- An old toothbrush
- Microfibre cloths
- A small bowl or bucket
- Rubber gloves
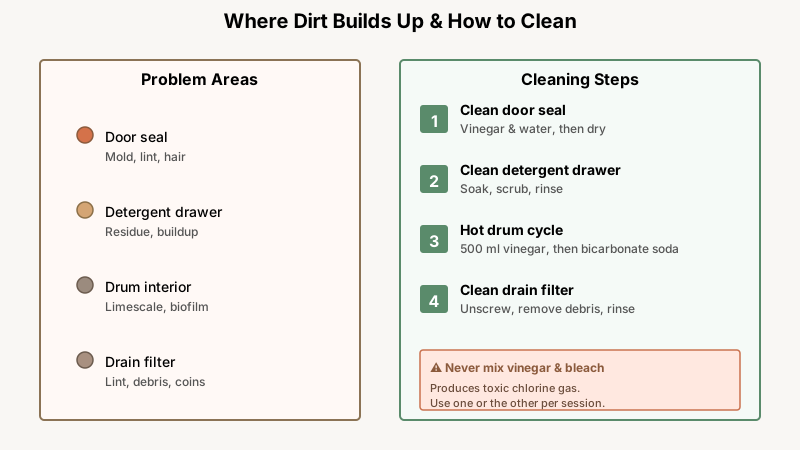
A note on mixing: Never combine vinegar and bleach — the reaction produces chlorine gas, which is toxic. Use one or the other in a given cleaning session, not both.
How to Clean a Front-Loading Washing Machine
Front-loaders are the worst offenders for mold and mildew because the rubber door gasket creates a permanent moisture trap.
Step 1: Clean the Door Seal (Gasket)
This is the most important step and the most commonly skipped. Pull back the rubber seal around the door opening and look inside the fold. You’ll likely find dark mold spots, lint, hair, and sometimes small objects.
- Mix equal parts white vinegar and water in a bowl.
- Dip a microfibre cloth in the solution and wipe thoroughly around the inside of the seal, getting into every fold.
- For stubborn mold, apply a small amount of neat bleach with a toothbrush, leave for five minutes, then wipe clean.
- Dry the seal completely with a clean cloth.
If the mold is deep-seated and won’t shift, a paste of bicarbonate of soda and water applied for 15–20 minutes before scrubbing can help lift it.
Step 2: Clean the Detergent Drawer
Remove the drawer entirely — most slide out with a press of a tab at the back. Soak it in hot water with a little washing-up liquid or white vinegar for 10–15 minutes, then scrub every compartment with the toothbrush. Rinse and dry before putting it back.
While the drawer is out, shine a torch into the empty drawer cavity and wipe away any residue or mold growing inside it.
Step 3: Clean the Drum With a Hot Cycle
Vinegar method: Pour 500 ml of white distilled vinegar directly into the drum (not the drawer). Set the machine to its hottest and longest cycle — usually a cotton 90°C setting. Start the cycle. The vinegar will dissolve mineral deposits and kill bacteria.
Bicarbonate of soda follow-up: Once the vinegar cycle finishes, add 100–200 g of bicarbonate of soda to the drum and run a second hot cycle. This neutralizes any remaining vinegar smell and helps shift loosened grime.
Alternatively: If you prefer a dedicated product, place a washing machine cleaning tablet in the drum and run a hot maintenance wash per the manufacturer’s instructions. These are particularly good for keeping on top of limescale.
Step 4: Clean the Drain Filter
Most front-loaders have a small access panel at the bottom front of the machine. Behind it is the drain filter (sometimes called the pump filter), which catches coins, fluff, and debris before they reach the pump.
- Place a shallow tray and some old towels beneath the panel — water will spill out.
- Slowly unscrew the filter cap counterclockwise. Let the water drain gradually.
- Pull the filter out completely, remove all debris, and rinse it under a tap.
- Use a toothbrush to clean inside the filter housing.
- Screw the filter back in firmly to prevent leaks.
This filter should be checked every one to three months. A clogged drain filter is one of the most common causes of a washing machine not draining properly.

Step 5: Wipe Down the Exterior
Finish by wiping the outside of the machine with a damp cloth — including the control panel, the top, and the sides. A little white vinegar on the cloth helps remove fingerprints and light limescale from around the dispenser area.
How to Clean a Top-Loading Washing Machine
Top-loaders are generally less prone to mold because the drum dries out more easily between washes, but detergent build-up and mineral deposits are still common.
Fill and Soak Method
- Set the machine to its largest load and hottest temperature. Start the cycle and let the drum fill with water.
- Once full, add 500 ml of white distilled vinegar and 200 g of bicarbonate of soda directly into the water.
- Pause the cycle and let the mixture soak for 30 minutes to an hour.
- While soaking, dip a cloth in the solution and wipe the inside of the drum, the top rim, and the agitator (if your model has one).
- After soaking, resume the cycle and let it complete.
- Run a second rinse cycle with plain water to flush out any residue.
Agitator and Drum Detail
If your top-loader has a central agitator, mold and residue can collect underneath and around it. Some agitators unscrew from the top — check your manual. If it does, remove it, soak in warm soapy water, and scrub with the toothbrush before reinstalling.
Dispenser Tray
Top-loaders often have a lint filter in the drum (a mesh screen around the agitator top) rather than a separate drain filter. Check your manual to find it, remove it monthly, and rinse it clean under running water.
Tackling Specific Problems
Musty or Sour Smell
A persistent bad smell almost always comes from biofilm and mold in the gasket (front-loaders) or in the drum itself. The fix:
- Run a 90°C cycle with either 500 ml of vinegar or a dedicated cleaner.
- Leave the door open for several hours after every wash to let the drum dry.
- Don’t leave wet laundry sitting in the machine.
If the smell returns within a week, check the drain filter — blockages can cause water to pool and stagnate.
If odor problems seem to follow you everywhere, our guide How to Get Rid of a Musty Smell in a Car: Fixing It Costs Under $20 tackles the same issue in a completely different appliance.
Limescale Build-Up
If you live in a hard-water area, limescale is a serious issue. It coats the heating element, forcing the machine to work harder and use more electricity. White vinegar dissolves light limescale well; for heavy deposits, a citric acid wash is more effective. Dissolve 100–150 g of citric acid powder in a little hot water, pour it into the drum, and run a hot cycle.
Using a water softener product monthly (like Calgon) or a descaling tablet helps prevent build-up rather than tackling it after the fact.
Black Mold on the Door Seal
Surface mold comes off with vinegar or a diluted bleach solution. If you see mold that has grown into or behind the rubber seal, and cleaning does not remove it, the gasket may need replacing — a job most appliance repair technicians can handle. Replacement gaskets are available for most brands.

How Often Should You Clean Your Washing Machine?
Here’s a realistic cleaning schedule:
| Task | Frequency |
|---|---|
| Wipe door seal / gasket | Weekly (front-loaders) |
| Clean detergent drawer | Monthly |
| Run a hot maintenance wash | Monthly |
| Clean drain filter | Every 1–3 months |
| Deep clean (full process) | Every 3–6 months |
| Descale (hard water areas) | Every 1–3 months |
The most impactful daily habit costs nothing: leave the door or lid slightly open after every wash. That single step dramatically reduces the conditions mold needs to thrive.
Common Mistakes to Avoid
Using too much detergent. More soap does not mean cleaner clothes. Excess detergent doesn’t fully rinse out and builds up as residue inside the machine. Follow the dosage on the packaging — and use even less in a soft-water area or for smaller loads.
Mixing cleaning agents. Vinegar and bleach together are dangerous. Bleach and hydrogen peroxide together create a hazardous reaction too. Stick to one product at a time.
Skipping the filter. Many people have never cleaned their drain filter — and some don’t know it exists. If your machine is slow to drain, smells bad, or shows error codes related to drainage, the filter is the first place to look.
Running maintenance washes at low temperatures. A 30°C or 40°C maintenance cycle is not hot enough to kill bacteria or dissolve grease. Always use the hottest setting available — ideally 90°C or a dedicated drum-clean setting.
Once your washer is fresh again, keep the momentum going with How to Clean a Dishwasher Properly: Where Grease And Odor Hide, since it’s another appliance notorious for hidden grime and smells.
Conclusion
Cleaning a washing machine is not complicated, but it requires a bit of routine. A monthly hot maintenance wash and keeping the door open between uses will handle most problems before they start. A quarterly deep clean — seal, drawer, drum, and filter — keeps performance at its best and extends the life of the machine.
The payoff is real: fresher laundry, fewer bad smells, fewer repair bills, and a machine that actually does its job. The whole process takes under an hour once you know the steps.