How to Make Homemade Hummus: The Complete Step-by-Step Guide

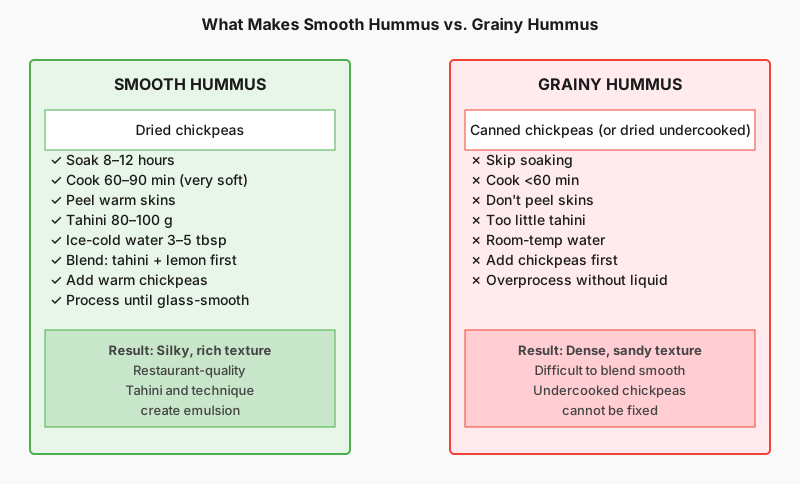
Making hummus at home is one of those kitchen wins that surprises people every time. The result — smooth, rich, genuinely fresh-tasting — beats the refrigerated tub from the supermarket by a wide margin, and the effort is far less than most people expect. If you’ve ever wondered why restaurant hummus tastes so much better than the store-bought kind, the answer is almost always technique: cooked chickpeas processed while still warm, enough tahini, and good olive oil at the end.
This guide walks you through exactly how to make homemade hummus from scratch, including the optional (but worthwhile) step of starting with dried chickpeas, plus every trick that separates silky hummus from the gritty, dense version most people end up with on their first try.
Why Homemade Hummus Wins Every Time
Store-bought hummus typically contains preservatives, stabilizers, and a conservative amount of tahini to keep costs down. The tahini-to-chickpea ratio matters enormously for flavor and texture — and commercial producers tend to use less of it than traditional recipes call for.
Making it yourself means you control:
- Tahini quantity — the single biggest flavor lever
- Garlic level — raw garlic is sharp; roasted is mellow
- Texture — from chunky and rustic to glass-smooth
- Salt and acidity — lemon juice brightens everything
You also avoid citric acid, guar gum, and potassium sorbate — not because those ingredients are dangerous, but because you simply don’t need them when the hummus will be eaten within a week.

Ingredients: What You Actually Need
A classic hummus recipe is minimal. Six core ingredients, no substitutions required:
The Core Six
| Ingredient | Amount (serves 4–6) | Notes |
|---|---|---|
| Dried chickpeas (or canned) | 250 g dried / 2 × 400 g cans | Dried gives better flavour |
| Tahini (sesame paste) | 80–100 g (about ⅓ cup) | Use a well-stirred, runny brand |
| Fresh lemon juice | 3–4 tablespoons | About 1.5 lemons |
| Garlic | 1–2 cloves | Raw for punch, roasted for sweetness |
| Ice-cold water | 3–5 tablespoons | The key to silky texture |
| Fine sea salt | 1 teaspoon, to taste | Add gradually |
Optional but worthwhile: A pinch of ground cumin adds depth without being obvious. A small amount of baking soda in the cooking water (more on this below) helps chickpea skins soften.
On Tahini: Don’t Cut Corners
Tahini is the ingredient most people under-invest in, and it’s the most important one after the chickpeas. Look for tahini made from hulled sesame seeds, preferably from a brand that stores the product in glass rather than plastic — sesame oil is volatile and picks up off-flavors over time. Middle Eastern grocery stores reliably stock good-quality tahini at a lower price than supermarkets. Brands like Al Nakhil, Soom, and Ziyad are consistently good, though availability varies by region.
Method 1: Starting With Dried Chickpeas (Best Results)
This takes planning — an overnight soak — but the texture payoff is real. Dried chickpeas also cost significantly less per serving than canned.
Step 1: Soak Overnight
Place 250 g of dried chickpeas in a large bowl. Cover with at least twice their volume of cold water and add half a teaspoon of baking soda. Leave at room temperature for 8–12 hours. They’ll nearly double in size.
Drain and rinse thoroughly before cooking.
Step 2: Cook Until Very Soft
Transfer the soaked chickpeas to a large pot. Cover with fresh cold water by about 5 cm. Add another half teaspoon of baking soda — this is the trick that breaks down chickpea cell walls and produces ultra-smooth hummus. Bring to a boil, skim off any grey foam, then reduce to a steady simmer.
Cook for 60–90 minutes. You’re aiming for chickpeas that are soft enough to crush easily between your thumb and forefinger — softer than you’d want for a salad. Undercooked chickpeas produce grainy hummus no amount of blending will fix.
Save the cooking liquid; you may use some of it instead of cold water later.
Step 3: Peel the Chickpeas (Optional, But Worth It)
This is the step most recipes skip, and skipping it is fine — but if you want the silkiest possible result, peel them. While the chickpeas are still warm, rub them between your hands in a bowl of water. The pale skins float to the top and you can skim them off. It takes about five minutes for a full batch.

Step 4: Blend in the Right Order
This is where technique matters most. Use a food processor rather than a blender if you have one — the wide blade creates a better vortex for thick pastes.
Order of operations:
- Add tahini and lemon juice to the food processor. Process for 60–90 seconds until the tahini turns pale and fluffy. This step aerates the tahini and is the single most underrated move in hummus-making.
- Add garlic and salt. Process another 30 seconds.
- Add half the chickpeas and process for 1 minute.
- Add the remaining chickpeas and process another minute.
- With the machine running, stream in ice-cold water one tablespoon at a time until you reach a texture slightly looser than you want — it will firm up as it cools.
Total blending time: at least 4 minutes. Patience here is non-negotiable.
Step 5: Taste and Adjust
Taste before serving. Common fixes:
- Too thick? Add cold water or reserved cooking liquid, one tablespoon at a time.
- Too bland? More salt, then more lemon — in that order.
- Too sharp? A pinch of sugar or an extra minute of blending mellows raw garlic.
- Slightly grainy? Keep blending. Give it another 2 minutes.
Method 2: Using Canned Chickpeas (Quick Version)
Canned chickpeas work well if you’re short on time. Two 400 g cans, drained and rinsed, equal roughly the yield of 250 g dried. The main drawback is texture — canned chickpeas are firmer and more intact, so the hummus often comes out slightly less smooth.
The fix: simmer the drained canned chickpeas in water with a pinch of baking soda for 20 minutes before blending. This softens them considerably and brings the result much closer to the from-scratch version.
Follow the same blending order as above.
How to Serve Homemade Hummus
The classic presentation is a wide, shallow bowl — spread the hummus outward from the center using the back of a spoon to create a well. Into that well:
- A generous pour of extra-virgin olive oil
- A dusting of sweet or smoked paprika
- A few whole cooked chickpeas
- Fresh flat-leaf parsley, roughly chopped
Serve with warm pita, raw vegetables, or flatbread. In Lebanon and Israel, hummus is often eaten as a standalone meal — a warm bowl with olive oil and a soft-boiled egg alongside, eaten with fresh bread in the morning.
If you love building a spread of homemade dips and condiments, How to Make Homemade Pickles: Crisp Dill Pickles In 48 Hours is another great project that pairs perfectly with a hummus platter.
Variations Worth Trying
Roasted red pepper hummus: Add 1–2 jarred roasted red peppers to the blender at the chickpea stage.
Roasted garlic hummus: Roast a whole head of garlic (cut in half, drizzled with oil, wrapped in foil at 180°C / 350°F for 45 minutes) and squeeze the cloves in instead of raw garlic. Completely different flavor profile — sweeter and nutty.
Spicy harissa hummus: Stir 1–2 tablespoons of harissa paste into the finished hummus.
Beetroot hummus: Add 1 small cooked beetroot while blending for a vivid pink version with an earthy sweetness.

Once you’ve mastered flavored hummus, you might enjoy exploring Budget-Friendly Homemade Gifts: 12 Ideas That Actually Work for more edible gifts to make from scratch.
Storage, Make-Ahead, and Shelf Life
Homemade hummus keeps well in the fridge for up to five days in an airtight container. Press a piece of plastic wrap directly onto the surface before sealing to reduce oxidation and skin formation.
To freeze: portion into small containers or silicone bags and freeze for up to three months. Thaw overnight in the fridge and stir well before serving — the texture holds up better than you’d expect.
Make-ahead tip: Hummus tastes better after it rests for an hour or two. The flavors integrate and the texture settles. If you’re making it for a dinner, prepare it the morning of.
Common Mistakes and How to Fix Them
The hummus is gritty. Chickpeas were undercooked, or blending time was too short. If you catch it early, return everything to the food processor and blend for another 3–4 minutes, adding cold water as needed.
The hummus is too dense and stiff. Not enough water added during blending, or the tahini was too thick. Loosen with cold water one tablespoon at a time while the machine runs.
The hummus is bitter. This usually comes from old or low-quality tahini. Check the expiry date and smell your tahini before using — it should smell nutty and mild, not rancid.
The garlic is overwhelming. Raw garlic sharpens considerably overnight. Use less next time, or switch to roasted garlic. A squeeze of extra lemon can partially mask the harshness.
A Few Notes on Equipment
A food processor is the tool of choice. Blenders work but tend to require more water and produce a slightly soupier result. A high-powered blender (like a Vitamix) can produce excellent hummus, but requires the tamper to keep the mixture moving.
If you own neither, a hand-held immersion blender and a tall jug will get you to a decent chunky version — more like a rough mash than a smooth dip, but entirely edible and still far better than most store-bought options.
The Bottom Line
Homemade hummus comes down to four things: soft chickpeas, enough tahini, aerated blending, and cold water. Nail those and the result is genuinely superior to anything you’ll buy pre-made. Start with canned chickpeas if you’re in a hurry; graduate to dried once you’ve made it a couple of times and want to refine the texture further.
The recipe scales easily — double it for a party, halve it for a weeknight snack. Once you have the base technique, the variations are endless and the investment is minimal. A bowl of good hummus, warm olive oil, and fresh bread is one of those meals that costs almost nothing and impresses almost everyone.
If making pantry staples from scratch has caught your interest, our guide How to Make Homemade Yogurt: No Machine or Additives Required is a natural next project.