Flavored Butter Boards: The Complete How-To Guide

What Is a Butter Board (and Why Make One)?
A butter board is exactly what it sounds: a wooden cutting board — or slate, marble, or any flat serving surface — smeared generously with softened butter, then topped with herbs, spices, aromatics, and other flavor-forward ingredients. It became a beloved party appetizer partly because it takes about ten minutes to make and scales effortlessly from two people to twenty.
The concept is simple: instead of slicing pats of butter from a cold stick, you spread a thick, even layer of room-temperature butter across a board and customize it with whatever flavors you love. Guests scoop or drag their bread directly off the board. It is communal, unfussy, and — when done well — genuinely impressive.

Choosing Your Butter and Board
Which Butter to Use
The butter is the main event, so quality matters more than it does in a sauce or baked good where other flavors dominate.
European-style or cultured butter has a higher fat content (usually 82–84% vs. the standard American 80%) and a slightly tangy, complex flavor. Brands such as Kerrygold, Plugrá, or any local creamery butter work very well. That extra fat means a creamier, silkier spread and a richer taste base.
Unsalted butter gives you more control, especially if you plan to add flaky finishing salt as a topping. Salted butter is fine if you prefer it; just go lighter on added salt.
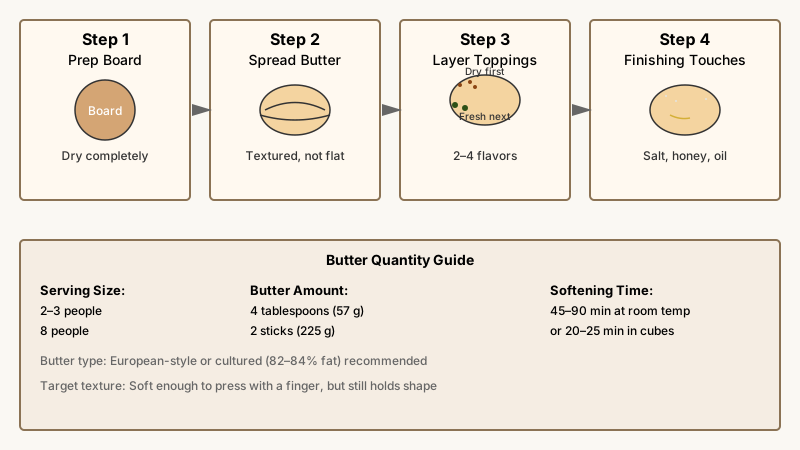
Quantity to plan for: Roughly 4 tablespoons (half a stick / 57 g) of butter serves 2–3 people as an appetizer. For a party of eight, use 2 full sticks (225 g) spread across a medium-to-large board.
Softening Without Melting
The texture of your butter matters. Too cold and it tears bread; too warm and it turns greasy and loses its appeal. The target is genuinely soft — a finger should press in easily — but still holding its shape.
- Leave it at room temperature for 45–90 minutes, depending on your kitchen temperature.
- In a hurry, cut it into small cubes and rest for 20–25 minutes — more surface area speeds things up.
- Do NOT microwave it unless you want puddles of melted fat.
For a deeper dive into the technique, How to Soften Butter Quickly: Skip The Microwave Meltdown walks through several quick methods that avoid the dreaded greasy puddle.
Board Materials
- Untreated wood: Rustic, absorbent, great for single-use settings. Sand the board and oil it well before use.
- Slate or marble: Non-porous, easy to wipe clean, and stays cool longer (nice in warm rooms, less ideal in cold kitchens where butter firms up quickly).
- Ceramic serving dishes or sheet pans: Fully food-safe, dishwasher-friendly, and give a more modern look.
A critical food safety note: if your wooden board has deep cuts or cracks, avoid using it as a direct-contact food surface. The USDA recommends replacing heavily scarred boards.
If you’re still deciding what surface to serve on, Cutting Boards for Every Food Type: How to Choose and Use Them Right breaks down which materials work best for different foods.
How to Build a Flavored Butter Board Step by Step
1. Prep Your Board
Rinse the board and pat it completely dry. A damp surface will cause the butter to slide rather than adhere. If you are using a wood board, give it a light wipe with a food-safe oil the day before to prevent staining and absorption.
2. Spread the Butter
Drop the softened butter onto the board in several dollops spaced across the surface. Use the back of a large spoon, an offset spatula, or even a sturdy butter knife to spread it outward in swooping, irregular strokes. You want texture — peaks, swirls, and slight valleys — not a perfectly flat surface. Those ridges hold toppings and look much more inviting.
Leave a 1–2 cm border around the edge of the board. It looks intentional and keeps toppings from sliding off.
3. Add Your Flavor Elements
This is the creative core of the dish. Layer toppings in a loose order:
- Dry/ground seasonings first — press them lightly into the butter so they adhere (e.g., chili flakes, smoked paprika, za’atar).
- Fresh or pickled aromatics next — minced herbs, citrus zest, capers, shallots.
- Finishing touches last — flaky sea salt, drizzles of honey, a thread of olive oil.
Keep your flavor combinations coherent — a board that has twelve competing themes is confusing. Two to four complementary flavors work best.
4. Dress It Up
A few finishing flourishes make a real difference:
- Edible flowers (nasturtiums, violets, borage) add color with zero extra flavor work.
- A drizzle of good olive oil or truffle oil gives sheen and richness.
- Microgreens or small herb sprigs create height and freshness.
- A sprinkle of flaky salt (Maldon or fleur de sel) right before serving catches light and adds crunch.
5. Serve Immediately — or Hold Correctly
Butter boards are best served within 15–20 minutes of making them, especially in warm environments. If you need to prep ahead:
- Build the board, cover tightly with plastic wrap, and refrigerate.
- Remove it 20–30 minutes before serving to let the butter soften back up.
- Add any delicate fresh toppings (herbs, flowers, zest) right before guests arrive — they wilt or discolor on the cold butter.
According to FDA and USDA food safety guidelines, butter (a dairy product) should not sit at room temperature for more than 2 hours. Set a reasonable timer and discard what is left after that point, or refrigerate promptly.
Flavor Combination Ideas
These combinations are tested enough in home kitchens to be reliable starting points — not definitive, but genuinely useful anchors:
Herb Garden Board Softened butter + fresh chives + flat-leaf parsley + tarragon + lemon zest + cracked black pepper + Maldon salt. Works with sourdough or a baguette.
Honey-Walnut Board Butter + a generous drizzle of raw honey + toasted crushed walnuts + fresh thyme + flaky salt. Pairs brilliantly with a dark, nutty bread or seeded crackers.
Roasted Garlic and Rosemary Board Butter + a full head of roasted garlic (squeezed out and dotted across the surface) + fresh rosemary needles + smoked paprika + coarse salt. Deeply savory and crowd-proof.
Za’atar and Olive Oil Board Butter + generous za’atar (a Middle Eastern spice blend of thyme, sesame, sumac, and herbs) + a thread of extra-virgin olive oil + pomegranate molasses + sesame seeds. Excellent with pita.
Citrus-Miso Board Butter + a teaspoon of white miso whisked in before spreading + orange zest + toasted sesame seeds + a few thin-sliced scallions. The miso deepens and salts the butter without overwhelming it — one of the more surprising combinations that consistently works.
Sweet Cinnamon-Vanilla Board Butter + powdered cinnamon + a half-teaspoon of vanilla paste or seeds scraped from a pod + a drizzle of maple syrup + a pinch of sea salt. Serve with brioche, thick toast, or pancakes.
What to Serve With a Butter Board
Bread is the obvious answer, but variety matters:
- Sourdough slices: the tang complements rich butter.
- Baguette rounds: classic for a reason.
- Pita wedges: ideal for Middle Eastern-themed boards.
- Crostini: for a crunchier, more formal presentation.
- Radishes, fennel sticks, or celery: raw vegetables cut through the richness and add a lighter snacking option.
- Crackers or flatbreads: good for guests avoiding gluten in bread.
Offer a separate serving utensil — a small offset spatula or dedicated butter knife — alongside the board so guests don’t need to reach across with whatever they are holding.

Common Mistakes to Avoid
Using cold butter. This is the single most common problem. Cold butter tears bread, breaks away in chunks, and does not spread. Start at true room temperature.
Overcrowding the toppings. A board that looks like a spice rack exploded is exhausting to look at and muddled to eat. Pick a clear flavor direction and stay with it.
Ignoring texture contrast. If everything is soft, the board feels flat. Include something crunchy (toasted nuts, seeds, crispy capers) and something bright-acidic (capers, pickled shallot, citrus zest) to give the palate somewhere to go.
Forgetting about serving time. Butter left at room temperature too long is a food safety concern, not just a quality one. The 2-hour rule applies.
Serving the board directly from the refrigerator. Even 5 minutes of cold butter on bread is a frustrating experience. Always allow time to come to temperature.
Frequently Asked Questions
Can you make a butter board ahead of time?
Yes. Spread and top the board (minus any delicate fresh herbs or edible flowers), wrap tightly in plastic, and refrigerate for up to 24 hours. Take it out 20–30 minutes before serving and add fresh garnishes just before guests arrive.
How long can a butter board sit out?
Butter is a dairy product and should not sit at room temperature for more than 2 hours — less if your room is warmer than 70°F/21°C. Refrigerate or discard any leftover butter from the board after that window.
Do you have to use salted or unsalted butter?
Either works. Unsalted gives you more control over the final salt level, which is helpful when adding finishing salts as a topping. Salted butter is perfectly fine — just be mindful about adding more salt on top.
What is the best board material for a butter board?
Wood is traditional and looks warm and rustic; slate is sleek and stays cooler; marble is elegant. All work well. The key practical factor: make sure the surface is clean, food-safe, and dry before spreading butter on it.
Can you make a dairy-free butter board?
Yes — high-quality vegan butters (such as those made from coconut oil, cashew, or oat bases) spread well at room temperature and accept toppings the same way. Look for a variety with a firm texture when cold, which generally means it will hold up better at room temperature. The flavor base will differ, but the method is identical.