Crispy French Fries at Home: The Complete Fresh Potato Guide

Most homemade French fries disappoint. They come out pale, floppy, or weirdly chewy — nothing like what you’d get from a proper chip shop or a good burger joint. The good news: the gap between mediocre and genuinely great fries is mostly technique, not equipment. With fresh potatoes and a few deliberate steps, you can produce fries that are shattering-crisp on the outside and fluffy inside, every single time.
This guide covers everything from choosing the right potato variety to the exact temperatures that make the difference between soggy and spectacular.
Choosing the Right Potato
Not all potatoes fry the same way. The starch content and moisture level of a potato determine its final texture in hot oil, and getting this wrong is the most common reason homemade fries fail.
If crispy wedges with the skin still on sound more appealing tonight, check out Crispy Roast Potatoes: The Step-by-Step Guide to Perfect Results for a different take on potato perfection.
High-Starch Varieties Are Your Best Friend
For classic crispy fries, you want a high-starch, low-moisture potato. In the United States, the Russet (also called Idaho) is the gold standard — its dry, starchy flesh becomes light and fluffy inside while the exterior crisps aggressively. In the UK, Maris Piper and King Edward work beautifully for the same reasons. In Australia, look for Sebago or Kennebec varieties.
Waxy potatoes — like Red Bliss, fingerlings, or most “new” potatoes — hold their shape well but contain too much water and sugar. They tend to brown too quickly on the outside while staying dense inside. They also go soft faster after frying. Avoid them here.
How Fresh Is Fresh Enough?
Potatoes stored for a long time at very cold temperatures (below about 7°C / 45°F) convert starch to sugar, which causes fries to over-brown before they cook through. Buy potatoes that have been stored at cool room temperature, not from a fridge. If your potatoes have sprouted or show green patches, discard those sections entirely — the green coloring indicates solanine, a mildly toxic compound.

The Essential Prep Steps
Crispy fries require more than just cutting and frying. Two techniques matter above everything else: soaking and drying.
Cut Consistently
Peel your potatoes (or scrub if you prefer skins-on), then cut them into even batons. A width of about 1 cm (roughly 3/8 inch) is the classic fry size — thick enough to stay fluffy inside, thin enough to cook through quickly. Uneven cuts mean some fries burn while others are undercooked. A mandoline with a julienne attachment speeds this up, but a sharp knife and a steady hand work fine.
Soak in Cold Water — Don’t Skip This
Once cut, submerge the fries in a large bowl of cold water and leave them for at least 30 minutes, though an hour is better and overnight in the fridge is better still. Soaking draws out surface starch, which would otherwise fuse fry-to-fry and create a gummy exterior instead of a crisp one. You’ll see the water turn milky — that’s exactly what you want.
If you’re soaking overnight, cover the bowl and keep it in the refrigerator. Change the water once if you can; this removes even more starch.
Dry Them Thoroughly
This step is non-negotiable. After soaking, drain the fries and spread them on a clean kitchen towel or paper towels. Pat them completely dry — surface moisture turns to steam in hot oil, which actively prevents crisping and can cause dangerous spatter. Some cooks go a step further and let the cut fries sit uncovered on a wire rack in the fridge for an hour or two after drying. The dry air pulls out additional moisture and produces a noticeably better crust.
The Double-Fry Method: Why It Works
Single-frying fries is the shortcut that explains most disappointing homemade batches. Professional kitchens — from fast-food chains to three-Michelin-star restaurants — use a two-stage frying process, and once you understand why, you’ll never skip it.
First Fry: Cook Through Without Browning
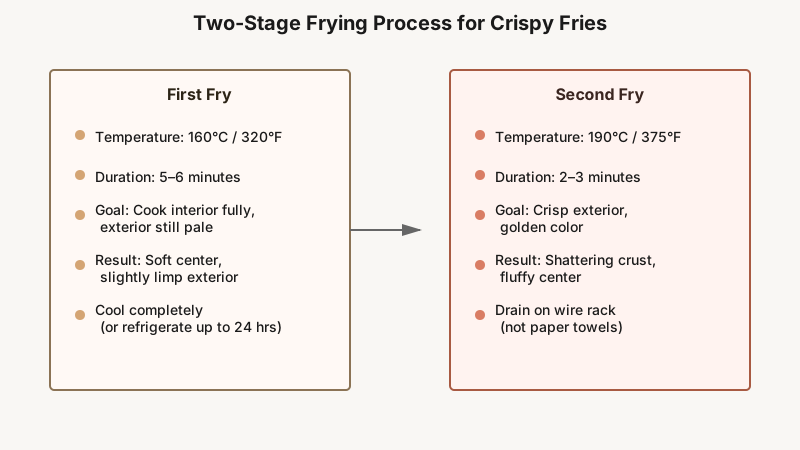
Heat your oil to 160°C / 320°F and fry the potatoes in small batches for 5–6 minutes. The goal at this stage is purely to cook the interior fully — you want a soft, cooked center, but the exterior should still be pale and slightly limp. Don’t crowd the pan; too many fries at once drops the oil temperature and causes steaming rather than frying.
After the first fry, transfer the fries to a wire rack (not paper towels, which trap steam underneath) and let them cool completely. At this point you can refrigerate them for up to 24 hours, which is actually beneficial — the surface dries further and the starch partially retrogrades, creating a firmer structure that crisps more aggressively in the second fry.
Second Fry: The Crisp
Raise the oil temperature to 190°C / 375°F — this is the hot, fast blast that creates the crust. Fry the par-cooked fries for 2–3 minutes until deep golden. At this temperature the exterior moisture evaporates almost instantly, the starch gelatinizes, and the Maillard reaction kicks in to produce that characteristic golden-brown color and nutty flavor.
Drain immediately on a wire rack, season with fine salt right away (it adheres better when the fries are still hot and slightly greasy), and serve within a few minutes. Fries left sitting go soft as steam from the interior migrates outward.

Choosing Your Frying Oil
Oil selection affects both flavor and the ability to fry at high temperatures without burning. The key property is smoke point — the temperature at which an oil begins to break down and produce acrid, bitter compounds.
- Refined peanut oil: Smoke point around 230°C / 450°F, neutral flavor, widely considered the best all-round choice for fries. Many fast-food chains use it for exactly this reason.
- Sunflower or safflower oil: High smoke points (210–230°C / 410–450°F), neutral flavor, widely available and affordable.
- Vegetable or canola oil: Smoke point roughly 200–205°C / 400°F, works well for home use.
- Beef tallow or duck fat: Traditionally used in Belgian and British chip shops. Lower smoke points than refined vegetable oils, but the flavor is exceptional — rich and savory in a way no vegetable oil matches. Worth trying for a special batch.
Avoid extra-virgin olive oil for deep frying — its low smoke point (around 190°C / 375°F) and strong flavor both work against you at frying temperatures.
How Much Oil and What Pan?
A heavy-bottomed pot — cast iron, enameled dutch oven, or a carbon steel wok — holds temperature better than thin pans, which is critical for maintaining the correct frying temperature when you add cold potatoes. Use enough oil that the fries can float freely (at least 8–10 cm / 3–4 inches deep). A kitchen thermometer is not optional; it’s the difference between consistent results and guessing.
Seasoning and Variations
Plain sea salt is the classic finish and often the best one, but there’s a lot of room to experiment after the second fry.
- Garlic Parmesan fries: Toss hot fries with melted butter, finely grated Parmesan, and minced garlic.
- Smoked paprika and cumin: A fast, earthy blend that works particularly well with thick-cut fries.
- Old Bay or Cajun seasoning: Adds heat and complexity with almost no effort.
- Truffle salt and fresh thyme: Simple and genuinely impressive for a dinner-party side.
Whatever seasoning you use, apply it while the fries are hot. Salt and spices don’t adhere well to cool, dry surfaces.

Troubleshooting Common Problems
Fries are soggy: Most likely cause is water. Either the potatoes weren’t dried properly, the oil was too cool, or the pan was overcrowded. All three lower the oil temperature and cause the fries to absorb oil rather than crust.
Fries are too dark before cooking through: Oil is too hot, or the potatoes have high sugar content (old potatoes stored cold). Drop the first-fry temperature and soak longer to remove more surface starch.
Fries stick together: Not enough oil, pan too crowded, or surface starch not fully removed by soaking. Give them more room and soak longer.
Interior is dense, not fluffy: Wrong potato variety. Switch to a higher-starch option like Russet or Maris Piper.
Fries go soft quickly after serving: This is normal — fries deteriorate fast as internal steam migrates out. Serve immediately after the second fry, and don’t cover them (which traps steam). If you’re cooking for a crowd, work in batches and keep finished fries uncovered in a low oven (about 100°C / 210°F) on a wire rack for no more than 10–15 minutes.
The Oven and Air Fryer Alternatives
If deep frying isn’t practical, both oven roasting and air frying can produce decent results — they won’t match a double-fried fresh potato, but they’re a reasonable trade-off.
For oven fries, parboil your cut potatoes for 5 minutes first, drain and steam-dry thoroughly, then toss aggressively in oil (around 3 tablespoons per 500g / 1 lb of potato) and roast at 220°C / 430°F on a preheated metal baking sheet. The preheated pan gives immediate contact heat that partially mimics frying.
For air fryer fries, the same prep applies: soak, dry thoroughly, and don’t skip the parboiling step. Cook at 200°C / 390°F in a single layer, shaking halfway through. The results are crispier than most oven methods, though the batch size is small.
Neither method fully replicates the double-fry result, but both are significantly improved by the soaking and drying steps that most recipes skip.
For an even lower-effort side dish that still relies on getting potato texture right, see How to Bake a Potato in the Oven: 7 Steps to Perfect.
Conclusion
Great homemade fries come down to four things: the right potato, removing surface starch through soaking, drying completely, and frying twice at different temperatures. None of those steps is complicated, and none requires special equipment beyond a kitchen thermometer and a heavy pot.
Try the full method once with Russets and refined peanut oil, using the double-fry approach, and compare the result to anything you’ve made before. The difference is stark enough that you likely won’t go back to the shortcut version.