Batch Cook Grains & Legumes: A Complete Weekly Prep Guide

One cooking session, five or six meal components, and a fridge stocked with building blocks that turn weeknight dinners from a chore into assembly work. That’s the practical promise of batch cooking grains and legumes — and it’s more achievable than it sounds once you understand a few non-obvious details about how each ingredient behaves.
This guide covers which grains and legumes hold up best over a week, exactly how to cook large quantities efficiently (stovetop, pressure cooker, and oven methods), how to store each one so it doesn’t turn to mush or cardboard, and how to rotate them into genuinely different meals so you’re not eating the same bowl on repeat.
Why Grains and Legumes Are Ideal Batch-Cook Candidates
Not all foods reward bulk preparation. Leafy greens wilt, delicate proteins overcook on reheating, and fresh herbs lose their point. Grains and legumes are the opposite: they survive refrigeration well, reheat without significant quality loss, and absorb new flavors from whatever you pair them with.
Dried legumes in particular reward batch cooking more than almost any food. Cooking a cup of dried chickpeas takes about the same hands-on effort as cooking four cups — the only variable is pot size. The same logic applies to a large pot of brown rice or farro. The marginal cost of a bigger batch is nearly zero in time.
There’s also a nutrition argument worth making plainly: legumes are among the most protein- and fiber-dense whole foods available at low cost per serving. Cooked lentils deliver roughly 18 grams of protein and 16 grams of fiber per cup. That’s not a pitch — it’s just a useful number when you’re planning how much to make.

Choosing What to Cook: Matching Grain and Legume to Weekly Use
The single most common batch-cooking mistake is cooking what you think you should eat rather than what fits your actual eating patterns. Before you fire up a pot, map out two or three dishes you’ll realistically make.
Grains to consider
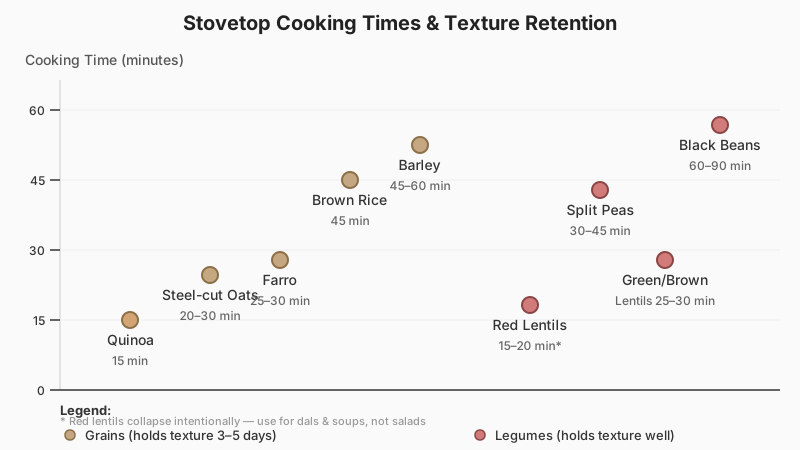
Brown rice is the most versatile grain in the fridge. It holds its texture for four to five days refrigerated, works in stir-fries, grain bowls, soups, and stuffed peppers, and takes well to both Asian and Mediterranean seasoning. The trade-off: it takes 45 minutes to cook in a covered pot, so front-load it at the start of your session.
Farro has a nutty chew that makes salads interesting even after three days in the fridge. Unlike rice, it doesn’t clump badly, so you can grab a handful cold and throw it directly into a pan. Cook it semi-pearled (the most common type sold) at a 1:3 grain-to-water ratio, simmering for 25–30 minutes.
Quinoa is the fastest grain here — 15 minutes, and it doubles as a complete protein source, containing all nine essential amino acids. It’s also the most fragile: overcooked quinoa turns bitter and mushy, so pull it off the heat the moment the water absorbs. Rinse it well before cooking or it tastes soapy.
Barley (pearl or hulled) is underused in weekly prep but excellent in soups and stews, where it thickens the liquid over time. It takes 45–60 minutes stovetop but can be cooked in a pressure cooker in under 20.
Oats (steel-cut) expand in the fridge as they absorb liquid overnight, so cook them slightly underdone. They reheat with a splash of water or milk and hold four to five days comfortably.
Legumes to consider
Chickpeas are arguably the most adaptable legume for batch cooking — they roast, mash into hummus, go into curries, and hold up in salads without disintegrating. Dried chickpeas need 8–12 hours of soaking followed by 1–1.5 hours of simmering, or about 40 minutes in a pressure cooker unsoaked.
Lentils are the exception to soaking rules: they require none. Green and brown lentils hold their shape after cooking and work well in soups, grain salads, and as a taco filling substitute. Red lentils cook in 15–20 minutes and completely collapse — intentional for dals and soups, not useful for salads. Keep the two types for different purposes.
Black beans are a workhorse for bowls, burritos, and soups. Soaked and simmered, they take 60–90 minutes; in an Instant Pot, dried black beans cook in about 25–30 minutes with natural pressure release.
White beans (cannellini or navy) are incredibly creamy when mashed and make a legitimate pasta sauce base or dip. They can fall apart if overcooked, so check them frequently in the last 20 minutes.
Split peas don’t need soaking and cook down into a thick, spoonable texture — more useful as a component in soups than as a standalone ingredient. They take 30–45 minutes on the stovetop.
If you’d rather skip the canned route entirely and cook legumes from their raw form, our guide How to Cook Dried Beans from Scratch (The Right Way) walks through soaking times and cooking ratios in detail.
Efficient Batch Cooking: Methods That Scale
The stovetop approach
For most grains, stovetop is perfectly fine and requires no special equipment. The key to efficiency is parallel cooking: get your longest-cooking item (brown rice, chickpeas) started first, then add farro or lentils to a second burner 20 minutes later. By the time your chickpeas finish, so does everything else.
Salt the cooking water for grains — unseasoned grains straight from a pot taste flat no matter what you add later. A teaspoon of salt per quart of water is a reasonable baseline. For legumes, the old advice to avoid salt during cooking (supposedly it toughens the skin) has been largely debunked by kitchen testing: salting at the start or middle of cooking doesn’t meaningfully toughen most beans, and it seasons them more evenly.

The pressure cooker / Instant Pot approach
If you’re cooking dried beans weekly, a pressure cooker pays for itself in time savings almost immediately. Chickpeas that take 90 minutes on the stovetop finish in 40–45 minutes under pressure (soaked) or about 50 minutes unsoaked. Black beans: 25–30 minutes unsoaked.
One underappreciated tip: cook legumes in just enough water to cover by two inches, and don’t fill the pot past halfway — legumes foam and expand significantly. Skip adding oil to the pot (it’s sometimes recommended to reduce foam, but it’s largely unnecessary and coats the beans).
Grains in the Instant Pot follow the manufacturer’s ratio recommendations, which differ from stovetop ratios. Brown rice, for instance, uses a 1:1 water-to-rice ratio under pressure versus 1:2 on the stovetop — a common source of mushy results when people use the wrong ratio.
Oven batch cooking (beans from canned)
If dried beans aren’t part of your routine, canned beans can still be batch-prepped usefully: drain, rinse, spread on a sheet pan with olive oil and seasoning, and roast at 200°C (400°F) for 25–30 minutes. The result is crispy chickpeas or black beans that store in an airtight container at room temperature for two to three days and add texture to any bowl. Fully crispy roasted chickpeas soften again in the fridge — store them at room temperature if you want the crunch.
Storage: How Long Each Component Lasts
Storage guidelines vary by ingredient and depend on your fridge temperature (aim for 4°C / 40°F or below).
- Cooked grains (rice, farro, quinoa, barley): 4–5 days refrigerated, up to 3 months frozen
- Cooked legumes (chickpeas, black beans, lentils): 4–5 days refrigerated, up to 3 months frozen
- Split peas / bean soups: 3–4 days refrigerated (they thicken considerably)
- Steel-cut oats: 5 days refrigerated
For freezing, spread cooked grains or beans in a single layer on a baking sheet first, freeze until solid (about 2 hours), then transfer to bags. This prevents them from freezing into one solid block. Portion into 1-cup amounts so you thaw only what you need.
Store grains and legumes separately. Combining them in the fridge causes the grain to absorb moisture from the beans and become mushy faster. Label containers with the date — it’s a small habit that prevents a lot of fridge archaeology.
Building Weekly Meals from Your Components
The most useful reframe is to think of cooked grains and legumes not as meals but as ingredients — closer to a block of cheese or a bag of pasta than to a finished dish. The cooking is done; the flavoring happens fresh at mealtimes.
A practical weekly rotation might look like:
Monday — Grain bowl: brown rice base, roasted vegetables, chickpeas, tahini dressing. Assembly time: 10 minutes.
Tuesday — Lentil soup: sauté aromatics, add cooked lentils plus stock, simmer 10 minutes, finish with lemon and cumin. Done in 15 minutes because the lentils are pre-cooked.
Wednesday — Farro salad: cold farro, cucumber, tomato, white beans, olive oil, red wine vinegar. No heat required.
Thursday — Stir-fry: brown rice heated in a hot wok, black beans added at the end, fried egg on top.
Friday — Dal-style: red lentils (if made) reheated with coconut milk and curry paste, served over any leftover grain.
The point isn’t to follow this schedule exactly — it’s to see that the same five components produce five structurally different meals with almost no repeated cooking.

To round out these grain and legume components into complete meals, pair them with a batch of proteins prepared using the same weekly-prep logic in Batch Cook & Freeze Proteins: A Weekly Meal Prep Guide.
Seasoning Strategy: Keep Components Neutral, Flavor at the End
A mistake worth naming explicitly: over-seasoning batch components. If you cook your chickpeas with a heavy Mediterranean spice blend, you’ve committed them to Mediterranean dishes for the week. Plain, lightly salted chickpeas go anywhere — into an Indian curry, a Mexican bowl, or a simple olive oil and herb situation.
The exception is aromatic base flavors that are genuinely universal: a bay leaf in the cooking water, a strip of kombu (which also aids digestibility), or a smashed garlic clove. These add subtle depth without narrowing your options.
For grains, toasting them dry in the pot for 2–3 minutes before adding water brings out a nuttiness that holds through storage — a small step with disproportionate payoff, especially for quinoa and farro.
Frequently Asked Questions
Do I need to soak beans before batch cooking?
Soaking reduces cooking time and may reduce some of the oligosaccharides that cause digestive discomfort in some people, though the evidence on digestibility benefits varies. For stovetop cooking, soaking overnight cuts time by 30–50%. In a pressure cooker, unsoaked beans are practical — the time savings from soaking are smaller and less critical.
Can I freeze cooked rice safely?
Yes. Cooked rice freezes well for up to three months. The key food safety point: cool rice quickly after cooking (within an hour) before refrigerating or freezing. Rice left at room temperature for extended periods can host Bacillus cereus spores, which are heat-resistant and can cause illness. Reheat frozen rice thoroughly until steaming throughout.
How much should I cook for one person per week?
A rough starting point: 1.5–2 cups of dried beans (yields roughly 4–5 cups cooked) and 1–1.5 cups of dry grains (yields 3–4 cups cooked) covers five to six moderate servings each. Adjust based on how central these components are in your meals versus other proteins.
Why does my cooked quinoa taste bitter even after rinsing?
Quinoa’s bitter compound, saponin, sits in the outer coating. Most commercial quinoa is pre-rinsed, but additional rinsing in a fine-mesh strainer for 30–60 seconds removes remaining saponin reliably. If you’ve rinsed and it’s still bitter, you may be using a variety with higher natural saponin content — try a different brand.
Can I mix grains and legumes into a single batch container?
For short-term use (same day or next day), yes. For a full week’s storage, keep them separate. Legumes release moisture that the grain absorbs, softening both and shortening shelf life. The small extra effort of separate containers is worth it.
Sources
- https://www.hsph.harvard.edu/nutritionsource/food-features/lentils/
- https://www.fda.gov/food/buy-store-serve-safe-food/safe-food-handling
- https://www.seriouseats.com/should-you-salt-your-bean-cooking-water
- https://www.ncbi.nlm.nih.gov/pmc/articles/PMC4325021/
- https://www.foodsafety.gov/food-safety-charts/cold-food-storage-charts