How to Keep a Car Interior Clean: Stop Messes Before They Start

A dirty car interior creeps up on you. One forgotten coffee cup, a handful of receipts stuffed in the door pocket, a dog that shakes off after a rainy walk — and suddenly your dashboard is grimy, your seats smell vaguely wrong, and you can’t find your sunglasses under the clutter. The good news: keeping a car interior clean doesn’t require a detailing shop or a half-day on the weekends. It requires a few consistent habits and the right tools for the job.
This guide breaks down exactly what works — from daily micro-habits to a proper deep clean — so your car stays presentable without becoming another chore you dread.
1. Start With the Right Supplies
Before any cleaning strategy works, you need the right kit. A handful of well-chosen tools beats a cabinet full of products you’ll never use.
What to keep in the car:
- A compact trash bag or small bin (fits in a door pocket or behind a seat)
- A pack of microfiber cloths (they lift dust without scratching surfaces)
- A small detailing brush or old toothbrush for vents and seams
- A portable handheld vacuum or a car adapter for a full-size vacuum
What to keep at home for periodic cleans:
- An interior cleaner spray safe for plastic, vinyl, and rubber
- Upholstery cleaner or foam cleaner for fabric seats
- Leather conditioner if your seats are leather
- A vacuum with a crevice tool and brush attachment
- Glass cleaner (interior windshield glass attracts an oily film from off-gassing plastics)
Quality matters more than quantity here. A good microfiber cloth and one solid all-purpose interior cleaner will outperform a shelf of specialty products you use inconsistently.

While you’re stocking up on interior supplies, it’s worth pairing them with How to Wash a Car Without Scratching the Paint so the outside stays just as pristine.
2. Build Habits That Stop Mess Before It Starts
The single most effective cleaning strategy is prevention. Small, automatic behaviors eliminate 80% of the mess before it accumulates.
Never Leave the Car Without One Thing
Make it a rule: every time you get out, take at least one piece of trash with you. Receipts, water bottles, snack wrappers — one item per exit adds up fast. After a week, the floor stays clear almost automatically.
Use a Dedicated Trash Receptacle
A small silicone or fabric trash bin wedged behind the center console or hanging from a headrest removes the excuse to leave wrappers on the seat. Empty it whenever you fill up with gas — that natural moment of stopping is a perfect trigger.
Eat and Drink Mindfully (or Not at All)
This one’s obvious but worth stating: food and drink are the leading cause of odors, stains, and crumbs in car interiors. If you limit eating to parked situations where you can be careful, you cut spill risk dramatically. If you must eat on the go, sealed containers and closed travel mugs over open cups make a real difference.
Set a “Clean Sweep” Ritual
Once a week — Sunday evenings work well for most people — take two minutes to remove everything that doesn’t belong in the car. No vacuuming, no wiping, just a clear-out. You’ll be surprised how much this resets the feeling of the interior.
3. Master the Weekly Wipe-Down
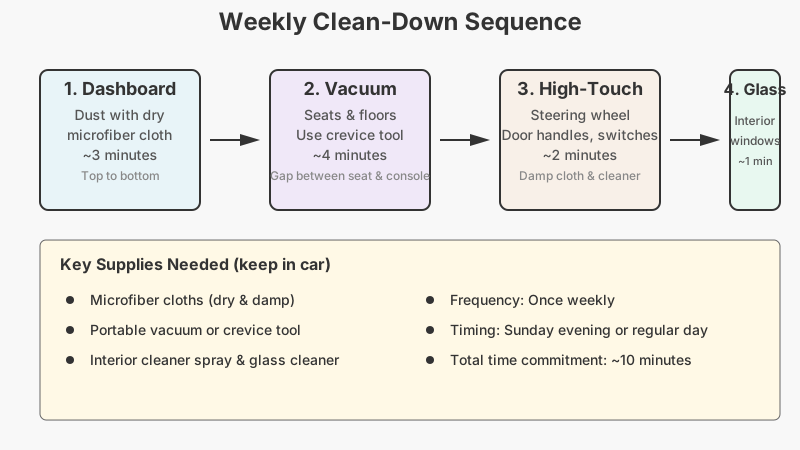
A quick 10-minute routine once a week prevents buildup and means your monthly deep clean is far less work.
Dust the Dashboard and Console First
Dust settles on horizontal surfaces constantly. A dry microfiber cloth across the dash, center console, and door panels takes about three minutes and keeps that dull, dusty film from baking onto surfaces under heat. Work from top to bottom so fallen dust lands somewhere you’ll vacuum next.
Vacuum Seats and Floors
Use a vacuum with a crevice tool to hit the gaps between the seat and the center console — that slot swallows coins, crumbs, and small objects. Go over the floor mats with a brush attachment. If you have removable rubber mats, pull them out and shake them before vacuuming.
Wipe Down High-Touch Areas
The steering wheel, gear shifter, door handles (inside), and window switches collect skin oils, grime, and, frankly, bacteria. A damp microfiber cloth with a drop of interior cleaner or even a mild soap wipes them clean in seconds. These surfaces show wear and odor more than any other part of the cabin.
Tackle the Windows
Interior glass gets hazy from the outgassing of plastics and vinyl — it’s that faint oily film you notice on a sunny morning. A dedicated glass cleaner and a clean microfiber cloth (used only for glass) keep visibility sharp and the cabin looking fresh. Wipe in a circular motion first, then straight strokes to eliminate streaks.

4. Do a Proper Deep Clean Every One to Three Months
Weekly maintenance keeps things tidy, but a real deep clean — one that gets into seams, under seats, and into the carpet pile — should happen roughly every one to three months depending on how hard you use the car.
Seats: Fabric vs. Leather
Fabric seats trap odors and stains more than any other surface. Use a foam upholstery cleaner: spray it on, work it in with a brush in circular motions, then blot (don’t rub) with a clean cloth. For stubborn stains, let the foam dwell for a few minutes before blotting. A portable steam cleaner is excellent here — heat kills bacteria and loosens grime without soaking the seat padding.
Leather seats need a two-step approach: clean with a pH-balanced leather cleaner, then condition with a leather conditioner. Skipping the conditioning step leaves leather dry and prone to cracking, especially in hot climates where UV and heat cycle constantly.
Carpets and Floor Mats
Remove all floor mats and vacuum the carpet underneath — debris always migrates under the mats. For rubber mats, a hose and brush outside cleans them in minutes. For fabric mats, use the same upholstery cleaner approach as fabric seats.
If the carpet has a persistent odor, baking soda is genuinely effective: sprinkle it liberally, let it sit for 15–30 minutes, then vacuum thoroughly. It absorbs rather than masks odors.
Air Vents and Tight Spaces
Vents accumulate dust fast and can harbor mold if the AC system isn’t dried out occasionally. A detailing brush (or a foam craft brush) works well here — it’s narrow enough to get between the slats and soft enough not to scratch. Follow up with a quick blast of compressed air if you have a can available. For the seams around the center console and door cards, the same brush technique applies.
Headliner Care
The headliner (the fabric ceiling of your car) is often forgotten and is surprisingly delicate. Don’t scrub it — the adhesive underneath can separate. Use a foam cleaner sprayed onto a cloth first, then press and gently dab at stains. Let it air dry completely.
5. Manage Odors at the Source
Air fresheners mask smells; they don’t fix them. If your car smells, the cause needs to be identified and removed first.
Common culprits:
- Spilled liquid soaked into carpet or seat padding (even a small amount ferments quickly in heat)
- Wet dog smell embedded in fabric
- Old food particles in the HVAC system or behind the seats
- A cabin air filter that’s overdue for replacement
Replace the cabin air filter regularly. Most manufacturers recommend every 15,000–25,000 miles or about once a year, but if you drive in dusty or polluted conditions, sooner is better. A clogged or moldy cabin filter blows stale, musty air into the interior every time the fan runs. It’s typically a 10-minute DIY replacement and costs between $15–$40 depending on the vehicle.
For lingering organic odors (pet, food, mildew), an ozone generator can be highly effective — but it must be used correctly (car empty and sealed, then aired out fully before use). Many detailing shops offer this as a service if you don’t want to buy the equipment.
For ongoing freshness, activated charcoal bags placed under the seats are a low-effort, fragrance-free option that genuinely absorbs odors without adding synthetic scent.
If musty smells keep creeping back despite your best efforts, How to Get Rid of a Musty Smell in a Car: Fixing It Costs Under $20 walks through a cheap fix that gets to the root of the problem.
6. Protect Surfaces to Make Cleaning Easier Next Time
A little protection after each deep clean pays dividends for months.
Dashboard and Trim
A UV protectant spray applied to plastic and vinyl surfaces after cleaning reduces fading and cracking from sun exposure. It also leaves a slight sheen that makes dust harder to stick and easier to wipe off next time. Avoid products that leave a greasy or overly glossy finish — they reflect glare onto the windshield.
Fabric Seat Protector
A fabric protector spray (similar to the principle behind stain-resistant upholstery treatments) creates a hydrophobic barrier on cloth seats. Liquid spills bead up rather than soaking in immediately, giving you time to blot the mess before it sets. Reapply after each deep clean.
Seat Covers and Cargo Liners
If you have kids, pets, or a job that regularly puts dirty gear in the car, fitted seat covers and a cargo area liner are pragmatic investments. They’re washable, replaceable, and far cheaper than reupholstering or deep-cleaning damaged fabric.

Putting It All Together
Keeping a car interior clean isn’t about perfectionism — it’s about building a rhythm that works with how you actually use the car. A small trash bin, a weekly wipe-down, and a thorough clean every couple of months will keep even a heavily used car in genuinely good condition.
The habits matter more than the products. Start with the one-item-per-exit rule and a weekly two-minute clear-out, and you’ll notice the car holds its baseline cleanliness almost automatically. Add in a proper deep clean a few times a year, protect what you’ve cleaned, and you’ll likely find you don’t need to think about it much at all.
A clean interior also protects resale value — interior condition is one of the top factors buyers assess when purchasing a used vehicle, and a well-maintained cabin signals overall care for the car. That alone makes the habit worth building.