How to Blanch Vegetables Properly: Stop Overcooking Before Freezing

What Blanching Actually Does — and Why It Matters
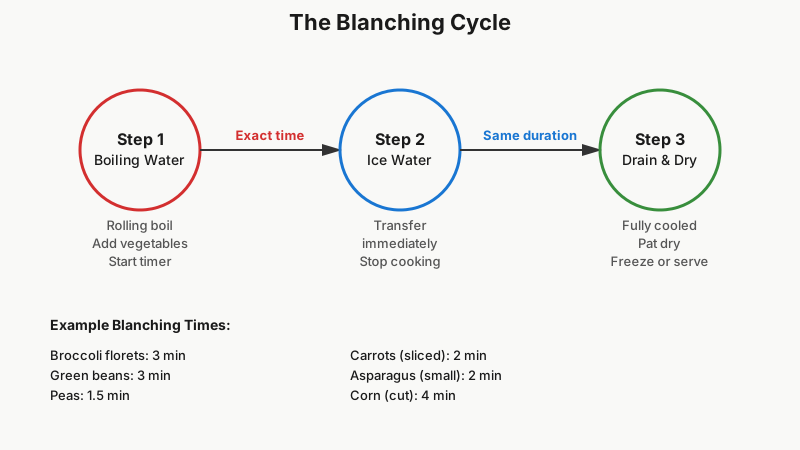
Blanching is a two-step thermal process: you briefly submerge vegetables in furiously boiling water, then stop the cooking instantly by plunging them into ice water. That might sound simple, but the chemistry underneath explains why skipping it — or doing it half-heartedly — produces inferior results.
The heat deactivates enzymes (particularly peroxidase and catalase) that keep breaking down color pigments, flavor compounds, and nutrients even after harvest. Those enzymes are why raw green beans slowly turn drab and why frozen corn eventually tastes stale. A properly timed blanch stops that enzymatic clock without cooking the vegetable through, locking in color, texture, and flavor before freezing, canning, or serving.
Blanching also has a sterilization effect. The boiling water kills surface microorganisms and drives out air trapped in plant cells, which reduces oxidation in frozen produce and improves shelf life. And on the plate, it sets the bright green chlorophyll in broccoli and asparagus, turning a muddy heap of raw greens into the vivid side dish that makes vegetables worth eating.
Equipment You Actually Need
You do not need specialized gear, but a few things matter:
- A large pot — at least 6–8 quarts for most batches. The water volume needs to return to a boil quickly after you add cold vegetables. A small pot prolongs that lag time and leads to uneven, mushy results.
- A blanching basket or spider strainer — something that lets you lower and lift vegetables without pouring out your hot water. A colander placed inside the pot works in a pinch, but a wire basket or fine-mesh spider is faster.
- A large bowl of ice water — fill it generously. You want enough ice that the water stays genuinely cold through the entire cooling process. Skimping on ice is one of the most common mistakes; lukewarm “ice” water doesn’t stop cooking.
- A kitchen timer — blanching times are measured in minutes and sometimes seconds. Eyeballing it leads to overcooking.
- Salted water (optional but recommended) — a tablespoon of salt per gallon of water seasons the vegetables lightly and slightly raises the boiling point.

Step-by-Step: The Right Technique
Prepare Your Vegetables First
Wash everything thoroughly. Trim, peel, or cut vegetables to their intended size before blanching. Pieces of uniform size blanch evenly — if you toss in a mix of thick carrot coins and thin slices, some will be overdone before others are ready.
For vegetables going into the freezer, cut them the way you plan to use them later. You will not want to wrestle with a frozen whole zucchini when a recipe calls for half-inch rounds.
Bring the Water to a Rolling Boil
Fill the pot with enough water so the vegetables will be fully submerged with room to circulate — roughly one gallon per pound of produce. Get it to a full, rolling boil before adding anything. A simmer is not sufficient; the rapid convection of a hard boil matters.
Add salt if you like, then lower your vegetables into the water using the basket or strainer.
Time It Precisely
Start your timer the moment the vegetables enter the water — not when the water returns to a boil. Some guides instruct you to start timing once the boil resumes, but this varies by how much your pot recovers. The simplest method is consistent: start the clock immediately on entry and pull the vegetables when the time is up, regardless of what the water is doing.
Here are reliable blanching times for common vegetables:
| Vegetable | Water Blanch Time |
|---|---|
| Asparagus (small spears) | 2 minutes |
| Asparagus (large spears) | 4 minutes |
| Broccoli florets | 3 minutes |
| Carrots (sliced, ¼ inch) | 2 minutes |
| Carrots (whole, small) | 5 minutes |
| Corn (on the cob) | 7–11 minutes |
| Corn (cut from cob) | 4 minutes |
| Green beans | 3 minutes |
| Leafy greens (spinach, chard) | 2 minutes |
| Peas (shelled) | 1.5 minutes |
| Zucchini (sliced) | 3 minutes |
| Cauliflower florets | 3 minutes |
These times are calibrated for vegetables destined for the freezer. If you are blanching for a salad or a crudité platter, trim a minute off and taste as you go.
Shock in Ice Water Immediately
The moment your timer sounds, transfer the vegetables directly into the ice bath. Speed matters — the difference between a vibrant, crisp green bean and a dull, limp one can be a matter of seconds.
Leave them in the ice water for the same amount of time you blanched them. A three-minute blanch gets a three-minute ice bath. This rule-of-thumb ensures the center of each piece has fully cooled, not just the surface.

Drain and Dry Thoroughly
After chilling, drain the vegetables and spread them on a clean kitchen towel or paper towels. Pat them dry. Excess moisture on frozen vegetables causes ice crystals to form on the surface, leads to freezer burn, and makes the bag contents clump together into one solid mass.
For freezing, arrange dried pieces in a single layer on a sheet pan and freeze for 1–2 hours before transferring to freezer bags. This flash-freeze step keeps individual pieces separate.
Common Blanching Mistakes
Not using enough water. When cold vegetables hit a small volume of hot water, the temperature drops too far, too long. The vegetables start to braise instead of blanch.
Blanching in batches that are too large. Even with plenty of water, cramming vegetables in causes them to steam on top of each other rather than circulate freely. Work in small batches, keeping the ratio manageable.
Skipping the ice bath. Some people drain and rinse under cold tap water. Tap water, especially in summer, is nowhere near cold enough to stop carryover cooking. This is where that extra bag of ice earns its keep.
Guessing the time. A minute too long and green beans are mushy. A minute too short and the enzymes are still active. Set the timer every single time.
Blanching vegetables with very different densities together. Peas and carrots do not blanch for the same time. Do them in separate batches.
Steam Blanching: The Alternative Method
Water blanching is standard, but steam blanching is worth knowing. You use a steamer basket above boiling water rather than submerging the vegetables. It takes about 1.5 times as long as water blanching — so a three-minute water blanch becomes roughly four-and-a-half minutes of steam — but it preserves more water-soluble nutrients like vitamin C and B vitamins that leach into boiling water.
Steam blanching is particularly good for leafy greens (which absorb water and go limp), small peas, and any vegetable you find tends to get waterlogged. The ice bath step remains exactly the same.

Blanching for Different End Goals
For Freezing
This is the primary reason most cooks blanch. Blanching before freezing is not optional if you want quality results after more than a few weeks. The USDA National Center for Home Food Preservation states clearly that unblanched frozen vegetables develop off-flavors and off-colors within a matter of weeks, even at 0°F. Blanched and properly stored vegetables maintain quality for 8–12 months depending on the type.
Once your blanched vegetables are frozen, check out How to Cook Frozen Vegetables Without Sogginess to make sure they thaw and cook up crisp instead of mushy.
For Salads and Crudités
A 60–90 second blanch transforms raw broccoli or green beans from something crunchy and slightly harsh into a vivid, pleasantly tender vegetable that still has structure. The shock makes the color pop visually on a platter. Rinse under cold water here (not ice bath duration, just a quick chill), since you’re eating them soon and exact texture preservation matters less than speed.
If you’re prepping ahead for a salad platter, How to Store Cut Vegetables and Keep Them Fresh explains how to keep those vegetables crisp until serving time.
For Peeling
Blanching for 30–60 seconds loosens the skins of tomatoes, peaches, and almonds. Score an X on the bottom of the tomato before it goes in, and the skin peels off in one smooth motion after the shock. No need for a lengthy ice bath — 15 seconds of cold water is enough here.
Before Sautéing or Stir-Frying
Restaurant cooks often par-blanch dense vegetables like broccolini or snap peas before a stir-fry because the wok time is very short. Blanching partway through means the vegetable finishes cooking in the pan without burning the exterior while waiting for the center to catch up.
A Few Vegetables That Don’t Need Blanching
Not every vegetable benefits from the process. Onions, leeks, and garlic go straight into the freezer without blanching and hold their flavor fine. Herbs are better frozen flat in oil or water in ice cube trays. Potatoes need special handling — their high starch content causes problems with standard blanching — and are better cooked through or shredded before freezing.
Some produce just does not freeze well regardless of blanching: cucumbers, celery, lettuce, and other high-water-content raw salad vegetables turn to mush upon thawing and are best preserved by other means (pickling, fermenting, drying).
Conclusion
Blanching is one of those foundational kitchen skills that feels fiddly the first time and becomes muscle memory fast. The principle is not complicated: brief heat, then rapid cold. What makes the difference between soggy, gray vegetables and bright, flavorful ones is attention to the details — enough water, correct timing, a genuine ice bath, and thorough drying before freezing.
Once you dial in the technique, you can work through a summer haul of garden produce in an afternoon and pull vibrant, freezer-ready vegetables out months later that taste genuinely good. That payoff makes the setup worth it.