How to Wash a Car Without Scratching the Paint

Washing your own car sounds straightforward until you notice fine swirl marks appearing in the clear coat after a few sessions. Those marks aren’t random — they’re almost always caused by the washing process itself. The good news is that the right technique, not expensive products, is what separates a clean car from a scratched one.
Why Washing Causes Scratches in the First Place
Paint scratches during washing happen because grit and dust get dragged across the surface under pressure. Even a soft sponge can act like sandpaper if it’s trapping particles against the paint. The most common culprits are:
- Single-bucket washing — rinsing your mitt in the same water you’re washing with puts the dirt straight back onto the car.
- Circular scrubbing — circular motions concentrate pressure and create the classic swirl-mark pattern visible under direct sunlight.
- Wrong materials — synthetic sponges, old T-shirts, and bath towels all have textures that drag rather than glide.
- Washing in direct sunlight — water and soap dry faster than you can rinse, leaving residue and forcing you to scrub harder.
- Skipping the pre-rinse — going straight to contact washing before rinsing loose dirt off first.
Understanding these causes makes the method below feel logical rather than arbitrary.

What You’ll Need Before You Start
You don’t need a garage full of detailing products. A focused kit is more effective than a cluttered one.
Wash Media
- Two buckets — one for clean soapy water, one as a rinse bucket with a grit guard insert at the bottom. The grit guard allows dirt to fall below it so you’re not re-loading it onto your mitt.
- Microfiber wash mitt — not a sponge. Microfiber’s deep pile traps particles away from the paint face. Wash it after every session.
- Dedicated car shampoo — pH-neutral formulas won’t strip existing wax or sealant. Dish soap strips both and has no place on a car’s paint.
Drying Media
- Large microfiber drying towel — the bigger the better; 70 x 90 cm or larger means fewer passes. Twisted-loop or waffle-weave patterns are both fine.
- Spray detailer or quick detailer spray — a light mist before drying lubricates the surface so the towel glides rather than drags.
Optional but Useful
- Foam cannon or foam gun (for a garden hose) — pre-soaks the car in thick shampoo foam before contact, dissolving more grit before you touch the paint.
- Hose or pressure washer — a pressure washer on a wide-angle setting (40° tip, not a zero-degree lance) is ideal for the pre-rinse. Keep it at least 30 cm from the surface.
- Detailing brushes — soft-bristle brushes for wheels, vents, and badges where the mitt can’t reach.
While you’re doing routine maintenance, it’s also worth reviewing How to Check Tire Pressure Correctly: Why Low PSI Hides In Plain Sight since properly inflated tires make washing and inspecting your wheels much easier.
The Two-Bucket Method: Step by Step
This is the standard technique used by professional detailers and enthusiastic owners alike. The steps are sequential — shortcutting any of them erases the benefit of the others.
Step 1: Park in Shade and Let the Body Cool
A hot bonnet dries water instantly, forcing you to scrub beading soap. Cool metal means you can work at a relaxed pace. If shade isn’t available, early morning before the sun climbs works well.
Step 2: Rinse the Entire Car First
Use a hose or pressure washer (wide fan setting) to knock loose dirt, bird droppings, and pollen off the surface before any mitt touches it. Start at the roof and work downward so you’re not pushing dislodged grit back onto areas you’ve already rinsed. Spray the wheel arches and sills — they hold the most contamination.
Step 3: Fill Your Buckets
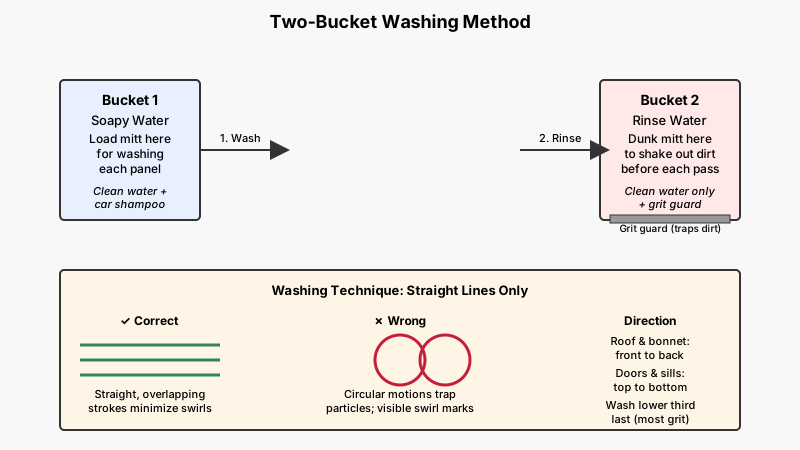
- Bucket 1: Clean water plus the car shampoo measured to the bottle’s recommendation (usually 30–60 ml per 10 litres). Let the hose fill it with pressure so it foams up.
- Bucket 2: Clean water only, with grit guard placed at the bottom.
Step 4: Wash Top to Bottom in Straight Lines
Load your mitt in Bucket 1. Wash in straight, overlapping strokes — front to back on horizontal panels, top to bottom on vertical ones. Never scrub in circles. Work one panel at a time (roof, then bonnet, then each door, then lower sills last). The lower third of a car collects the most road grit, so save it for last.
After each panel, dunk the mitt into Bucket 2 (the rinse bucket) and agitate it so grit falls through the guard. Then reload from Bucket 1. This is the core logic of the two-bucket system.
Step 5: Rinse Each Section as You Go
Don’t let shampoo dry on the paint. On a warm day, rinse each panel immediately after washing it rather than waiting until the whole car is done.
Step 6: Final Full Rinse
Rinse the entire car one more time, working top to bottom. For the final pass, a low-pressure sheet rinse (remove the nozzle and let water sheet off) reduces water spots because the water runs off in sheets rather than beading into droplets that dry individually.

Step 7: Dry Immediately
Leaving a wet car to air-dry is one of the main causes of water spots, especially in hard-water areas. Mist a quick detailer over a panel, then lay your microfiber drying towel flat against the surface and drag it with light pressure — don’t press down hard. Work panel by panel. Fold the towel frequently to expose a clean, dry face. Never drag a towel that’s already soaked; swap to a second dry towel if needed.
Wheels, Glass, and Trim: Separate Tools for Each
Using the same mitt for your wheels as your bodywork is a shortcut that guarantees contamination. Brake dust and road tar are highly abrasive.
- Wheels: Use a dedicated wheel brush and a separate wheel bucket. Most alloys respond well to a pH-neutral wheel cleaner left to dwell for 60 seconds before agitation. If you have painted or polished wheels, avoid acidic cleaners entirely.
- Glass: A separate microfiber cloth for windows prevents any shampoo residue or wax from smearing onto glass. A streak-free glass cleaner applied afterward gives a clearer finish.
- Rubber and plastic trim: Shampoo is fine for trim during the wash, but follow up with a trim dressing if the plastic looks faded — it protects against UV graying.
Common Mistakes That Still Cause Scratches
Even with the right kit, a few habits undermine the process.
Washing with a dirty mitt. If you drop your mitt on the ground, don’t pick it up and keep going. Grit embedded in one side of a microfiber will scratch the full length of whatever panel you drag it across.
Over-drying with the same spot of towel. A drying towel that’s saturated isn’t drying anything — it’s spreading water and dragging. Fold it constantly.
Ignoring bird droppings between washes. Fresh bird droppings are acidic and begin etching clear coat within hours in hot weather. Carrying a small bottle of quick detailer and a dedicated cloth in the car lets you lift them immediately without scratching — mist, wait 30 seconds, then blot gently, never wipe dry.
Using the touchless car wash as a substitute for proper washing. Automated tunnel washes — even touchless ones — use high-alkalinity chemicals that strip wax and often leave residue. They’re fine for emergencies, but they’re not a substitute for hand washing.
Skipping a decontamination step when the paint feels rough. If the paint surface feels like sandpaper under a plastic bag rubbed gently over it (the “clay bar test”), embedded iron particles and tar are present. A clay bar or iron fallout remover removes this contamination before it gets ground in further during the next wash. This is worth doing a few times a year.

How Often Should You Wash Your Car?
There’s no single right answer, but as a general guide:
- Every two weeks is a sensible baseline for a daily driver in a suburban setting.
- Weekly if you park under trees (sap and bird droppings accumulate fast), drive in coastal areas (salt air), or live somewhere with road salt during winter.
- After every off-road trip or muddy drive — leaving mud to dry and harden makes it more abrasive when you eventually wash it.
Washing more frequently with good technique is far less damaging than washing infrequently with poor technique.
Protecting Your Paint After Washing
A good wash is the foundation, but protection extends the time between washes and makes each wash easier.
- Carnauba wax: Applied by hand and buffed off, it gives a warm, deep gloss and lasts roughly six to eight weeks. It’s the traditional choice and still valid.
- Synthetic sealant: Polymer-based, easier to apply, and typically lasts three to six months. Less depth of gloss than carnauba but more durable.
- Ceramic coating: A semi-permanent layer that bonds chemically with the clear coat, lasting one to several years depending on the product tier. It requires careful surface preparation and is harder to apply correctly, but the hydrophobic (water-beading) effect dramatically reduces the effort needed at each wash.
- Paint protection film (PPF): A physical film applied to high-impact areas (bonnet, bumpers) that absorbs stone chips and road debris. This is a professional installation, not a DIY task.
Whichever protection you use, re-apply it according to the product’s recommended schedule. A car with a fresh layer of sealant washes much more easily and is more forgiving of minor technique lapses.
Once the exterior is spotless, keep the momentum going with How to Keep a Car Interior Clean: Stop Messes Before They Start so the inside of your car matches the effort you just put into the outside.
Conclusion
Washing a car without scratching the paint comes down to one principle: minimize friction between dirt and paint. Pre-rinse thoroughly, use the two-bucket method, work top to bottom in straight lines, dry with a lubricated microfiber, and keep wheels, glass, and bodywork on separate tools. None of this requires expensive equipment — a couple of good-quality microfiber products and a dedicated pH-neutral shampoo cover the essentials. Get the process right, and the car you’re washing will stay looking better for longer with less corrective polishing required.