Stop Window Drafts Before Winter Costs You More

Drafts around windows are one of the most common — and most fixable — comfort problems in a home. Even a gap the width of a coin can let cold air pour in steadily, forcing your heating system to work harder while you pile on extra layers. The good news is that most window draft fixes require nothing more than a trip to the hardware store and a free afternoon.
This guide covers why drafts form, how to find them, and which fixes work best depending on the gap type, window style, and your budget.

Why Windows Let Cold Air In
Windows create drafts through several distinct failure points, and the right fix depends on knowing which one you’re dealing with:
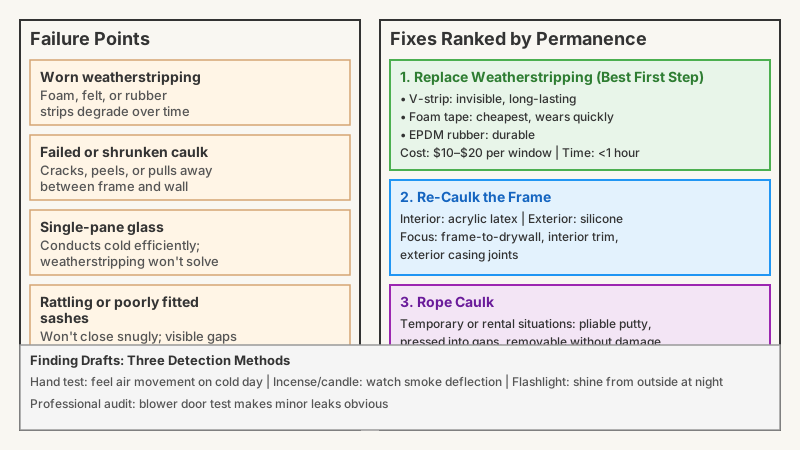
Worn weatherstripping. The foam, felt, or rubber strips that compress when the window closes degrade over time, leaving gaps. This is the single most common cause of drafts in older windows, and it’s also the cheapest to fix.
Failed or shrunken caulk. The caulk sealing the gap between the window frame and the surrounding wall eventually cracks, peels, or pulls away — especially on homes with wood framing that swells and shrinks seasonally.
Single-pane glass. Cold air doesn’t just sneak through gaps; single-pane glass itself conducts cold so efficiently that air near the surface chills, drops, and flows across the floor as a perceived draft. No amount of weatherstripping fully solves this.
Rattling or poorly fitted sashes. Double-hung windows with worn hardware or out-of-square frames may not close snugly enough, leaving visible gaps even when latched.
Missing or damaged interior trim. The casing around a window sometimes separates from the drywall, opening a direct channel to the wall cavity — which connects to cold outdoor air.
Finding the Drafts Before You Fix Them
Before buying anything, spend 10 minutes tracking down where the cold is actually entering. Three reliable methods:
Hand test. On a cold, windy day, move your palm slowly around the window perimeter — sash edges, corners, and where trim meets drywall. You’ll feel air movement even through a surprisingly small gap.
Incense or a thin candle. Hold it near the window joints. Smoke or flame deflection shows leakage clearly. Keep it away from curtains and operate it safely near flammable materials.
Flashlight from outside at night. Have someone shine a bright flashlight around the outside of the window frame while you watch from inside in a darkened room. Light peeking through reveals gaps in the caulk line or frame joint.
For a more thorough audit, the US EPA notes that a professional energy audit using a blower door test can depressurize the house and make even minor leaks immediately obvious. That’s worth doing if you have persistent drafts you can’t isolate by eye.

Fixes Ranked by Permanence
1. Replace Weatherstripping (Best First Step)
Weatherstripping is almost always the right place to start. Remove the old material — peel it, unscrew it, or scrape it depending on type — clean the channel, and press or nail new material in place. The type of replacement to buy depends on the window:
- V-strip (tension seal): A folded piece of plastic or metal that springs open to fill the gap between the sash and frame. Long-lasting and nearly invisible. Works well on sliding and double-hung windows.
- Foam tape: The cheapest option. It compresses easily but also wears out faster — often within a couple of seasons. Use closed-cell foam tape rather than open-cell, which absorbs moisture.
- Door and window seals (EPDM rubber): More durable than foam, good for casement windows and doors where the compression load is consistent.
- Pile weatherstripping (brush seal): Best on sliding windows, where rubbing contact would wear down foam quickly.
For a standard double-hung window, the whole job takes under an hour and the materials rarely cost more than $10–$20 per window.
2. Re-Caulk the Frame
Scrape out old caulk completely — new caulk won’t bond over old. A plastic scraper or oscillating tool works well. Clean the surface with isopropyl alcohol and let it dry before applying new caulk.
For interior use, paintable acrylic latex caulk is easy to work with and cleans up with water. For exterior applications exposed to UV light and rain, silicone or siliconized acrylic holds up better and remains flexible through more temperature cycles. Apply in one continuous bead, smooth with a wet finger or a caulk tool, and let it cure fully before painting.
Pay particular attention to:
- Where the window frame meets the interior drywall or plaster
- Interior trim joints at corners
- Any gap where the exterior casing meets siding
3. Rope Caulk for Temporary or Rental Situations
Rope caulk — a soft, pliable putty that comes on a roll — can be pressed into gaps without any tools and peels off cleanly in spring. It won’t bond permanently, which makes it perfect for renters or for windows you want to restore ventilation to in warmer months. One roll ($3–$6) typically covers two to three windows.
4. Interior Window Insulation Kits
For windows where air sealing alone isn’t enough — particularly single-pane windows — a shrink-film insulation kit creates a still-air buffer between the glass and the room. You apply double-sided tape around the frame, press a clear plastic film to it, and heat the film with a hair dryer until it shrinks taut and nearly invisible.
These kits can noticeably reduce the cold-wall effect of single-pane glass and eliminate air leaks at the same time. They’re not permanent and won’t survive being opened, but for windows you don’t use in winter, they’re genuinely effective. Results vary depending on how carefully the tape seal is made.
5. Draft Snakes and Interior Blockers
Draft snakes — fabric tubes filled with insulation or sand — are a low-tech but effective stop-gap for the gap at the bottom of a window or where the lower sash meets the sill. They cost almost nothing to make from an old towel, and they add zero permanent value to the home. Use them only while you’re fixing the real problem, not instead of fixing it.
6. Cellular (Honeycomb) Blinds
If you’re replacing window coverings anyway, consider cellular shades, which trap air in their honeycomb structure and act as an insulating layer. They won’t stop infiltration from gaps, but they reduce radiant cold from the glass surface. Double-cell shades outperform single-cell ones. They’re not a substitute for sealing gaps, but they complement good weatherstripping well.
7. Secondary Glazing and Window Inserts
For windows with genuine thermal performance problems — old single-pane, or double-pane units with failed seals showing fogging — interior window inserts are a more permanent step up from film kits. These are rigid acrylic or glass panels that mount magnetically or with compression seals inside the existing frame, creating an air gap similar to a double-pane unit. Some suppliers offer custom-made inserts; the cost ranges considerably, so get measurements right before ordering.
Full window replacement is a major investment and doesn’t always pay back in energy savings alone within a reasonable timeline. Air sealing is nearly always more cost-effective for the average home with drafty but structurally sound windows.

Working from Outside vs. Inside
Some of these fixes are purely interior (rope caulk, film kits, weatherstripping on the sash) and others require exterior access (re-caulking the frame-to-siding joint). Don’t skip the exterior step. Gaps on the outside allow water as well as air to enter — and water damage inside a wall cavity can far outpace whatever you’d spend on a tube of exterior caulk.
If you’re working above the ground floor, prioritize safety: use a properly footed ladder and avoid working in icy or wet conditions.
While you’re tackling small household fixes yourself, How to Stop a Running Toilet: Fix It Fast & Save Water is another quick weekend project that stops waste and saves money.
How Much Difference Does It Actually Make?
Energy savings from air sealing depend heavily on how leaky the house was to begin with, local climate, and fuel costs — so any specific dollar figure you’ll read is more illustrative than reliable for your situation. Homes with older, poorly maintained windows in cold climates tend to see the largest comfort improvements. What air sealing consistently delivers, regardless of the payback calculation, is a measurable improvement in thermal comfort: fewer cold spots, fewer drafts across the floor, and less noise from outside.
The US EPA’s ENERGY STAR program and the Department of Energy both identify air sealing as among the most cost-effective weatherization steps for existing homes — often ahead of adding insulation, because insulation has no effect on infiltration.
Frequently Asked Questions
Can I just add new caulk over old caulk?
No — new caulk won’t bond properly to old, cracked material. Scrape the old caulk out completely, clean the surface, and apply fresh caulk for a seal that holds through temperature changes.
My windows rattle in the wind but seem sealed when I touch them. What’s causing it?
Rattling is usually a sash-fit problem: the sash doesn’t press firmly enough against the stop or weatherstripping to resist wind pressure. V-strip weatherstripping added to the channels, or adjusting/replacing the window hardware, usually solves it.
Is condensation on the inside of the glass a sign of a draft?
Not directly. Interior condensation means warm, moist indoor air is hitting cold glass and losing moisture — it indicates the glass is cold (a thermal performance issue) rather than that air is infiltrating. However, condensation between two panes of glass means the sealed unit has failed and should be replaced.
How often should weatherstripping be replaced?
Foam tape may last only one to three seasons, especially on windows opened and closed frequently. V-strip and EPDM rubber can last ten years or more with proper installation. Inspect weatherstripping each fall by closing the window on a thin strip of paper — if it pulls out without resistance, the seal is inadequate.
Does plastic film insulation really work, or does it just look bad?
Properly installed shrink film can reduce cold-air intrusion and the cold-wall effect noticeably. The main drawbacks are that it eliminates ventilation through that window for the season and can look slightly hazy up close. The film from reputable kits shrinks reasonably clear when heated — the result is far less visible than you’d expect.
Putting It Together
Most draft problems in residential windows come down to three things: failed weatherstripping, cracked caulk, and single-pane glass conducting cold. The first two are straightforward weekend projects with cheap materials. The third takes a bit more investment — film kits, inserts, or eventual replacement — but even that doesn’t have to be done all at once. Start with weatherstripping and re-caulking, check the result after the first cold snap, and go further only where you still feel problems.
A well-sealed window doesn’t just save energy — it makes a room genuinely more comfortable to be in, which is the real reason to bother.
If drafty windows have you thinking about the bigger picture, How to Make Your Home More Energy Efficient: Seal, Insulate, Save walks through other sealing and insulating projects that pay off all winter.