Homemade Vegetable Broth from Kitchen Scraps: Save Scraps, Skip Waste

Most vegetable scraps go straight from cutting board to compost bin — or worse, the trash. But those onion peels, celery ends, carrot tops, and herb stems hold a surprising amount of flavor. Learning to turn kitchen scraps into a rich, savory broth costs almost nothing, cuts food waste, and gives you a versatile cooking base that store-bought cartons can’t quite match.
This guide covers which scraps work (and which to skip), how to store them, and the exact method for coaxing out maximum flavor.
Why Bother Making Broth from Scraps?
Commercial vegetable broth is perfectly fine, but it usually contains a lot of sodium and a fairly narrow flavor profile — mostly carrot, celery, and onion. When you make your own, you control what goes in, which means you can lean savory, herby, or earthy depending on what you’ve accumulated.
There are practical reasons too:
- Cost: Once you have a habit of saving scraps in the freezer, your broth is essentially free.
- Flavor depth: Roasting scraps before simmering adds a dimension you rarely get from a carton.
- Waste reduction: The United Nations Food and Agriculture Organization estimates that roughly one-third of all food produced globally is lost or wasted. Using scraps is a small, consistent way to work against that.
It’s also just satisfying. There’s something genuinely pleasing about making something useful from what would have been garbage.
The Best Scraps to Save — and the Ones to Avoid
Not every vegetable scrap belongs in broth. Some add complexity; others muddy the flavor or make it bitter. Here’s a breakdown.
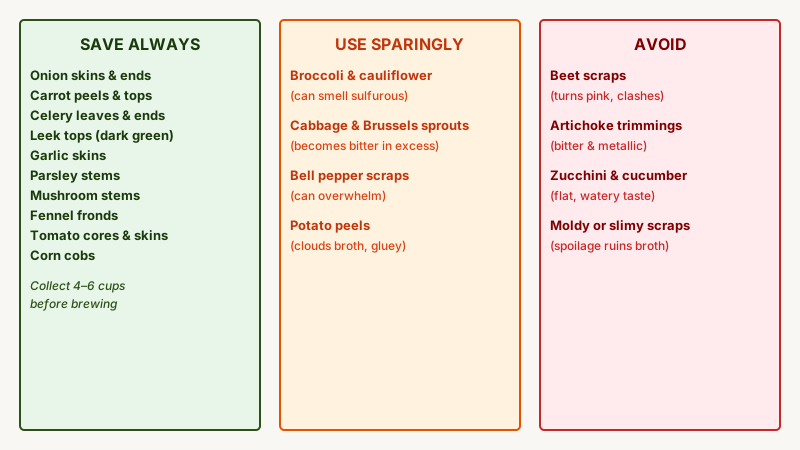
Go-To Scraps (Save These Always)
- Onion and shallot skins and ends — they add deep, savory color and flavor. Brown onion skins especially darken the broth naturally.
- Carrot peels, tops, and nubs — sweet and earthy, they’re a broth backbone.
- Celery leaves and base ends — intensely flavored; a little goes a long way.
- Leek tops (the dark green parts) — often discarded but packed with flavor.
- Garlic skins and loose cloves — add sharp, savory depth.
- Parsley stems — arguably more flavorful than the leaves for cooking purposes.
- Mushroom stems and trimmings — contribute remarkable umami, especially from cremini or shiitake.
- Fennel fronds and stalks — give a subtle anise note that pairs well with many dishes.
- Tomato cores and skins — add body and a slight acidity.
- Corn cobs — sweet and slightly starchy, they add a pleasant roundness.
Use in Small Amounts
- Brassicas (broccoli, cauliflower, cabbage, Brussels sprouts stems) — use sparingly; too much makes the broth smell sulfurous and taste bitter.
- Bell pepper scraps — can add a slightly sweet, roasted note in small quantities but can overwhelm.
- Starchy potato peels — cloud the broth and give it a slightly gluey texture. Fine in small amounts if you don’t mind a less clear result.
Avoid These
- Beet scraps — they turn everything deep pink and add an earthy-sweet flavor that clashes with most uses.
- Artichoke trimmings — make broth bitter and metallic.
- Zucchini/cucumber scraps — produce a flat, watery, slightly off taste.
- Moldy or slimy scraps — this should be obvious, but broth is not a cure for spoilage. Off scraps make off broth.

How to Collect and Store Your Scraps
The most practical system is a dedicated zip-lock bag or airtight container in the freezer. Every time you peel a carrot or trim celery, the scraps go straight in. Frozen scraps don’t need to thaw before use — they go directly into the pot.
A few tips:
- Label the bag with the date you started it. If it takes more than three months to fill, start fresh — frozen scraps can develop off-flavors over time.
- Keep scraps dry before freezing where possible. Wet scraps clump together and are harder to portion out.
- Separate strong flavors if you want flexibility. A small separate bag for mushroom stems lets you add or omit them depending on the dish.
- Aim to collect roughly 4–6 cups of scraps before making a batch of broth. That’s enough for a good 6–8 cups of finished broth.
The Method: From Scraps to Finished Broth
Step 1 — Optional but Recommended: Roast the Scraps
Spread your frozen or fresh scraps on a baking sheet. Drizzle lightly with olive oil and roast at 400°F (200°C) for 25–30 minutes until the edges begin to caramelize. This step adds a nutty, roasted depth that raw-simmered broth simply doesn’t have. It’s worth the extra half hour.
Skip roasting if you want a lighter, cleaner-tasting broth — good for delicate soups like miso or light spring vegetable dishes.
Step 2 — Build the Pot
Transfer scraps to a large stockpot. Add:
- Cold water to cover by about 2 inches (roughly 8–10 cups for a standard batch)
- A few whole peppercorns (8–10 is plenty)
- A bay leaf or two
- A small bunch of fresh thyme or parsley, if you have it
- A splash of apple cider vinegar or white wine (optional — acids help draw minerals from vegetables and brighten flavor)
Do not add salt at this stage. Salt the broth after straining, so you can calibrate it to the dish you’re making.
Step 3 — Simmer, Don’t Boil
Bring the pot to just below a boil, then reduce to a gentle simmer. A boiling broth turns cloudy and can make it taste harsh. You want small, lazy bubbles breaking the surface.
Simmer for 45 minutes to 1.5 hours. Taste at 45 minutes. If it’s already deeply flavored, stop there. If it tastes thin or watery, keep going. Mushroom-heavy batches often reach full flavor faster than lighter mixes.

Step 4 — Strain and Press
Set a fine-mesh strainer over a large bowl or second pot. Ladle or pour the broth through. Once drained, press the solids with the back of a spoon or a potato masher to extract every drop of liquid — there’s often a full cup hiding in the spent scraps.
Discard the solids (or compost them — they’ve given everything they have).
Step 5 — Season and Cool
Now taste and season with salt. Start with ½ teaspoon and work up gradually. Let the broth cool to room temperature before refrigerating or freezing.
Storage:
- Refrigerator: 5 days in a sealed container
- Freezer: Up to 6 months; freeze in 1- or 2-cup portions (ice cube trays work brilliantly for small quantities)
Getting the Most Flavor: Troubleshooting
Broth tastes flat or thin: Simmer uncovered for an additional 20–30 minutes to concentrate. Add a small piece of kombu (dried kelp) during the last 15 minutes — it boosts umami without making the broth taste noticeably “seaweedy.”
Broth is bitter: You likely have too many brassica scraps or celery leaves. For the next batch, reduce those. You can partially balance existing bitterness with a small pinch of sugar or a splash of apple juice.
Broth is too dark: Onion skins in large quantities produce a very dark broth. That’s fine for most uses but can color pale sauces. Reduce onion skins in the next batch, or strain through a coffee filter for a clearer result.
Broth lacks depth: Add more mushroom scraps, a small piece of parmesan rind (if you’re not keeping it vegan), or a tablespoon of soy sauce or miso stirred in after straining.
Ways to Use Your Homemade Broth
The obvious use is soup — but broth earns its keep in many other places:
- Risotto and grain cooking: Use it instead of water when cooking rice, farro, quinoa, or polenta. The flavor difference is significant.
- Braising liquid: A base for braised lentils, beans, or vegetables.
- Pan sauces: Deglaze a hot pan with broth after sautéing vegetables for an instant, light sauce.
- Mashed potatoes: Replace some or all of the milk with warm broth for a richer, more savory result.
- Freezer cubes: A frozen cube dropped into a stir-fry or pasta at the last minute adds flavor without adding liquid bulk.

If you’re already rescuing scraps from the compost bin, don’t stop there — Homemade Croutons: The Easy Guide to Perfect Results shows you how to turn stale bread into another zero-waste kitchen staple.
Making It a Habit
The hardest part of scrap broth isn’t the method — it’s the habit of saving scraps before they go in the bin. Keep the freezer bag somewhere visible and easy to reach, right next to where you do most of your prep. Once saving scraps becomes automatic, making broth becomes an occasional 90-minute task that produces something genuinely better than what you’d buy.
The goal isn’t perfection. Every batch will taste slightly different depending on what you’ve accumulated. That variability is a feature, not a flaw — it keeps the broth honest and the cooking interesting.
Start with one bag, one pot, one batch. The results tend to be convincing enough that you won’t need more motivation after that.
For another easy way to build waste-saving habits into your routine, check out Homemade Breadcrumbs: A Complete Guide to Every Type.