Homemade Breadcrumbs: A Complete Guide to Every Type
Why Bother Making Breadcrumbs at Home?
Store-bought breadcrumbs sit in a cardboard canister for months and taste like it. Homemade breadcrumbs cost almost nothing — they’re built from bread you’d otherwise throw away — and the difference in texture and flavor is immediate. Whether you’re coating chicken cutlets, binding meatballs, or finishing a gratin, fresh crumbs made from real bread deliver a crunch and depth that the dusty commercial version simply can’t replicate.
This guide covers every style of homemade breadcrumb: fresh, dried, panko-style, and seasoned. Once you know the method for each, you’ll never need to buy the canned kind again.

What Kind of Bread Should You Use?
Almost any bread works, but the choice matters more than most people realize.
Best Breads for Breadcrumbs
- Sourdough and artisan loaves – Dense crumb, complex flavor, excellent for savory coatings and gratins. The slight tang carries through even after cooking.
- White sandwich bread – Soft, neutral, and very easy to process. Ideal when you want a mild crumb that won’t compete with other flavors.
- Brioche or enriched bread – Higher fat content gives you richer, more golden crumbs. Outstanding for macaroni and cheese toppings or stuffings.
- Baguette or ciabatta – Airy interior, thin crust. Makes light, irregular crumbs that fry up incredibly crisp.
- Whole wheat or seeded bread – Adds a nutty flavor and slightly coarser texture. Good for meatballs or as a coating on fish.
Bread to Avoid
Skip bread with strong additions — heavy garlic, jalapeño, sun-dried tomato — unless the recipe specifically calls for those flavors. Also avoid any bread with visible mold; that’s not salvageable.
Stale bread is actually better than fresh for most methods. Moisture is the enemy of crunch, so bread that’s a day or two old processes more cleanly and dries faster.
How to Make Fresh Breadcrumbs
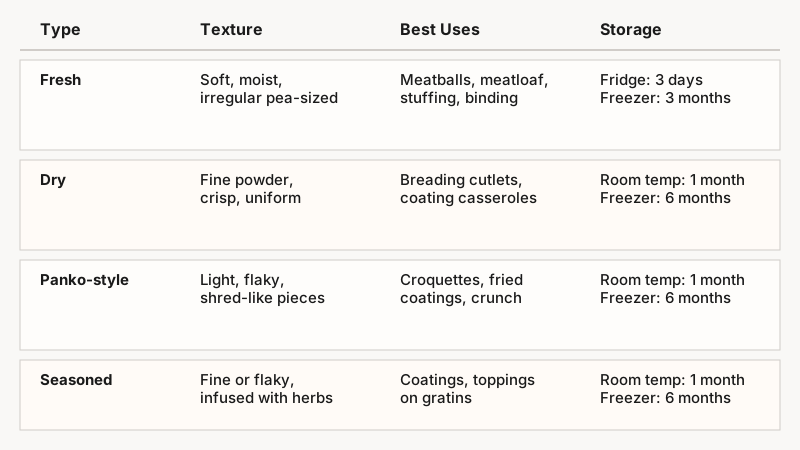
Fresh breadcrumbs are soft, moist, and irregular. They soak up liquid well, which makes them the right choice for meatballs, meatloaf, stuffings, and anywhere you want the crumb to integrate into a mixture rather than create a crust.
What You Need
- Slightly stale or day-old bread
- A food processor (or a box grater as a backup)
Steps
- Remove the crusts if you want a finer, more uniform crumb. Leave them on for rustic, coarser results — both are legitimate.
- Tear the bread into rough chunks, about 2-inch pieces. Don’t bother cutting precisely; the processor doesn’t care.
- Pulse in a food processor in short bursts — about 8 to 10 pulses — until you reach the texture you want. For meatballs, aim for pea-sized irregular pieces. For stuffing, slightly coarser works fine.
- Use immediately or refrigerate in an airtight container for up to 3 days.
Fresh breadcrumbs freeze very well. Spread them on a sheet pan, freeze until solid, then transfer to a zip-lock bag. Frozen fresh crumbs keep for up to 3 months and go straight from freezer to recipe without thawing.

How to Make Dry Breadcrumbs
Dry breadcrumbs are the workhorse of the kitchen — used for breading cutlets, coating croquettes, and adding crunch to casseroles. The goal is to remove all moisture so the crumbs stay crisp under heat.
Oven Method (Most Reliable)
- Preheat your oven to 300°F (150°C). Low heat dries without burning.
- Slice or tear your bread into 1-inch chunks and spread them in a single layer on a rimmed baking sheet.
- Bake for 20 to 30 minutes, stirring once halfway through, until the pieces feel completely dry and snap rather than bend. They should be pale golden, not brown.
- Cool completely before processing — steam from warm bread will turn your crumbs gummy.
- Process in a food processor to your desired texture. Run it continuously for fine crumbs (30–40 seconds), or pulse for medium crumbs.
- Sift if needed. For very fine, even crumbs, push them through a fine-mesh strainer and re-process the larger pieces.
Air Fryer Method (Faster)
Set the air fryer to 275°F (135°C). Spread bread pieces in the basket, making sure they’re not piled on top of each other. Check after 10 minutes, toss, and continue until completely dry — usually 15 to 20 minutes total. Cool, then process.
Storing Dry Breadcrumbs
Keep in an airtight glass jar or container at room temperature for up to 1 month, or freeze for up to 6 months. Dry crumbs absorb odors, so keep them away from strong-smelling foods in the freezer.
How to Make Panko-Style Breadcrumbs at Home
Panko originated in Japan and is characterized by its light, flaky, shred-like structure — very different from the dense powder of Western-style dried crumbs. Commercially, panko is made with bread that’s cooked by electrical current rather than radiant heat, which creates a crustless loaf with a very specific interior structure.
You can approximate panko at home with a simple trick:
- Use white sandwich bread with the crusts removed. The crust creates darker, denser crumbs — remove it entirely.
- Freeze the crustless bread for about 30 minutes, until it’s firm but not fully frozen.
- Grate on the large holes of a box grater. The semi-frozen bread grates into long, thin shards rather than clumping. This mimics the flaky panko structure.
- Spread the grated crumbs on a baking sheet and dry in a 300°F oven for 8 to 12 minutes, until just barely golden and completely dry. Watch carefully — because the crumbs are thin, they burn quickly.
These homemade panko crumbs won’t be identical to the commercial version, but they’re dramatically lighter and crispier than standard dried crumbs, and they behave similarly in recipes like tonkatsu, fried shrimp, or baked fish.
How to Make Seasoned Breadcrumbs
Seasoned crumbs are just dried crumbs with herbs and salt added. The advantage of doing this at home is control — commercial seasoned crumbs are often oversalted and use dried herbs that have long since lost their flavor.
Classic Italian-Style Seasoning
Per 1 cup of dry breadcrumbs, stir in:
- 1 teaspoon dried parsley
- ½ teaspoon dried oregano
- ½ teaspoon garlic powder
- ¼ teaspoon onion powder
- ¼ teaspoon fine sea salt
- A few grinds of black pepper
- 2 tablespoons finely grated Parmesan (optional, but excellent)
Toasted Herb Crumbs (for finishing)
For pasta, roasted vegetables, or soup garnish, sauté plain breadcrumbs in 2 tablespoons of olive oil over medium heat, stirring constantly, until deep golden — about 3 to 4 minutes. Remove from heat, toss with fresh herbs (flat-leaf parsley, thyme, or rosemary work especially well), and a pinch of lemon zest. Use these immediately; they lose their crunch if left to sit.

Common Mistakes and How to Fix Them
Crumbs turned out gummy or clumped together. Almost always a moisture problem. Either the bread wasn’t dry enough before processing, or you processed it while still warm from the oven. The fix: spread the clumped crumbs back on the baking sheet and dry for another 10 minutes.
Crumbs burned during toasting. The oven was too hot, or they were left unattended. Breadcrumbs go from golden to scorched faster than you’d expect. Stick to 300°F and check every 10 minutes.
Crumbs too fine or too coarse. With a food processor, the difference between fine and coarse is just a few seconds of processing. Pulse for coarser crumbs, run continuously for finer ones. You can always blend further — you can’t un-process them, so err on the coarser side and adjust from there.
No food processor available. A blender works in a pinch for dried crumbs (process in very small batches). A box grater handles fresh or semi-frozen bread well. A zip-lock bag and a rolling pin will crush dried bread into crumbs with some elbow grease — not as uniform, but functional.
Getting your prep tools right matters too, and Cutting Boards for Every Food Type: How to Choose and Use Them Right can help you choose the best surface for slicing bread and other ingredients cleanly.
Practical Uses for Homemade Breadcrumbs
Once you have a stash, here’s where they earn their keep:
- Fresh crumbs: Meatballs, meatloaf, stuffed mushrooms, stuffings, panade (bread soaked in milk, added to burgers to keep them juicy)
- Dry fine crumbs: Schnitzel, chicken parmesan, crab cakes, croquettes, breaded vegetables
- Panko-style crumbs: Tonkatsu, fried shrimp, baked fish, mac and cheese topping
- Toasted seasoned crumbs: Pasta al pangrattato (a Southern Italian dish where crumbs stand in for grated cheese), finishing garnish for soups and salads, roasted broccoli or cauliflower topping
If you enjoy stale bread getting a second life, Homemade Croutons: The Easy Guide to Perfect Results is another great way to turn leftover slices into something crunchy and useful.
Conclusion
Making breadcrumbs at home takes maybe 30 minutes of mostly hands-off oven time, costs nearly nothing, and produces a noticeably better result than anything from a can. The core skill is simple: dry the bread thoroughly, let it cool, and process it to the texture you need. Master that sequence, and you have a pantry staple that improves almost everything it touches.
Keep a jar of dry crumbs on the counter and a bag of fresh crumbs in the freezer, and you’ll find yourself reaching for them constantly — not just as a coating, but as a finishing touch, a binder, and a textural fix for dozens of dishes.