Bone Broth at Home: The Complete Cooking Guide

Why Bone Broth Is Worth Making from Scratch
Store-bought broth exists on a spectrum from “barely flavored water” to “decent but expensive.” Homemade bone broth sits in a different category entirely — richer color, more complex flavor, and a satisfying gel that forms when you chill it (a sign of real collagen extraction). Once you’ve used it as a braising liquid or stirred it into a pan sauce, going back to cartons feels like a step backward.
This guide covers everything from bone selection to finishing touches, with practical tips for getting the most out of a long simmer.

Choosing the Right Bones
The bones you start with largely determine what you end up with. Not all bones are equal.
Collagen-Rich Bones (the Backbone of Good Broth)
These are what turn your broth into a gel when refrigerated:
- Knuckle bones (beef or veal): packed with cartilage, the single best gelatin source
- Chicken feet: surprisingly high in collagen, they transform a thin chicken broth into something that wobbles
- Pig trotters: gelatinous and flavorful, excellent for pork or mixed broths
- Oxtail: meaty enough to add flavor, rich enough to add body
Flavor Bones
These add roasted, savory depth but don’t gel on their own:
- Beef marrow bones: buttery richness, especially after roasting
- Chicken backs and necks: inexpensive and widely available
- Veal knuckles: mild and clean-tasting, good for neutral stocks
Getting Bones
The best source is a local butcher — they often sell beef bones cheaply or even give them away. Ask specifically for knuckle bones or “soup bones.” Farmers’ markets with a meat vendor are another reliable option. Save raw chicken carcasses in a zip-lock bag in the freezer; once you have two or three, you have enough for a batch.
If you enjoy the idea of turning kitchen odds and ends into something useful, our guide to Homemade Vegetable Broth from Kitchen Scraps: Save Scraps, Skip Waste shows how the same frugal mindset works for a lighter, plant-based stock.
Preparing Bones Before You Simmer
Two steps make a real difference before the bones hit the pot.
Blanching (Optional but Recommended for Beef)
Place raw beef or pork bones in a large pot, cover with cold water, bring to a boil, and drain after 10–15 minutes. Rinse the bones and wash the pot. This removes blood proteins and impurities that would otherwise cloud the broth and give it an off-flavor. It’s less necessary for chicken, which produces less scum.
Roasting for Depth
After blanching (or instead, if you prefer), spread bones in a single layer on a rimmed baking sheet. Roast at 425°F (220°C) for 30–40 minutes, turning once, until deeply browned. The Maillard reaction happening on the bone surfaces is what gives finished broth that mahogany color and complex, savory note. Scrape every bit of the dark fond from the pan into your pot — that’s flavor.

The Simmer: Time, Temperature, and Aromatics
Water and Acid
Cover bones with cold water by about two inches. Add one to two tablespoons of apple cider vinegar or white wine vinegar per gallon of water. Acid helps draw minerals from the bones and begins breaking down collagen. Let the bones soak in the cold acidulated water for 20–30 minutes before applying heat — a small step, but worth doing.
Aromatics
Add these once the broth reaches a simmer:
- 1 large onion, halved (char it in a dry pan for extra color)
- 3–4 celery stalks
- 2–3 medium carrots
- A whole head of garlic, sliced in half crosswise
- A small bunch of flat-leaf parsley (stems and all)
- 2–3 bay leaves
- 1 tablespoon of black peppercorns
Avoid adding salt at this stage — wait until after straining, when you can season to taste.
Temperature: Simmer, Not Boil
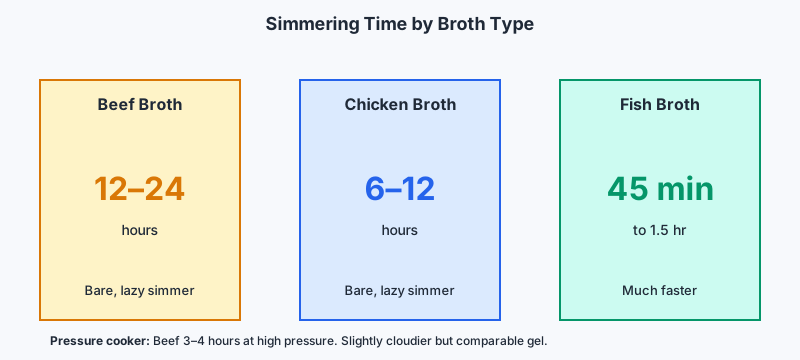
This is the most common mistake. A full rolling boil makes broth cloudy and can produce a bitter flavor from emulsified fats. You want a bare, lazy simmer — a few bubbles breaking the surface, nothing more. If you’re making beef broth, that simmer needs to hold for 12–24 hours. Chicken broth is done in 6–12 hours. Fish broth is much faster: 45 minutes to 1.5 hours at most.
For long simmers, a slow cooker or an Instant Pot on the “slow cook” setting is genuinely useful — it maintains consistent low heat without any attention from you.
Using a Pressure Cooker
An Instant Pot or stovetop pressure cooker cuts time drastically. Beef bones that would simmer for 18 hours are done in 3–4 hours at high pressure. The texture and gel are comparable to the long-simmered version. The only thing you lose is the option to skim during cooking — the result can be slightly cloudier, though the flavor difference is negligible for home cooking.
Skimming, Straining, and Finishing
Skimming
During the first 30–60 minutes of simmering, gray foam (coagulated proteins) rises to the surface. Skim it off with a spoon or fine-mesh skimmer. After that first wave, you won’t need to skim much.
Straining
Pour the finished broth through a fine-mesh strainer or a colander lined with cheesecloth. Discard the bones and spent vegetables — they’ve given everything they have. Let the broth cool for 20–30 minutes, then transfer to jars or containers.
Defatting
Refrigerate the broth overnight. The fat will solidify into a pale layer on top. Lift it off with a spoon. You can discard it, or save beef or chicken fat for sautéing. The cold broth underneath should be a firm, wobbling gel — that’s a good sign. Broth that doesn’t gel is still edible, but it means less collagen was extracted (often due to bones with little cartilage, or too much water).
Seasoning
Season the finished, defatted broth with salt to taste. Keep it lightly seasoned if you plan to reduce it for sauces — you can always add more salt later.

Storing and Using Your Broth
If you’re stocking your kitchen with homemade staples, our guide How to Store Bread and Revive a Stale Loaf at Home is another handy way to cut down on food waste.
Storage
- Refrigerator: 4–5 days in sealed containers
- Freezer: up to 6 months; use wide-mouth mason jars (leave headspace for expansion), silicone ice cube trays for small portions, or zip-lock freezer bags laid flat
Freezing in ice cube trays is especially practical — pop out a few cubes for deglazing a pan, finishing a sauce, or enriching a soup without thawing a whole jar.
Once your freezer starts filling up with jars and bags of broth, it might be time to revisit How to Declutter Your Home Step by Step (That Actually Works) to keep your kitchen storage under control.
Using Bone Broth in Cooking
This is where homemade broth pulls ahead of store-bought. The higher gelatin content means it reduces into a glossy sauce without needing a roux or cornstarch. Specific uses:
- Braising liquid: Substitute for water or stock in any braise — short ribs, oxtail, chicken thighs. The results are noticeably richer.
- Pan sauces: Deglaze a roasting pan with a splash of wine, add broth, reduce by half. That’s a legitimate pan sauce.
- Risotto: Use warm broth instead of water; the gelatin gives risotto a silkier finish.
- Soups and ramen: The flavor base sets the whole dish. Homemade pork or chicken broth in a bowl of ramen is a different experience from carton stock.
- Grains: Cook rice, farro, or quinoa in broth instead of water for background depth.
- Sipping straight: Some people drink warm broth on its own, lightly salted, especially in cooler months.
Troubleshooting Common Problems
Broth is cloudy: You boiled it too hard, or skipped the blanching step. Clarity doesn’t affect flavor, but if it bothers you, blanch bones next time and keep the heat lower.
Broth didn’t gel: Not enough collagen-rich bones, or too much water. Add chicken feet or extra knuckle bones next batch. Try a 2:1 bones-to-water ratio by weight.
Broth tastes flat or bland: The bones may not have been roasted enough, or you used too much water. Reduce the finished broth on the stovetop — simmering uncovered concentrates flavor.
Broth is too greasy: You didn’t defat thoroughly. Chill, remove the solid fat cap, and strain again if needed.
Conclusion
Making bone broth at home is more a habit than a project once you’re set up. Keep a freezer bag for chicken carcasses and leftover bones, and you’re already halfway there. The process itself requires very little active time — mostly just setup, a long simmer you can ignore, and a quick strain at the end.
The payoff, in both flavor and cooking versatility, is substantial. A well-made broth is one of those foundations that quietly improves everything built on top of it.