Homemade Applesauce: 7 Easy Steps to a Perfect Batch

Making applesauce from scratch is one of those kitchen tasks that sounds like more effort than it is. The reality: a pot of homemade applesauce takes about 30 minutes of active work, tastes noticeably better than anything jarred, and gives you complete control over sweetness and texture. Whether you want a smooth, silky purée or a chunky, rustic sauce, the method is the same — only the finishing step changes.
This guide walks through every stage, from choosing the right apples to canning or freezing your batch for later.
Choosing the Best Apples for Applesauce
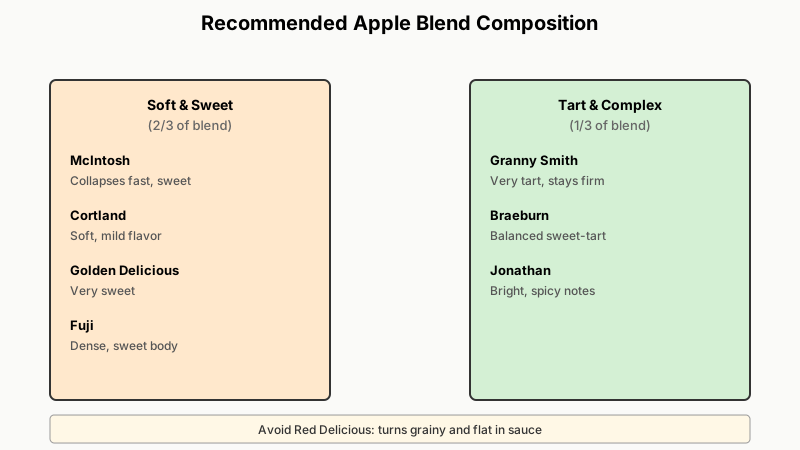
Apple variety matters more here than in most recipes. Some apples break down quickly and become naturally sweet; others hold their shape and stay tart. The best applesauce usually comes from a blend of two or three varieties.
Apples That Break Down Beautifully
- McIntosh — collapses fast, produces a naturally sweet, pinkish sauce
- Cortland — soft texture, mild flavor, blends well with tarter varieties
- Golden Delicious — very sweet, needs little or no added sugar
- Fuji — dense and sweet, takes slightly longer to cook but gives great body
Apples That Add Tartness and Complexity
- Granny Smith — very tart, stays firmer; use as 25–30% of your blend
- Braeburn — balanced sweet-tart, holds up well during cooking
- Jonathan — old-fashioned variety, bright flavor, slightly spicy notes
A reliable starting blend: two-thirds McIntosh or Cortland for softness and sweetness, one-third Granny Smith for backbone. Avoid purely Red Delicious apples — they turn grainy and flat in sauce.

What You Need: Ingredients and Equipment
Ingredients (makes about 4 cups / 1 litre)
- 3 lbs (roughly 1.4 kg) apples — about 6–8 medium apples
- ½ cup water or apple cider
- 1–2 tablespoons sugar or honey (optional — taste first)
- ½ teaspoon ground cinnamon (optional)
- Pinch of nutmeg (optional)
- 1 teaspoon lemon juice
The lemon juice is not just for flavor — it preserves color and brightens the sauce noticeably.
Equipment
- Large heavy-bottomed pot or Dutch oven
- Sharp knife and cutting board
- Potato masher, immersion blender, or food mill
- Fine-mesh strainer (optional, for ultra-smooth sauce)
- Ladle and storage jars or freezer containers
A food mill is the classic tool for applesauce: you can skip peeling entirely, cook the apples with skins on (where much of the pectin and flavor lives), then pass them through the mill to leave skins and seeds behind. If you don’t own one, peel and core before cooking, then mash or blend at the end.
Step-by-Step: How to Make Homemade Applesauce
Step 1 — Prep the Apples
Wash the apples well. If you’re using a food mill, simply quarter them — no need to peel or core. If mashing or blending by hand, peel, core, and cut into rough 1-inch chunks. Uniform size helps them cook evenly.
Step 2 — Add Liquid
Place the apples in your pot and add the water or apple cider. The liquid prevents scorching in the first few minutes before the apples release their own juice. Apple cider deepens the flavor; water keeps it clean and simple. Either works.
Step 3 — Cook Low and Slow
Bring the pot to a medium heat. Once you see steam, reduce to medium-low, cover, and cook for 20–30 minutes, stirring every 5 minutes or so. The apples are ready when they’re completely soft and collapsing when pressed with a spoon. Softer varieties may be done in 15 minutes; dense apples can take 35.
Step 4 — Mash or Mill
Food mill method: Pass the cooked apples through the mill using the medium disc. The skins and seeds stay behind; you get a smooth, naturally colored sauce.
Immersion blender method: Blend directly in the pot. For a slightly chunky result, pulse rather than run continuously.
Potato masher method: Mash to your preferred texture — this gives the most rustic, chunky sauce and requires the least cleanup.
Blender method: Transfer (carefully — it’s hot) to a standard blender in batches. Vent the lid by removing the center cap and covering with a folded towel to prevent steam buildup.

Step 5 — Season to Taste
This is the most important step most recipes rush past. Taste the sauce before adding anything. Many apple blends need no sugar at all — the natural sugars concentrate during cooking. Add sugar or honey one tablespoon at a time. Stir in cinnamon and nutmeg if you like them; a pinch of cardamom is an underrated addition. The lemon juice goes in here too.
Season, taste, adjust. That’s it.
Step 6 — Cool and Store
Let the sauce cool to room temperature before refrigerating. It keeps well in the fridge for up to two weeks in a sealed container. For longer storage, freeze in portions (ice cube trays work well for baby food portions, zip-lock bags for family servings) — applesauce freezes for up to a year without losing quality.
Step 7 — Can It (Optional)
If you’ve made a large batch and want shelf-stable storage, water-bath canning is safe and straightforward for applesauce. Follow USDA-tested guidelines: process half-pint or pint jars for 15–20 minutes depending on altitude. Do not adjust the lemon juice quantity in a canning batch — it’s there to keep acidity safe, not just for flavor.
If you enjoy preserving produce at home, How to Make Homemade Pickles: Crisp Dill Pickles In 48 Hours walks through another quick small-batch canning project worth trying.
Flavor Variations Worth Trying
Once you have the basic method down, applesauce is a template:
- Pear-apple sauce — replace 30% of the apples with ripe Bartlett or Bosc pears for a floral, softer sauce
- Maple cinnamon — swap sugar for pure maple syrup; add a split vanilla bean while cooking
- Ginger apple — stir in 1 teaspoon freshly grated ginger in the last 5 minutes of cooking
- Roasted applesauce — cut apples in half, roast cut-side down at 400°F (200°C) for 35 minutes, then scoop out flesh and blend; roasting adds a caramelized depth that’s hard to replicate on the stovetop
- Pink applesauce — leave red skins on during cooking when using a food mill; the natural pigment bleeds into the sauce, giving it a beautiful blush color without food dye
Troubleshooting Common Problems
Sauce is too thin: Return to low heat, uncovered, and simmer for another 10–15 minutes. Water evaporates; flavor concentrates.
Sauce tastes flat: Add more lemon juice first — it lifts the entire flavor profile — before reaching for sugar. A pinch of salt also works surprisingly well.
Sauce is too chunky after blending: If you want it smoother, push it through a fine-mesh strainer with the back of a ladle.
Apples are browning before cooking: This is purely cosmetic and fixes itself once the heat goes on. If it bothers you, toss cut apples in a bowl of cold water with a squeeze of lemon while you prep.
Sauce tastes too tart: Add sugar gradually and let it dissolve fully before tasting again. Cooking it a little longer also mellow tartness naturally.

How to Use Homemade Applesauce
Beyond serving it as a side dish, applesauce is a legitimate pantry ingredient:
- Baking substitute — replace up to half the oil or butter in muffins, quick breads, and pancake batter with unsweetened applesauce; the texture stays moist and the fat drops significantly
- Pork pairing — the classic European combination of pork and apple exists for good reason; serve alongside roasted pork loin or pan-seared pork chops
- Baby food — smooth, unsweetened homemade applesauce is one of the most common first foods; skip all spices and sugar for babies under 12 months
- Yogurt topping — swirl into plain Greek yogurt with a drizzle of honey for a fast breakfast
- Cake layer — use as a filling between cake layers in place of jam
A jar of homemade applesauce also makes a lovely edible present, so check out Budget-Friendly Homemade Gifts: 12 Ideas That Actually Work for more ideas along those lines.
If you enjoy putting up homemade condiments like this, you’ll also want to check out How to Make Homemade Salsa: Brighter Than Anything In A Jar for another fresh-tasting jarred favorite.
A Few Final Notes
Homemade applesauce rewards small decisions: the right apple blend, a splash of cider instead of water, tasting before sweetening. None of those choices takes extra time — they just require paying attention.
If you grow or pick your own apples, even better. Windfalls (apples that drop from the tree and bruise slightly) are perfect for sauce — cut away the damage and cook what’s left. Nothing goes to waste.
A batch of 3 pounds of apples takes less time than most weeknight dinners and produces something genuinely good. Scale up when apples are at peak quality and cheap, freeze the surplus, and you have quick-serve applesauce for months.