Batch Cook & Freeze Proteins: A Weekly Meal Prep Guide

Why Batch Cooking Proteins Is Worth the Effort
Most weeknight cooking stress traces back to a single problem: the protein isn’t ready. Everything else — vegetables, grains, sauces — can be assembled fast. But thawing, seasoning, and cooking chicken thighs or a pot of beans from scratch at 6 p.m. eats up the energy most people no longer have.
Batch cooking proteins solves this at the root. You spend two to three hours on one day — usually Sunday, but any day works — and you produce enough cooked or semi-cooked protein to carry five to seven meals. The rest of the week becomes assembly, not cooking.
This guide covers which proteins freeze best, exactly how to cook them in bulk, how to store and label them properly, and how to defrost safely without sacrificing texture. No vague advice — just a practical system you can run every week.

This protein-focused approach fits neatly into the broader strategy laid out in Easy Meal Prep Ideas for the Week: Build Blocks, Not Full Dishes, which encourages cooking reusable components rather than complete recipes.
Which Proteins Freeze Well (and Which Don’t)
Not every protein survives the freezer gracefully. Ice crystals rupture cell walls and push out moisture. The proteins that handle this best share one trait: they have enough connective tissue, fat, or natural density to bounce back after thawing.
Excellent Freezer Candidates
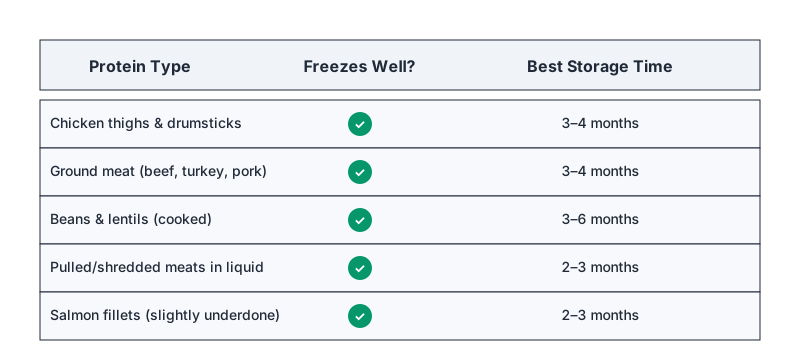
Chicken thighs and drumsticks are the gold standard. The higher fat content compared to breast meat means they reheat moist. Cook them fully, freeze them, and they reheat in minutes.
Ground meat (beef, turkey, pork, lamb) freezes beautifully whether raw or cooked. A batch of browned, seasoned ground beef or turkey can become tacos, pasta sauce, grain bowls, or stuffed peppers across the week.
Beans and lentils — cooked from dry — are among the most cost-efficient proteins to batch freeze. A pound of dried chickpeas yields roughly six cups of cooked chickpeas. Freeze in 1.5-cup portions (equivalent to a can) and they thaw quickly in warm water.
Pulled or shredded meats — pork shoulder, beef chuck, lamb shoulder — actually improve after freezing because the braising liquid redistributes as the meat thaws. Cook low and slow, shred, then freeze in portions submerged in their own cooking liquid.
Salmon fillets freeze well if you cook them slightly underdone (about 120–125°F internal temperature rather than 145°F). They’ll finish cooking during reheating. Fatty fish handle freezing better than lean white fish.
Hard-boiled eggs are borderline — the whites turn rubbery and weep liquid after freezing. If you want batch-cooked eggs, refrigerate them for up to a week instead of freezing.
Proteins That Need Extra Care
Chicken breast can be frozen after cooking, but it dries out if it was cooked past 165°F before freezing. The best approach: cook it in liquid (poaching or pressure cooking), freeze it with some of that poaching liquid, and slice or shred it before storing.
Shrimp is best frozen raw rather than cooked. Cooked-then-frozen shrimp often turns mealy. Buy raw, peel, and freeze in a single layer.
Tofu actually benefits from freezing raw — the ice crystals create a spongier, meatier texture that absorbs marinades more readily. Press it first, freeze it, then thaw and cook.
A Practical System for Batch Cooking Each Protein
The key is overlapping cook times. You’re not cooking each protein one at a time — you’re managing an oven, a stovetop burner, and possibly a slow cooker or pressure cooker simultaneously.
The Two-Hour Sunday Method
Here’s a realistic batch session that produces proteins for four to six meals:
-
Start the slow cooker or Instant Pot first. A pork shoulder takes 8 hours on low (slow cooker) or 75 minutes on high pressure (Instant Pot). Set this going before you touch anything else.
-
Get the oven working. Season two sheet pans of chicken thighs or drumsticks (six to eight pieces per pan). Roast at 425°F / 220°C for 35–40 minutes. While those cook, move to the stovetop.
-
Brown ground meat on the stovetop. Use a large skillet or Dutch oven. Brown 1.5–2 lbs of ground beef or turkey with just salt, pepper, and garlic. Keep seasoning minimal so you can customize flavors later in the week. Drain fat, let cool.
-
Simmer beans if you’re using dried. Soaked chickpeas or black beans take 45–75 minutes on the stovetop. Lentils take 20–25 minutes and don’t need soaking. This can run alongside step 3.
By the time the oven timer goes off, you have four distinct proteins ready to cool and portion.

Cooling Before Freezing: The Step Most People Skip
Putting hot food directly into the freezer is a food-safety and quality problem. It raises the freezer temperature, potentially thawing neighboring items, and it produces large ice crystals that wreck texture.
Spread cooked proteins on a rimmed baking sheet and let them cool at room temperature for no more than two hours (the USDA food safety window). Then refrigerate briefly — 30 to 60 minutes — until the food is cold to the touch. Then move it to the freezer.
For liquids like broth-braised meats or bean cooking liquid, an ice bath in the sink (a large bowl of ice water with your pot sitting in it) brings the temperature down in 20–30 minutes.
Portioning and Packaging
Pre-portioning before freezing is the move that makes the whole system work during the week. Decide how you’ll use each protein and portion accordingly:
- Single-serve portions (4–6 oz cooked meat): for lunches or solo dinners
- Two-serve portions: for couples or families where you’ll use half at once
- Beans in 1.5-cup portions: matches a standard can size, useful for recipes
Best containers for freezing:
- Zip-lock freezer bags (lay flat while freezing to save space and speed up thawing)
- Rigid freezer-safe containers with tight lids
- Vacuum-sealed bags if you have a sealer (best for long-term storage, minimizes freezer burn)
Remove as much air as possible. For zip bags, seal almost fully, then press out remaining air before sealing completely.
Labeling — Always, Without Exception
Every container needs: the protein name, any key seasoning, the date it was cooked, and the portion size. A label like “Ground turkey – plain – July 14 – 5 oz” takes ten seconds to write and saves ten minutes of guesswork later.
Freezer masking tape and a permanent marker work fine. Pre-printed labels are unnecessary.
Freezer Storage Times and Defrosting Safely
How Long Cooked Proteins Keep
According to food safety guidelines, cooked proteins stored at 0°F / -18°C (a properly functioning freezer) last:
- Cooked poultry: 3–4 months for best quality (still safe beyond, but texture declines)
- Cooked ground meat: 3–4 months
- Cooked beef/pork roasts or shredded meat: 2–3 months
- Cooked fish: 2–3 months
- Cooked beans and lentils: 3–6 months (they hold up especially well)
- Raw tofu (frozen): up to 5 months
These aren’t expiration dates — they’re quality windows. The food stays safe longer but may develop off-flavors or texture loss.
Defrosting Without Ruining Texture
The refrigerator method is the safest: move the frozen portion from freezer to fridge the night before. By morning, it’s thawed and cold. This is ideal for chicken thighs, salmon, and shredded meats.
The cold-water method works faster: keep the protein in its sealed bag and submerge it in cold tap water, changing the water every 30 minutes. A chicken thigh thaws in 45–60 minutes this way. Never use warm water — it brings the surface into the bacterial danger zone before the interior thaws.
The microwave is acceptable if you’re cooking the protein immediately afterward. Use the defrost setting and don’t leave it at room temperature.
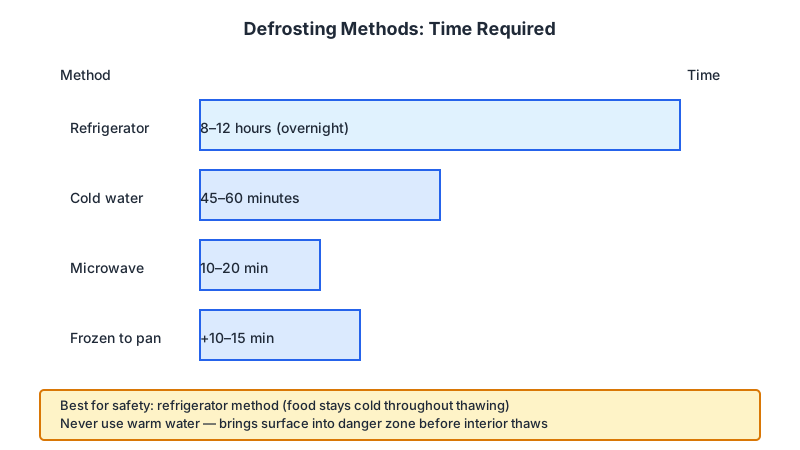
Direct from frozen to pan or oven works for some proteins. Ground meat can go straight into a hot skillet (break it up as it thaws and browns). Beans can go directly into soups or stews. Thin fish fillets can go from freezer to a 400°F oven with an extra 10–15 minutes added to the cook time.

Putting It to Work: Building Meals from Frozen Proteins
The whole point of this system is that weeknight meals become short. Here’s what that looks like in practice:
Monday: Pull thawed ground turkey from the fridge. Heat in a pan with jarred marinara for 8 minutes. Serve over pasta.
Tuesday: Thaw a portion of pulled pork in cold water (45 minutes). Warm in a skillet with a splash of the saved braising liquid. Serve with rice and pickled vegetables.
Wednesday: Take chicken thighs from the fridge (thawed overnight). Slice cold over a grain bowl with hummus, cucumber, and lemon dressing.
Thursday: Add frozen beans directly to a pot of simmering vegetable broth with canned tomatoes and kale. Ready in 20 minutes.
Friday: Thaw salmon fillet in the fridge since Thursday night. Flake it over a salad with capers and a mustard vinaigrette.
None of these meals required cooking a protein from scratch. The batch session funded the entire week.
For the other half of your meal prep puzzle, Batch Cook Grains & Legumes: A Complete Weekly Prep Guide shows you how to batch cook the grains and legumes that round out these protein-based meals.
Common Mistakes and How to Avoid Them
Over-seasoning before freezing. Spices and herbs intensify in the freezer. Keep batch-cooked proteins lightly seasoned and add bold flavors at the reheating stage.
Not accounting for moisture loss. Cooked proteins lose some moisture in the freezer. Adding a tablespoon of broth, sauce, or water during reheating (covered, low heat) restores texture significantly.
Freezing in massive portions. A 2-pound block of shredded chicken sounds efficient until you can’t break off what you need. Smaller, flat portions thaw faster and reduce waste.
Forgetting freezer burn. Freezer burn (white, dry patches from oxidation) doesn’t make food dangerous but ruins texture. Tight packaging and removing air are the only real solutions.
Not rotating stock. New batches go behind older ones. This sounds obvious but a chaotic freezer makes it easy to find a forgotten bag of pork from four months ago when you’re looking for this week’s chicken.
Conclusion
Batch cooking and freezing proteins is one of those systems that costs a few hours up front and pays out every evening for the rest of the week. The mechanics aren’t complicated — cook in parallel, cool properly, portion small, label everything, and defrost safely. What makes it stick is doing it consistently until the system becomes muscle memory.
Start with one or two proteins on your first batch day. Get the rhythm down before you try to run four proteins simultaneously. Within a month, the process gets faster and the weekly payoff becomes obvious enough that skipping it feels like a mistake.
A stocked freezer is, in practical terms, the most useful kitchen tool you own.
Sources
- https://www.fsis.usda.gov/food-safety/safe-food-handling-and-preparation/food-safety-basics/freezing-and-food-safety
- https://www.foodsafety.gov/food-safety-charts/cold-food-storage-charts
- https://www.seriouseats.com/the-food-lab-complete-guide-to-sous-vide-chicken-breast
- https://nchfp.uga.edu/how/freeze/freezing_prepared_foods.html