How to Declutter Your Home Step by Step (That Actually Works)

Most decluttering advice tells you to “start small” and “be ruthless.” That’s not wrong, but it skips the part that actually trips people up: the order you tackle things, the decisions that stall you mid-pile, and the psychological weight of stuff you’ve been hauling around for years. This guide cuts through the noise and gives you a clear, repeatable process — whether you’re clearing out a single junk drawer or a four-bedroom house.
Step 1: Set a Clear Goal Before You Touch a Single Item
The single biggest reason decluttering projects collapse is that people start sorting without knowing what they’re sorting toward. Are you trying to fit everything into a smaller space? Reduce visual noise so the house feels calmer? Free up rooms for a specific purpose? Your goal shapes every decision.
Write it down in one sentence. Something like: “I want the living room to feel like a place where we actually want to spend time, not a storage unit.” That sentence becomes your tiebreaker when you’re holding an object and genuinely unsure whether to keep it.
Set a realistic timeline
A full home declutter is not a weekend project for most households. It’s more like a two-to-eight-week commitment, depending on how much you have and how much time you can carve out. Break it into sessions of 90 minutes or less — that’s roughly the window before decision fatigue sets in and you start putting things back just to be done.
Step 2: Gather Your Supplies First
Before diving into any room, assemble what you need:
- Large bins or cardboard boxes — label them: Keep, Donate, Trash, Relocate, Sell
- Black bin bags for obvious rubbish
- Sticky notes or masking tape for labeling items you’re unsure about
- A sharpie (always harder to find mid-sort than it should be)
- A laundry basket for items that belong in a different room — don’t let yourself walk things back as you go, just drop them in the basket and redistribute at the end
The Relocate box is underrated. Lots of clutter isn’t junk — it’s the right thing in the wrong room. Sorting that out separately prevents you from constantly stopping to put things away.

Step 3: Work Room by Room, Not Category by Category
You may have heard of the category-based method — pulling every item from a single category (say, all your books) into one massive pile and sorting from there. For some people it works brilliantly. For others, creating a catastrophic pile in the middle of the living room is the fastest route to abandoning the whole project.
A room-by-room approach is more forgiving. You make a contained mess, you resolve it, and you have a finished room to look at — which is the best motivation to keep going.
If your craft supplies are one of the trouble spots slowing you down, How to Organize a Home Craft Space: Build a Workflow Not a Shelf offers a more targeted approach for that specific room.
Suggested room order
Start with the spaces that have the highest annoyance factor for you, but generally, this order works well:
- Entryway or hallway — small, fast, and immediate visual payoff
- Living room — central to daily life, sets the tone
- Kitchen — functional rooms respond fast to decluttering
- Bathrooms — usually quick; expired products go straight in the bin
- Bedrooms — more personal, takes longer
- Home office or desk area — often the most paper-dense zone
- Storage spaces (garage, attic, basement, under-bed) — save these for last; they’re the hardest emotionally and logistically
Don’t touch sentimental items until you’ve built decision-making momentum from earlier, easier rooms.
Step 4: Use a Decision Framework That Actually Speeds You Up
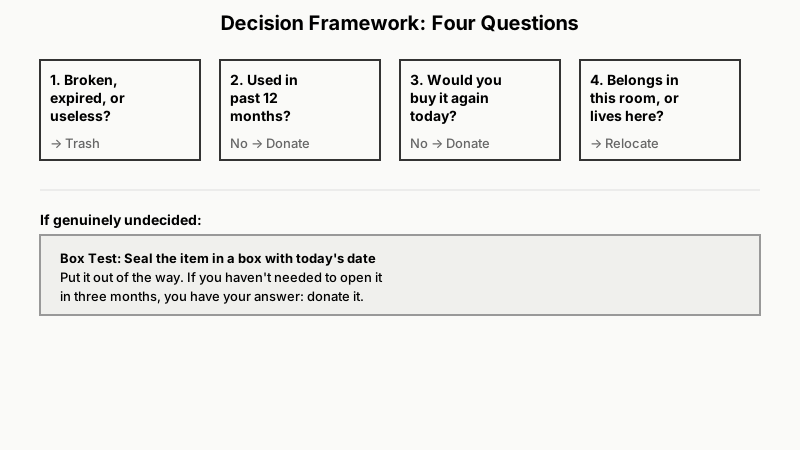
Standing in front of an object and asking “do I love this?” leads to paralysis. Here’s a faster set of questions:
Ask in this order:
- Is this broken, expired, or genuinely useless? → Trash.
- Have I used this in the past 12 months? → If no, and it has no clear future use, it goes.
- If I didn’t own this and saw it in a shop, would I buy it again today? → This cuts through nostalgia efficiently.
- Does it belong in this room, or does it just live here by accident? → Relocate box.
- Could someone else use this more than I do? → Donate or sell.
For anything that genuinely stumps you, the box test works: seal it in a box with today’s date and put it somewhere out of the way. If you haven’t needed to open it in three months, you have your answer.
The guilt-item problem
Gifts you don’t like. Expensive mistakes. Things inherited from people who’ve died. These deserve a separate note. The object is not the relationship or the memory. Photographing sentimental items before letting them go is a practical middle path — you keep the record without keeping the thing. Storage apps like Google Photos let you tag and search those photos later, so the memory doesn’t disappear.

Step 5: Sort Your Donations and Trash Immediately
Nothing derails progress like keeping bags of donations in the hallway for three weeks. The moment a donation box or bag is full:
- Load it into your car the same day
- Schedule a charity collection if you can’t transport it yourself
- Take it to a charity shop within 48 hours — the longer it sits, the higher the chance you’ll dig back through it
For items with resale value, decide upfront whether selling is actually worth your time. Listing, photographing, messaging buyers, and arranging pickups takes real effort. Unless an item is worth more than roughly £30–£50 (or your local equivalent), donating is usually more practical. Online platforms like eBay, Facebook Marketplace, or Vinted are worth using for higher-value pieces — furniture, electronics, quality clothing.
Responsible disposal
Not everything can go in the household bin. Electronics, batteries, paint, chemicals, and some furniture need specific disposal routes. Most local councils and municipalities have household waste recycling centres or scheduled collection days for bulky items. Check your local authority’s website before assuming something is landfill-bound — many items can be recycled or refurbished.
If you’re separating out recyclables as you sort your trash pile, How to Set Up a Recycling System at Home (Step-by-Step) can help you set up a system that keeps this step painless going forward.
Step 6: Organize What Remains (And Only What Remains)
Organizing before decluttering is a trap. You end up buying storage solutions for things you should have thrown away. Only once you know exactly what you’re keeping should you think about where it lives and what, if anything, it needs to be stored in.
A few organizing principles that hold up:
- Like with like — group similar items together so you always know where to look
- Use containers that fit the space, not aspirational ones from lifestyle photos
- Everything needs a home — if an object doesn’t have a specific place, it will always end up as clutter again
- Vertical space is almost always underused — shelves, hooks on the backs of doors, hanging organizers in cupboards
Avoid overcomplicating this phase. A cardboard box that does the job beats an expensive storage system you’ll abandon.
Step 7: Build Habits That Keep Clutter From Coming Back
Decluttering once won’t fix a recurring problem if the inflow of stuff outpaces the outflow. Clutter is mostly a flow problem, not a storage problem.
The one-in, one-out rule
Every new item that enters the house displaces one existing item. Buy a new jumper, donate an old one. It sounds rigid, but it quickly becomes automatic, and it forces you to be intentional about purchases before you make them rather than after.
Regular resets
A 10-minute tidy at the end of each day stops small accumulations from becoming weekend projects. Once a season — roughly every three months — do a light walkthrough of each room with a single bin bag for obvious discards. This is the maintenance mode that makes big declutters rarely necessary.
If your clutter tends to come back because household tasks keep slipping through the cracks, How to Make a Chore Chart That Actually Works: Audit Before You Design can help you build a system that keeps everyone accountable.
Shop differently
The most effective long-term decluttering strategy is buying less. Not in a deprivation sense, but in a more deliberate sense — pausing 48 hours before non-essential purchases, keeping a wishlist and revisiting it in a month, and asking whether you need the item or just the feeling buying it briefly produces.

Common Mistakes to Avoid
Decluttering someone else’s stuff without their buy-in. Even if you live together, removing another person’s things without their agreement will cause conflict and resentment. Invite, don’t impose.
Trying to do the whole house in a day. This creates chaos, exhausts you, and usually ends with everything back in a pile somewhere.
Keeping things “just in case.” Just-in-case items make up a surprising proportion of household clutter. Ask yourself honestly: what’s the realistic scenario where I need this? And if that scenario arose, could I borrow, rent, or cheaply replace it?
Buying organizers before you’ve finished decluttering. Every professional organizer will tell you the same thing: sort first, shop second.
Conclusion
Decluttering isn’t about achieving a magazine-perfect home or following a specific guru’s system. It’s about getting your space to a point where it works for your actual life, not the life you imagined when you bought things. The process above is straightforward, but it requires repeated small efforts rather than one heroic weekend.
Start with a single drawer today. Not the whole kitchen — one drawer. That’s a real beginning.