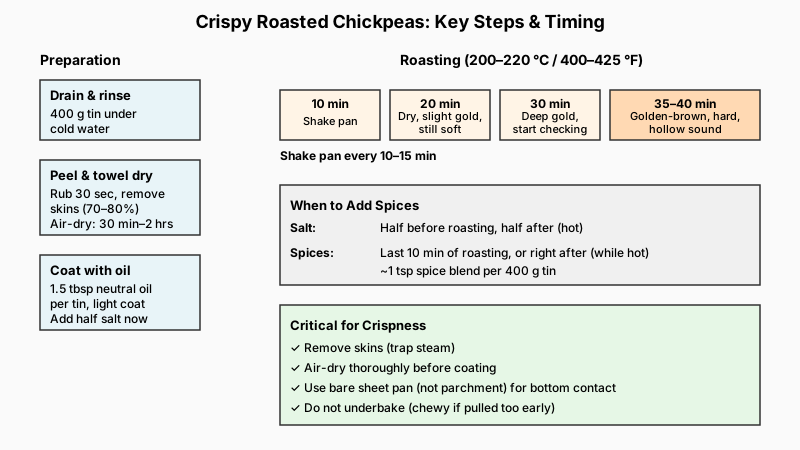
Crispy Roasted Chickpeas: Bone-Dry Beans, Bold Coating Ratios

Roasted chickpeas are one of those snacks that sound simple until you make them badly twice and wonder what everyone else knows that you don’t. The secret isn’t a single trick — it’s a handful of small decisions that stack up. Get them right and you pull a sheet pan of shatteringly crisp, golden legumes out of the oven. Get them wrong and you get chewy, rubbery pebbles that nobody wants.
This guide covers everything: choosing your chickpeas, drying them properly, the oil-and-seasoning ratio, oven temperature, timing, and how to store them without losing that crunch. No filler — just what actually works.
Start With the Right Chickpeas (and Dry Them Thoroughly)
You can use canned chickpeas or home-cooked dried ones. Both work. Canned are faster; home-cooked from dried legumes often produce a slightly denser, nuttier result. If you’re using canned, drain and rinse a 400 g (14 oz) tin under cold water.
The single most important step: remove as much moisture as possible before anything else happens.
Spread the rinsed chickpeas across a clean kitchen towel or several layers of paper towels. Fold the towel over the top and rub gently for about 30 seconds. The skins will start to slip off — and you want to let them, or even encourage it. Those papery outer skins trap steam during roasting and actively prevent crisping. Peel off as many as you have patience for; even removing 70–80% makes a noticeable difference.
After peeling, spread the chickpeas in a single layer and let them air-dry uncovered for at least 30 minutes, or up to a couple of hours. This is not optional if you want real crunch. Some bakers go further and dry them in a 100 °C (210 °F) oven for 20 minutes before seasoning — a useful trick if your kitchen is humid.

If you’re starting from dried chickpeas rather than canned, How to Cook Chickpeas from Dried: Why Soaking Actually Matters explains why proper soaking makes a real difference to texture before they ever hit the oven.
Seasoning and Coating: Get the Ratios Right
Once your chickpeas are genuinely dry, toss them with oil. Use about 1.5 tablespoons of a neutral high-smoke-point oil — avocado, sunflower, or refined coconut — per 400 g tin. Olive oil works fine too, though extra-virgin loses some character at high heat; a lighter olive oil is a reasonable compromise.
A common mistake is adding too much oil. More oil does not equal more crunch — it makes the outside greasy and slows the evaporation of residual moisture. Coat lightly and evenly.
When to add salt and spices matters. If you season before roasting, sugar-containing spices (smoked paprika, chili powder, garlic powder with fillers) can scorch before the chickpeas are done. A practical approach:
- Salt: Add half before roasting, half immediately after while still hot.
- Dry spices: Add in the last 10 minutes of roasting, not at the beginning. Or toss them through right after the chickpeas come out of the oven while the oil is still warm enough to help them adhere.
Flavour Combinations Worth Trying
- Smoked paprika + cumin + cayenne — classic and crowd-pleasing
- Za’atar + lemon zest — earthy, herbal, bright
- Curry powder + turmeric — bold, great over grain bowls
- Cinnamon + brown sugar + a pinch of chili — sweet-heat snack
- Nutritional yeast + garlic powder — savoury, almost cheesy, vegan-friendly
Stick to about 1 teaspoon of spice blend per 400 g as a starting point. Chickpeas are neutral enough to carry strong flavours, but piling on too many competing spices muddies the result.
Roasting: Temperature, Pan Setup, and Timing
Set your oven to 200–220 °C (400–425 °F), conventional heat. Fan-assisted (convection) mode is better if your oven has it — the circulating air accelerates moisture evaporation and gives a more even roast.
Spread the coated chickpeas in a single layer on a rimmed baking sheet. Do not use parchment paper if you can help it — the chickpeas need direct contact with the hot metal for the bottom to blister properly. A bare sheet pan lightly greased, or a seasoned cast-iron pan, produces noticeably better results than parchment.
Roast for 30–40 minutes total, shaking the pan every 10–15 minutes. What you’re looking for:
- At 20 minutes: they should look dry and slightly golden, but they’ll still feel soft when you press one. Don’t panic — this is normal.
- At 30 minutes: colour is deepening, you might hear faint crackling. Start checking closely.
- At 35–40 minutes: deep golden-brown, they sound hollow when you roll them, and they feel hard when pressed.
Do not pull them too early. Undercooked chickpeas look done on the outside but turn chewy within minutes of leaving the oven. When in doubt, add another 5 minutes.
One reliable test: pull one out, let it cool for 90 seconds, and bite it. It should snap, not bend.

Troubleshooting Common Problems
Many of the same crisping principles apply beyond legumes, and Crispy Tofu: 7 Secrets to Getting It Right Every Time tackles a similar set of frustrations for anyone trying to get that same shatter-crisp texture on tofu.
Chickpeas Turn Chewy After Cooling
This is the most common complaint. It usually means:
- Not dried long enough before roasting — trapped moisture is the culprit.
- Pulled from the oven too soon — they need more time than you think.
- Stored while still warm — sealing them before they’ve fully cooled creates steam inside the container.
Always cool chickpeas completely on the open pan before storing.
Burnt on the Outside, Raw Inside
Your oven is too hot, or the chickpeas were wet and steamed initially before the exterior set. Drop the temperature to 200 °C and extend the time.
Skins Keep Burning
If you left many skins on, they’ll char before the interior crisps. Remove more of them at the prep stage.
Uneven Browning
Overcrowding the pan is almost always the cause. If the chickpeas are touching significantly, roast them in two batches or across two pans. Steam needs somewhere to go.
How to Store Roasted Chickpeas
Once fully cooled — and this means at room temperature for at least 20 minutes — store them in a paper bag, an open bowl covered with a paper towel, or a loosely covered jar. Avoid airtight containers. Moisture is the enemy, and a sealed lid traps the small amount of residual humidity still escaping as they cool down further.
At room temperature, properly made roasted chickpeas stay crispy for 2–3 days. After that, they soften noticeably regardless of storage method.
If they’ve gone soft, spread them back on a sheet pan and return to a 200 °C oven for 8–10 minutes. They’ll crisp back up almost as good as fresh.
Avoid refrigerating them — the cold, humid environment of a fridge destroys the texture faster than anything else.

Using Crispy Chickpeas Beyond Snacking
A bowl of roasted chickpeas is a perfectly valid snack, but they do more than that:
- Salad topper: Scatter over a Caesar or grain salad as a crunchy, protein-rich crouton substitute.
- Soup garnish: Add at the table (not while cooking) over lentil or tomato soup.
- Grain bowl component: Works especially well with farro, roasted vegetables, and tahini dressing.
- Flatbread topping: Press into focaccia-style dough before baking.
- Trail mix: Combine with nuts, dried fruit, and dark chocolate chips for a higher-protein option.
A Quick Reference: The Crispy Chickpea Method
| Step | Detail |
|---|---|
| Chickpeas | 400 g canned, drained and rinsed |
| Dry | Towel-dry + peel skins + 30 min air-dry |
| Oil | 1.5 tbsp neutral oil |
| Temperature | 200–220 °C (400–425 °F), fan-assisted preferred |
| Time | 30–40 min, shaking every 10–15 min |
| Spices | Added in last 10 min or right after |
| Cool | Fully on open pan before storing |
| Storage | Loose container, room temp, 2–3 days |
Conclusion
Crispy roasted chickpeas are worth mastering. They’re cheap, genuinely nutritious (roughly 6 g of protein and 5 g of fibre per half-cup serving of canned chickpeas before roasting), and flexible enough to go anywhere from a salted snack to a composed grain bowl topping.
The formula is straightforward: start dry, stay dry, use the right heat, and give them enough time. Once you’ve nailed the base method, the seasoning variations are limited only by what’s in your spice drawer.