How to Stop a Running Toilet: Fix It Fast & Save Water

A running toilet wastes more water than most people expect — somewhere between 200 and 7,000 gallons per day depending on how badly the fill valve or flapper is leaking. That’s not a rounding error; it’s a real hit on your water bill and a surprisingly easy fix once you know where to look.
This guide walks through every common cause of a running toilet, how to diagnose which one you’re dealing with, and exactly how to fix it — usually in under 30 minutes with parts that cost less than $20.
What’s Actually Inside Your Toilet Tank
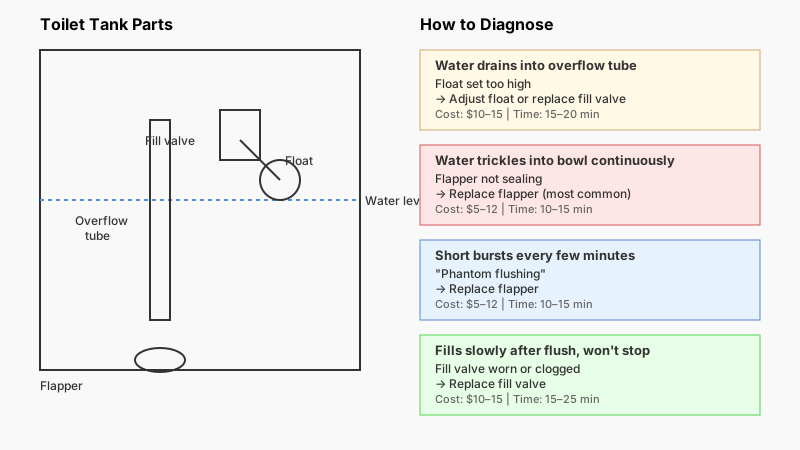
Before pulling anything apart, it helps to know the three main components that control water flow:
- The flapper — a rubber seal at the bottom of the tank that opens when you flush and closes to hold water while the tank refills.
- The fill valve (ballcock) — controls how water enters the tank from the supply line. It shuts off automatically when the water reaches the correct level.
- The float — either a ball float on an arm or a cup float that rides up and down on the fill valve. It signals the fill valve to shut off when the water is high enough.
Most running toilet problems trace back to one of these three parts. Identifying which one is failing takes about two minutes.

Step 1 — Diagnose the Problem Before You Buy Anything
Does the toilet run constantly?
Lift the tank lid and listen. If water is trickling into the bowl continuously, the flapper isn’t sealing properly. You can confirm this quickly: put a few drops of food coloring into the tank. Wait 10 minutes without flushing. If color appears in the bowl, you have a flapper leak.
Is the water running into the overflow tube?
The overflow tube is the vertical plastic pipe in the center of the tank. If water is spilling into it, your float is set too high, keeping the fill valve open even after the tank is full. You’ll see a thin stream of water draining into it — sometimes almost silent.
Does the toilet run in short bursts every few minutes?
This is often called “phantom flushing.” The tank slowly loses water through a leaking flapper, the level drops, the fill valve kicks on briefly to top it up, then it shuts off — and the cycle repeats. Again, a failing flapper is the usual suspect.
Does it run only after a flush and take a long time to stop?
If the toilet fills but the fill valve never quite shuts off — or shuts off but then restarts — you probably have a worn or clogged fill valve.
Step 2 — Fix a Leaking Flapper (Most Common Cause)
The flapper is made of rubber and degrades over time from chlorine in tap water, mineral deposits, and just plain age. Replacing it is the first thing to try.
What you’ll need:
- Adjustable wrench or pliers
- Replacement flapper (most toilets use a universal 2-inch flapper; check your model if unsure)
- Towel
Steps:
- Turn off the water supply valve on the wall behind the toilet. Turn clockwise until it stops.
- Flush the toilet to drain the tank as much as possible.
- Unhook the flapper’s side ears from the pegs on the overflow tube. Disconnect the chain from the flush handle arm.
- Take the old flapper to a hardware store or photograph it before buying a replacement — flappers aren’t entirely universal. Brands like Korky and Fluidmaster both make reliable aftermarket options.
- Snap the new flapper’s ears onto the overflow tube pegs. Clip the chain to the flush arm, leaving about half an inch of slack. Too much slack and the flapper closes too early; too tight and it won’t seal properly.
- Turn the water supply back on. Let the tank fill and listen. Run the food coloring test again after 10 minutes to confirm the seal.
Total cost: $5–$12. Time: 10–15 minutes.

Step 3 — Adjust or Replace the Fill Valve
Adjusting the float level
If water is running into the overflow tube, the water level in the tank is set too high. The target level is typically about an inch below the top of the overflow tube — most tanks have a marked line.
Ball float (older toilets): Bend the float arm gently downward, or turn the adjustment screw at the valve clockwise to lower the float’s shutoff point.
Cup float (modern toilets): Pinch the clip on the side of the fill valve and slide the float down the shaft. This lowers the cutoff level.
Flush, let the tank refill, and check whether the water now stops below the overflow tube.
Replacing the fill valve
If adjusting the float doesn’t work — or if you hear a constant hissing from the valve itself — the fill valve likely needs replacing. A Fluidmaster 400A or equivalent universal fill valve costs around $10–$15 and fits most toilets.
Steps:
- Shut off the water supply valve and flush to drain the tank.
- Use a sponge or towel to remove remaining water from the tank.
- Disconnect the water supply line from the bottom of the tank (have a small container ready for drips).
- Unscrew the locknut securing the fill valve from underneath the tank. Lift the old valve out.
- Set the height of the new valve according to the package instructions — the critical refill tube outlet should sit an inch above the overflow tube.
- Hand-tighten the locknut under the tank, then snug it with pliers (don’t overtighten — the tank is porcelain and can crack).
- Reconnect the supply line, clip the small refill tube into the overflow tube, turn the water on, and adjust the float to the correct water level.
Total cost: $10–$18. Time: 20–30 minutes.
Step 4 — Check the Flush Valve Seat
If you’ve replaced the flapper and the toilet still runs, the problem may be the flush valve seat — the ring the flapper presses against to seal. Over time, mineral deposits or physical damage can pit or warp the seat, preventing a clean seal no matter how new the flapper is.
Run your finger around the seat. If it feels rough, gritty, or has visible chips, you have two options:
- Light scoring: Use fine-grit (400-grit) wet-dry sandpaper to smooth the seat carefully. Rinse well after.
- Severe damage: Replace the entire flush valve — a bigger job that may require draining and removing the tank. At that point, calling a plumber is a reasonable call, though it’s still a DIY-able repair if you’re comfortable with it.
Step 5 — Inspect the Handle and Chain
Sometimes the fix is embarrassingly simple. A chain that’s too long can get trapped under the flapper, holding it open. Or the handle arm can become bent so the chain stays taut even at rest. Check:
- Is the chain catching on anything inside the tank?
- Is there enough slack in the chain when the handle is at rest?
- Is the handle arm cracked or out of position?
Adjusting the chain takes 30 seconds. Replacing a handle arm costs about $8 and takes 10 minutes.
When to Call a Plumber
Most running toilet repairs are well within DIY range. But call a plumber if:
- You find cracks in the tank or bowl
- The shutoff valve behind the toilet won’t close fully (you’ll need the valve replaced before any other repair is possible)
- Water appears around the base of the toilet rather than in the tank — that’s a wax ring or flange issue, a separate problem entirely
- You’ve replaced the flapper and fill valve and the toilet still runs with no obvious cause
A plumber’s visit typically costs $100–$250 for a straightforward toilet repair, depending on your location.
How to Prevent a Running Toilet
Once fixed, a few habits extend the life of your tank components:
- Use in-tank cleaners sparingly. Bleach tablet cleaners are hard on rubber flappers and can degrade them within months. If you use them, check your flapper annually.
- Check for leaks seasonally. The food coloring test takes two minutes and can catch a slow leak before it becomes an obvious run.
- Know your water chemistry. Hard water accelerates mineral buildup on valves and seats. If you’re in a hard-water area, inspect tank components every year or two and descale with white vinegar if needed.
- Don’t use the tank as a shelf. Heavy items resting on the tank lid can vibrate and shift components out of alignment.
If you’re already thinking about cutting down on water waste, How to Make Your Home More Energy Efficient: Seal, Insulate, Save offers more ways to trim utility bills throughout the house.
Wrapping Up
A running toilet is almost always one of three things: a worn flapper, a misadjusted or failing fill valve, or a chain that’s caught where it shouldn’t be. Start with the cheapest and simplest fix (flapper replacement), confirm it worked, and only move to the next component if the problem persists.
The whole repair kit — flapper plus fill valve — runs under $25 at any hardware store or online, and the job rarely takes more than half an hour. That’s a small investment against the water waste and the cost of ignoring it.