How to Make Your Home More Energy Efficient: Seal, Insulate, Save

Most homes waste a surprising amount of energy — not because of one big problem, but because of dozens of small ones adding up. A gap under the front door, an aging water heater, a thermostat that never quite learned your schedule. Taken together, these issues can inflate your utility bills by 20–30% or more. The good news is that improving home energy efficiency doesn’t require a full renovation. You can start with a ten-dollar roll of weatherstripping and scale up from there.
This guide walks through twelve practical upgrades, ordered roughly from easiest and cheapest to more involved, so you can pick what fits your budget and situation right now.
1. Seal Air Leaks First — Before You Do Anything Else
Heating and cooling account for roughly half of a typical home’s energy use. If conditioned air is leaking out through gaps around windows, doors, pipe penetrations, and attic hatches, you’re paying to heat or cool the outdoors. Air sealing consistently delivers the best return on investment of any home energy measure.
Where to look:
- Around door frames and window sashes
- Where walls meet the floor and ceiling
- Electrical outlets and switch plates on exterior walls
- Where pipes and wires enter through the foundation or walls
- Attic hatch edges
Use caulk for stationary gaps (window frames, baseboards) and weatherstripping for moving parts (door edges, operable windows). Foam backer rod is useful for larger gaps before caulking. This work takes a weekend, costs under $50 for most homes, and can cut heating and cooling costs by 10–20%.

2. Add or Upgrade Insulation
Air sealing and insulation are partners. Sealing stops air movement; insulation slows heat transfer. The two most commonly under-insulated areas in a home are the attic and the basement rim joists.
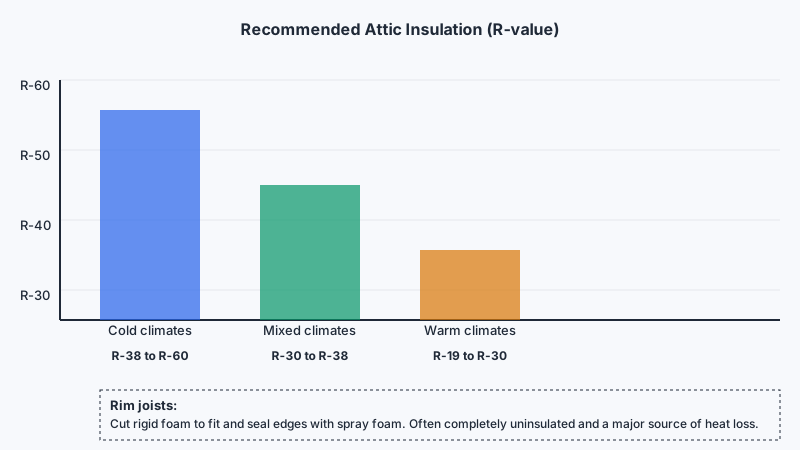
In a typical house, adding blown-in cellulose or fiberglass insulation to an attic that only has a few inches of existing insulation can reduce heating bills noticeably. Most building codes and energy programs recommend attic insulation reaching R-38 to R-60 in cold climates. Check what you have first — a ruler stuck into your attic insulation gives you a reasonable depth estimate, and most insulation products list R-value per inch on the bag.
Rim joists (the perimeter framing at the top of your foundation wall) are notorious for heat loss and often completely uninsulated. Cutting rigid foam to fit and sealing the edges with spray foam is a straightforward DIY project that can meaningfully reduce drafts in first-floor rooms.
3. Switch to LED Lighting Throughout
If you haven’t already replaced incandescent and CFL bulbs with LEDs, this is the easiest upgrade with almost no downside. Modern LED bulbs use roughly 75% less energy than incandescents and last 15–25 times longer. The quality of light has improved dramatically — you can now find LEDs in warm white (2700K), neutral (3000K–3500K), and daylight (5000K) to match any room’s feel.
For a typical household running 20–30 light fixtures, switching to LEDs can save $100–$200 per year in electricity costs. The payback period is often under a year.
4. Install a Smart or Programmable Thermostat
A thermostat that automatically adjusts temperature when you’re asleep or away removes a consistent source of waste. Turning your thermostat back 7–10°F for eight hours a day can save roughly 10% on heating and cooling annually, according to the U.S. Department of Energy.
Programmable thermostats start around $30 and work fine for households with predictable schedules. Learning thermostats (like the Ecobee or Google Nest) cost $150–$250 but adapt to your habits and can integrate with utility demand-response programs in some areas. Both are straightforward to install if you’re comfortable with basic wiring.

5. Upgrade to ENERGY STAR Appliances When Replacements Are Due
Don’t rush out to replace working appliances — the energy and materials embedded in manufacturing a new appliance usually take years to recoup. But when something reaches end of life, choose an ENERGY STAR-certified replacement. ENERGY STAR refrigerators, dishwashers, and washing machines use significantly less energy and water than older models.
Older refrigerators from the 1990s or early 2000s can consume 700–1,000 kWh per year. A modern ENERGY STAR model may use 300–400 kWh. If you have an old second refrigerator in the garage running year-round, unplugging it (or replacing it with a smaller, efficient model) often saves $100–$150 a year by itself.
6. Tackle Your Water Heater
Water heating is typically the second or third largest energy expense in a home, after heating and cooling. A few changes can make a real difference:
- Lower the temperature setting. Many water heaters are factory-set to 140°F. Dropping to 120°F is safe for most households, reduces standby heat loss, and slows mineral buildup.
- Insulate the first few feet of hot water pipes leading from the heater with foam pipe insulation — inexpensive and easy.
- Consider a heat pump water heater when your current unit needs replacing. These use roughly 60–70% less electricity than conventional electric resistance heaters. They work best in conditioned spaces with enough surrounding air volume (usually at least 700–1,000 cubic feet).
While you’re focused on cutting water and energy waste, How to Stop a Running Toilet: Fix It Fast & Save Water is another quick fix worth tackling.
7. Address Windows Strategically
Full window replacement is expensive — typically $500–$1,500 per window installed — and the energy payback period is long, often exceeding 20 years. Before replacing, try:
- Interior window film (low-e film) applied directly to existing glass can reduce heat gain and loss meaningfully at a fraction of the cost.
- Storm windows added over single-pane windows improve thermal performance significantly for less than replacement cost.
- Heavy lined curtains on north- and east-facing windows in winter reduce drafts and heat loss at night.
- Exterior shading — awnings, exterior blinds, or deciduous trees — blocks summer sun on south- and west-facing windows without reducing winter solar gain.
If windows are genuinely failing (fogging between panes, cracked frames, won’t seal), replacement makes more sense. Look for double-pane units with low-e coatings and a U-factor below 0.30 for cold climates.

8. Optimize Your Heating and Cooling Systems
Even a well-sealed, well-insulated home needs an efficient HVAC system that’s properly maintained.
Annual or seasonal habits that matter:
- Replace air filters every 1–3 months. A clogged filter forces the system to work harder.
- Have the system professionally serviced once a year — a tune-up keeps it running at rated efficiency.
- Seal and insulate ductwork if you have a forced-air system. Studies by Lawrence Berkeley National Laboratory found that duct leakage in typical U.S. homes accounts for 20–30% of HVAC energy loss.
Longer-term upgrades:
- If your furnace or central AC is over 15 years old, a modern high-efficiency replacement will likely pay for itself through lower bills over time.
- Heat pumps (including mini-split systems) are worth serious consideration for both heating and cooling. Modern cold-climate heat pumps operate efficiently well below freezing and can replace both a furnace and an air conditioner in one system.
9. Manage Standby and Phantom Loads
Electronics and appliances that are plugged in but not in use still draw power. This “phantom load” or “standby power” can account for 5–10% of a household’s electricity use. Smart power strips that cut power to devices when a primary device (like a TV) is turned off are an easy partial fix. Unplugging chargers, gaming consoles, and entertainment systems when not in use is more effective but requires the habit.
A smart plug with energy monitoring (many cost under $20) is a useful diagnostic tool — plug in a device and see exactly how much it draws on standby.
10. Improve Ventilation Without Wasting Energy
Tighter homes — which is what you’re creating with air sealing — need controlled ventilation to maintain air quality. Bathroom exhaust fans and range hoods should vent to the outside (not into an attic). Use them when cooking and bathing, then turn them off — running exhaust fans continuously moves a lot of conditioned air outside.
For very tight homes, a Heat Recovery Ventilator (HRV) or Energy Recovery Ventilator (ERV) brings in fresh air while capturing 70–80% of the heat (or cooling) from the outgoing air. These are more common in new construction but can be added to existing homes.
11. Use Landscaping to Your Advantage
This one takes longer to deliver results, but strategically placed trees and shrubs do meaningful work. Deciduous trees on the south and west sides of a house shade summer sun while allowing winter sun through after they drop their leaves. The U.S. Department of Energy estimates that well-placed trees can reduce summer cooling costs by 15–35%.
Evergreen trees and shrubs on the north and northwest sides act as windbreaks, reducing heating loads in cold climates.
12. Get a Professional Energy Audit
If you’re serious about reducing your home’s energy use, a professional energy audit is the most efficient starting point. Certified auditors use blower-door tests (which pressurize your house to find leaks), infrared cameras (to spot insulation gaps and thermal bridges), and combustion safety testing to give you a prioritized, building-specific action plan.
Many utility companies offer subsidized or free audits for their customers. Independent auditors typically charge $300–$600, but the recommendations often identify savings that dwarf that cost. Look for auditors certified through BPI (Building Performance Institute) or RESNET.
Putting It All Together
Energy efficiency improvements compound. Sealing your envelope reduces the load on your HVAC; a smaller load means a smaller system can handle the job; a well-maintained smaller system runs fewer hours. The upgrades reinforce each other.
A reasonable approach for most homeowners:
- Start with free and cheap fixes — air sealing, weatherstripping, LED bulbs, thermostat adjustments.
- Add insulation where it’s lacking.
- Get an energy audit to prioritize bigger investments.
- Replace major equipment (HVAC, water heater) with high-efficiency units when they reach end of life.
You don’t have to do everything at once. Pick one section above, act on it this month, and move to the next. Each step independently reduces your bills and increases your home’s comfort — and the improvements stay with the house.
If this project sparked a broader interest in sustainable living, Easy Ways to Be More Eco Friendly at Home and Beyond offers plenty of additional ideas beyond the home.