Shortcrust Pastry by Hand: The Method That Actually Works

Making shortcrust pastry by hand is one of those kitchen skills that sounds intimidating until you do it once and realize the whole process takes about ten minutes of active work. No food processor required, no stand mixer, no special equipment — just your fingers, a bowl, a rolling pin, and a bit of patience.
The reason hand-mixing is worth learning is not nostalgia. Cold hands and a light touch give you direct feedback at every stage, which means you are far less likely to overwork the dough. A machine that runs two seconds too long can turn a crumbly shortcrust into a tough one. Your fingers naturally stop when the texture feels right.

The Ingredient Proportions That Matter
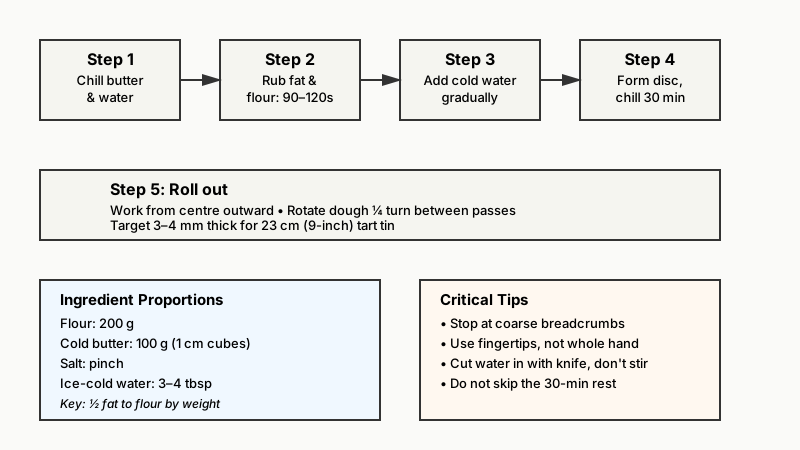
Shortcrust pastry follows a ratio that bakers return to again and again: half fat to flour by weight. A simple, reliable all-purpose batch:
- 200 g plain (all-purpose) flour
- 100 g cold unsalted butter, cut into 1 cm cubes
- Pinch of fine salt
- 3–4 tablespoons ice-cold water (add gradually)
For a sweet shortcrust (pâte sucrée style), add 1–2 tablespoons of caster sugar and one egg yolk in place of part of the water. The egg yolk adds richness and helps the pastry hold its shape when baked blind.
Why cold butter matters: the goal is to keep the fat in distinct, pea-sized pockets that have not melted into the flour. When the pastry hits the oven, those butter pockets create steam, which separates the layers and produces a short, crumbly texture. Warm butter gets absorbed into the flour protein network, developing gluten and making the result tough.
On flour: plain flour works well. Bread flour has more protein and encourages gluten development — avoid it here. Some bakers use a mix of plain flour and a small amount of cornflour (cornstarch), which makes the crust even more tender. A ratio of about 90% plain to 10% cornflour is a reasonable experiment if you want a more delicate result.
The Hand Method, Step by Step
1. Chill everything before you start
Put the cubed butter in the freezer for 10–15 minutes. Keep the water in the fridge. If your kitchen is warm (above about 22 °C / 72 °F), run your hands under cold water and dry them before you start.
2. Combine the fat and flour
Tip the flour and salt into a large bowl. Add the cold butter cubes. Now work quickly: using your fingertips — not your whole hand, which is too warm — pick up some flour and butter together and rub them between thumb and fingers, letting the mixture fall back into the bowl. Repeat in a rhythmic, lifting motion.
You are not squeezing. The motion is a gentle smear-and-lift rather than a pinch-and-press. After about 90 seconds to 2 minutes, the mixture should look like coarse breadcrumbs, with some pieces still slightly larger than others. Those larger pieces are fine and actually desirable — they become the flaky spots.
Stop when the mixture resembles rough, sandy breadcrumbs. Overworking at this stage is the most common mistake.
3. Add the water carefully
Sprinkle in the cold water one tablespoon at a time, stirring lightly with a table knife or palette knife after each addition. You are trying to distribute moisture without activating gluten, so use a cutting motion rather than vigorous stirring.
The dough should just come together when you press a handful between your palms. It should not be sticky, should not crack apart at the edges, and should not look wet. Three tablespoons is often enough for a 200 g batch; a fourth tablespoon is sometimes needed depending on humidity and flour brand. Add slowly — it is much harder to fix a wet dough than a dry one.
4. Bring it together
Once the dough starts clumping, tip it onto a lightly floured surface and press it into a flat disc with the heel of your hand — just a few presses, not kneading. The French technique called fraisage (smearing the dough once or twice across the work surface) can improve texture marginally, but it is easy to overdo. Two smears maximum, then stop.
Wrap the disc in cling film and refrigerate for at least 30 minutes. This is the step many people skip, and it is not optional. Resting lets the gluten strands relax (so the pastry rolls out without springing back), and it re-firms the butter so you get good structure during baking.

5. Rolling out
Work on a lightly floured surface. Roll from the center outward, rotating the dough a quarter turn between passes rather than rolling back and forth over the same spot. This keeps thickness even and prevents tearing.
For a standard 23 cm (9-inch) tart tin, roll to roughly 3–4 mm thick. Lift the dough by folding it loosely over the rolling pin, then drape it into the tin. Press it in gently without stretching — stretched pastry shrinks back during baking. Trim the overhang with a knife or by rolling the pin across the rim.
6. Blind baking (when needed)
For wet or custardy fillings, blind bake the shell before adding the filling. Line the chilled shell with baking parchment and fill with baking beans or dried chickpeas. Bake at 190 °C / 375 °F (fan 170 °C) for 15 minutes, then remove the beans and parchment and bake for another 5–8 minutes until the base looks dry and just starting to color. The edges will be pale gold.
A tiny crack in the base can be patched with a thin piece of raw pastry pressed into place before the second bake — it disappears completely in the oven.
Common Problems and What Causes Them
Shrinkage during baking: usually means the pastry was stretched during lining, or did not rest long enough. Let it rest again in the tin in the fridge for 15 minutes before baking.
Tough, hard texture: gluten was overdeveloped. This happens from working the dough too long or adding too much water. Keep everything cold and stop mixing earlier than you think you need to.
Crumbly dough that won’t come together: not enough water, or the fat was cut in too finely (no distinct pieces left). Add water half a teaspoon at a time, pressing between additions.
Soggy bottom: the filling was too wet, or the tin was not preheated. A dark metal tin conducts heat better than ceramic; placing the tin on a preheated baking sheet also helps set the base faster.
Uneven browning: rolling thickness was uneven. The quarter-turn rolling technique and a consistent light pressure fix this over time.
If you’re building a savory pie filling to go with your pastry, How to Cook Chickpeas from Dried: Why Soaking Actually Matters explains why proper preparation makes such a difference in texture.
Variations Worth Knowing
For another baking project that hinges on technique over ingredients, How to Make a Fluffy Frittata: 7 Secrets That Actually Work is worth a look.
Whole wheat shortcrust
Substitute up to half the plain flour with whole wheat flour. The bran cuts gluten strands mechanically, so the result is more tender than you might expect, but with a slightly nuttier flavor and a coarser crumb. Use all the same proportions; you may need a touch more water.
Nut-enriched pastry
Replace 30–40 g of the flour with finely ground almonds or hazelnuts. This is particularly good for chocolate tarts or fruit flans. The fat from the nuts means you can sometimes reduce the butter slightly.
Olive oil shortcrust
Replace the butter with 70–80 ml of good olive oil for a dairy-free version. The result is more cracker-like and less flaky — better suited to savory applications. Mix the oil directly into the flour with a fork; it will not rub in the way butter does.
Gluten-free shortcrust
Use a 1:1 gluten-free plain flour blend with added xanthan gum (most commercial blends include it). The texture is more fragile: rolling between two sheets of cling film helps enormously, and chilling the lined tin before baking prevents slumping.
Frequently Asked Questions
Can I freeze shortcrust pastry dough?
Yes, and it freezes well. Wrap the disc tightly in cling film and place in a zip-lock bag. It will keep for up to two months. Defrost overnight in the fridge, not at room temperature, so the butter stays cold. You can also freeze a fully lined, unbaked tart shell in its tin.
Why does my pastry crack when I roll it out?
It is either too cold or too dry. If the dough came straight from a very cold fridge, let it sit at room temperature for 5 minutes before rolling. If it was always crumbly, the dough needed a little more water.
Is lard better than butter for shortcrust?
For pure shortness (a very crumbly texture), lard has a slight edge because its fat crystals are larger and its melting point is higher, keeping them solid longer during mixing. However, lard adds almost no flavor. Many traditional bakers use half lard, half butter: the lard improves texture, the butter adds flavor. Neither is objectively wrong.
What is the difference between shortcrust and rough puff?
Shortcrust rubs the fat into the flour until no visible lumps remain. Rough puff keeps the butter in much larger chunks — sometimes the size of a walnut — then folds and rolls repeatedly to create distinct, laminated layers. Rough puff rises and flakes more dramatically; shortcrust stays crumbly and dense.
Do I need to grease the tin?
For most well-floured tins and good-quality nonstick tins, greasing is unnecessary — there is already plenty of fat in the pastry. For older or ceramic tins, a very light butter-and-flour dusting provides insurance. Silicone tins never need greasing.