How to Cook Chickpeas from Dried: Why Soaking Actually Matters

Canned chickpeas are convenient, but dried chickpeas are something else entirely — cheaper per pound, free of added sodium, and noticeably creamier once cooked. If you’ve never made them from scratch, the process is simpler than most people expect. You just need to plan ahead.
This guide covers everything: soaking methods, cooking methods (stovetop, pressure cooker, slow cooker), how to tell when they’re done, and what to do with them afterward.
Why Bother Starting from Dried?
The short answer: flavor and texture. Dried chickpeas cooked low and slow have a buttery, slightly nutty quality that canned versions rarely match. Their skins stay intact without turning mushy, and the cooking liquid — which some cooks call aquafaba — is a useful byproduct you’d otherwise throw away.
On the practical side, a 1-pound bag of dried chickpeas costs a fraction of an equivalent amount in cans and yields roughly 6 cups of cooked chickpeas (the equivalent of about three 15-ounce cans). They also keep in a sealed bag or jar for up to a year without quality loss, so buying in bulk actually makes sense.
There’s one real trade-off: time. Dried chickpeas need to soak and then cook, which adds planning. But most of that time is hands-off.
The same logic applies across the pulse family, and our broader guide How to Cook Dried Beans from Scratch (The Right Way) covers the principles that carry over to any dried legume.
Step 1: Sort and Rinse
Before anything else, spread the dried chickpeas on a flat surface or baking sheet and pick out any shriveled peas, small stones, or debris. Bag lots can contain these. Then rinse the chickpeas under cold running water in a colander.
This step takes about two minutes and prevents unpleasant surprises later.
Step 2: Soaking — Which Method to Use
Soaking reduces cooking time significantly and helps the chickpeas cook evenly. It also leaches out some of the oligosaccharides that cause digestive discomfort, which is a genuine benefit.

Overnight Soak (Recommended)
Place the sorted, rinsed chickpeas in a large bowl. Cover with at least 3 inches of cold water — they will roughly double in size. Leave at room temperature for 8–12 hours, or refrigerate if your kitchen is warm or if you’re soaking longer than 12 hours. Drain and rinse before cooking.
This method requires no energy and produces very evenly hydrated chickpeas.
Quick Soak (For the Impatient)
Put the chickpeas in a large pot and cover with 3 inches of water. Bring to a boil, boil hard for 2 minutes, then turn off the heat. Let them sit in the hot water for 1 hour. Drain, rinse, and proceed to cooking.
Quick-soaked chickpeas cook slightly less evenly than overnight-soaked ones, but the difference is minor.
No-Soak Cooking
You can skip soaking entirely if you’re using a pressure cooker (see below). On the stovetop without soaking, expect cooking times to roughly double and results to be slightly less consistent.
Step 3: Cooking Methods
Stovetop (Classic Method)
This is the most universally accessible method and gives you the best control.
- Place the drained, soaked chickpeas in a large pot. Cover with fresh cold water by about 2 inches — don’t use the soaking water.
- Bring to a boil over high heat, then reduce to a gentle simmer. Skim off any foam that rises in the first few minutes.
- Add a pinch of salt after the first 20 minutes of simmering. Adding salt too early can toughen the skins slightly, though this is less dramatic than old cooking lore suggests. A bay leaf or a few smashed garlic cloves in the pot adds background flavor.
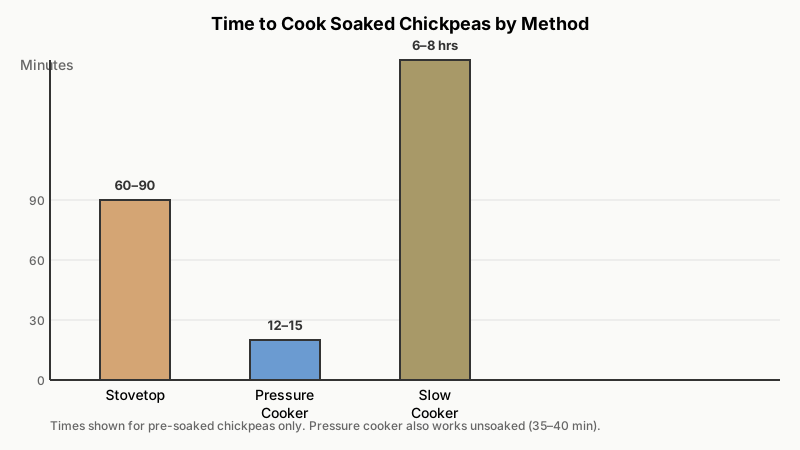
- Simmer, partially covered, for 60–90 minutes for overnight-soaked chickpeas. Start checking at the 45-minute mark.
- They’re done when you can easily press a chickpea between two fingers and it yields without graininess at the center.
Water ratio: roughly 3 cups of water per 1 cup of dried chickpeas.

Pressure Cooker or Instant Pot
This is the fastest route and the method that genuinely doesn’t require soaking.
- Soaked chickpeas: Cover with 2–3 inches of fresh water. Cook on high pressure for 12–15 minutes, then allow a natural pressure release for 15 minutes before venting.
- Unsoaked chickpeas: Same water ratio, but cook on high pressure for 35–40 minutes, followed by a full natural pressure release.
The Instant Pot (or any electric pressure cooker) is particularly good here because it holds temperature consistently without supervision. The resulting chickpeas are slightly softer than stovetop ones — perfect for hummus, soups, and stews.
Slow Cooker
Ideal if you want to set something going before you leave for the day.
- Place soaked, drained chickpeas in the slow cooker. Cover with 2 inches of water.
- Cook on LOW for 6–8 hours or HIGH for 3–4 hours.
- Add salt and aromatics in the last hour.
One note: slow cookers don’t reach a sustained rolling temperature, so they work best with pre-soaked chickpeas. Under-soaked or unsoaked dried chickpeas may not fully soften, especially if your slow cooker runs cool.
How to Tell When Chickpeas Are Done
The squeeze test is reliable: pick out a chickpea and pinch it between your thumb and index finger. It should squish completely without any hard or chalky center. For hummus, you want them quite soft. For salads or grain bowls, slightly firmer is better.
You can also taste one. That chalky, starchy center flavor means they need more time.
If some chickpeas are done and others aren’t, that’s usually a sign of uneven soaking or old dried chickpeas (see below).
Troubleshooting Common Problems
Chickpeas won’t soften, even after an hour: Old chickpeas are the most common culprit. Dried legumes older than 1–2 years can become so dehydrated that even extended cooking won’t fully hydrate them. This is called the “hard-to-cook” defect and is caused by changes in the cell wall during long storage. Buy from a store with high turnover and check packaging dates when possible.
Another cause: acidic cooking liquid. Tomatoes, vinegar, citrus juice, and even some mineral-heavy tap water can slow hydration. Add acidic ingredients only once the chickpeas are fully cooked.
Skins slipping off: This is mostly cosmetic and doesn’t affect flavor. It’s more common with quick-soaked chickpeas or when the water boils too vigorously. A gentle simmer prevents most of it.
Cooking liquid turned thick and green-gray: Normal. That’s dissolved starches and some plant compounds. The liquid (aquafaba) is safe to use and valuable in cooking.
Saving and Storing Cooked Chickpeas
Once cooked, let the chickpeas cool in their cooking liquid — this keeps them moist. Then:
- Refrigerator: Store in an airtight container submerged in some of the cooking liquid. Use within 5 days.
- Freezer: Drain, spread on a baking sheet to freeze individually, then transfer to a zip-lock bag. Frozen cooked chickpeas keep well for up to 3 months and thaw quickly in warm water or a hot pan.
Don’t discard the aquafaba. Refrigerate it separately — it whips like egg whites and works in meringues, mayonnaise, and baked goods. It also adds body to soups and stews.

What to Do With Them
Cooked chickpeas from dried are versatile beyond hummus:
- Roasted chickpeas: Toss drained, very dry chickpeas with olive oil and spices, roast at 400°F (200°C) for 25–30 minutes until crispy. They deflate after a few hours, so eat them soon.
- Chana masala: The quintessential North Indian chickpea curry. The firm texture of home-cooked chickpeas holds up much better than canned in this dish.
- Pasta e ceci: A thick Italian pasta-and-chickpea soup where the chickpeas lightly thicken the broth — home-cooked chickpeas make a genuine difference here.
- Grain bowls and salads: Add protein and substance without overpowering other ingredients.
- Falafel: Some recipes call for uncooked soaked chickpeas rather than cooked ones; always check before you start.
If chickpeas have converted you to cooking from scratch, How to Cook Lentils from Scratch: Why Variety Choice Matters Most shows how a different pulse with no soaking required can fit into your rotation just as easily.
A Few Tips That Actually Matter
- Salt the water. Lightly salted cooking water (about 1 teaspoon of kosher salt per quart) seasons the chickpeas from the inside and doesn’t toughen them if added after the first 15–20 minutes.
- Don’t crowd the pot. Use a larger pot than you think you need. Chickpeas expand and need room to circulate.
- Batch cook. Since the effort is roughly the same for 1 cup as for 4 cups, cooking in bulk and freezing portions is genuinely efficient.
- Baking soda hack: Adding 1/4 teaspoon of baking soda per pound of chickpeas to the soaking or cooking water speeds up softening by raising the pH, which breaks down pectin in the cell walls faster. Useful for hummus where you want very silky results. Skip it if you want firmer chickpeas for salads.
Conclusion
Cooking chickpeas from dried is one of those kitchen fundamentals that rewards you every time you do it — better flavor, lower cost, more flexibility. The overnight soak plus a 60–90 minute simmer is the reliable baseline. Pressure cookers compress that into 15 minutes of active cooking. Either way, you end up with something noticeably better than what comes from a can, plus a pot of useful aquafaba on the side.
Start with a pound, cook the whole batch, and freeze what you don’t use. After one round, it becomes a habit.