Natural Wood Furniture Finishes: How to Maintain Them at Home

Wood furniture that has been properly finished can last generations — but only if you actually look after the finish, not just the wood underneath. Most people clean the surface and call it done. The finish is what does the real work: it seals the grain, repels moisture, and gives the piece its visual character. Neglect it, and you end up with white rings, grey patches, peeling edges, and eventually a refinishing job that costs far more time and money than routine care would have.
This guide covers the most common natural wood finishes — oil, wax, shellac, and lacquer — and gives you a practical, room-by-room maintenance plan that actually fits into real life.
Understanding What Finish You’re Working With
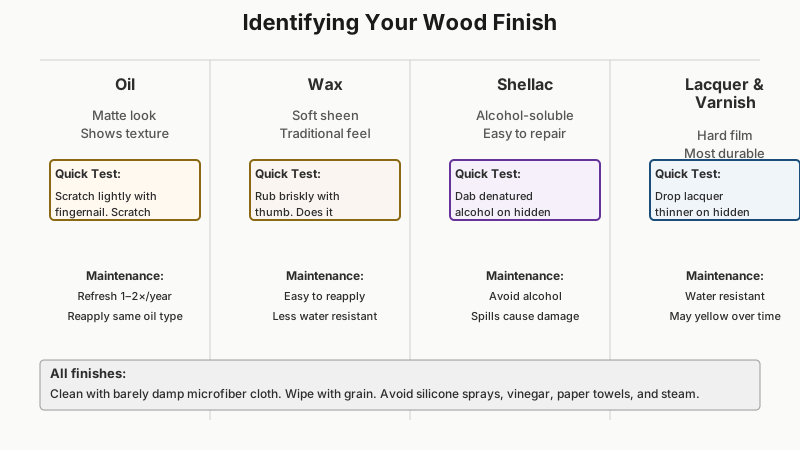
Before you buy a single product or reach for a cloth, identify your finish. Using the wrong cleaner or conditioner on the wrong finish can permanently damage the surface.
Oil Finishes
Penetrating oil finishes — linseed, tung, Danish oil, and hardening oils — soak into the wood fibers rather than forming a film on top. The result is a matte, natural look that shows the wood’s texture clearly. The downside: they offer less surface protection than film-forming finishes, so they need refreshing more often — typically once or twice a year depending on use.
Quick test: Scratch a hidden area lightly with your fingernail. If the wood looks almost the same and the scratch disappears when you rub it, you likely have an oil finish.
Wax Finishes
Beeswax, carnauba, and paste wax are traditional finishes often applied on top of an oil or shellac base. They produce a warm, soft sheen. Wax is easy to reapply but offers less resistance to water and heat than modern film finishes.
Quick test: Rub a small area briskly with your thumb. If it starts to shine, you probably have wax.
Shellac
Shellac — derived from lac resin — was the go-to furniture finish for much of the 19th and early 20th centuries, and it’s still used on antiques and some high-end pieces. It’s alcohol-soluble, which means spilled wine or hand sanitizer can immediately dull or dissolve it. On the positive side, it’s one of the easiest finishes to repair.
Quick test: Dab a tiny amount of denatured alcohol in a hidden spot. If the finish softens, it’s shellac.
Lacquer and Varnish
Nitrocellulose lacquer and alkyd varnish form hard, clear films on the surface. These are among the most durable finishes and are found on a huge proportion of mass-market and mid-range furniture. They resist water and mild solvents reasonably well but can yellow over time and develop hairline cracks with age or temperature swings.
Quick test: Put a drop of lacquer thinner on a hidden spot. If the finish wrinkles or softens, it’s likely lacquer.

Routine Cleaning — The Foundation of Everything
Daily and weekly cleaning is where most damage actually starts. Common culprits: spray cleaners with silicone, furniture polish with petroleum distillates, and the habit of wiping wood with a wet rag.
What to Use
- Microfiber cloths — they lift dust without scratching and don’t leave lint behind.
- Diluted mild soap solution — a few drops of dish soap in a litre of warm water works well for most film finishes. Wring the cloth until it’s barely damp.
- Dedicated wood cleaners — products like Murphy Oil Soap (diluted as directed) are appropriate for oil and wax finished pieces, but check compatibility first.
What to Avoid
- Silicone-based sprays (Pledge and similar). They create a pleasant temporary shine but build up in layers, eventually making the surface impossible to refinish without stripping everything off.
- Vinegar and water mixtures — acetic acid, even diluted, slowly degrades oil finishes and dulls lacquer over time.
- Paper towels — they contain wood fibers that act as mild abrasives.
- Steam cleaners — the heat and moisture combination is damaging to every wood finish.
The Right Technique
Always wipe with the grain, not across it. Use one damp cloth and one dry cloth — wipe with the damp, follow immediately with the dry. Never let moisture sit. For carved or intricate surfaces, use a soft natural-bristle brush to clear dust from recesses before wiping.
Conditioning and Refreshing Each Finish Type
Oil-Finished Wood
Oil finishes need periodic reapplication — the wood literally consumes them. Here’s how:
- Clean the surface thoroughly and let it dry completely (at least an hour).
- Apply a thin coat of the appropriate oil (use the same type originally used if you know it — mixing linseed and tung oil on the same piece is fine, but adding Danish oil to pure tung oil can interfere with curing).
- Work it into the grain with a lint-free cloth or 0000 steel wool, moving with the grain.
- Let it penetrate for 15–30 minutes, then wipe off all excess. This is critical — oil left sitting on the surface goes rancid or sticky.
- Allow full cure before use. Tung oil typically needs 24–48 hours; linseed can take several days in cool conditions.
If a section looks drier or more matte than the rest, that area needs attention first.
Wax-Finished Surfaces
Wax builds up if reapplied too eagerly. Strip old wax annually with a small amount of mineral spirits on a cloth, then reapply fresh paste wax:
- Apply a thin coat of paste wax with a soft cloth, working in small sections.
- Let it haze (usually 10–15 minutes).
- Buff firmly with a clean cloth or a lamb’s wool pad on a low-speed drill for large surfaces.
- Repeat for a second thin coat only if the surface looks uneven.
For antique pieces with wax-over-shellac, use only paste wax — never oil or spirit-based cleaners.
Shellac
Shellac’s vulnerability is also its greatest convenience: damaged areas melt back into fresh shellac, which means spot repairs are often invisible. If you find a ring or a dull patch:
- Clean and dry the area.
- Apply a small amount of fresh shellac (blonde or amber to match the existing tone) with a fine artist’s brush or a cotton pad.
- Allow to dry, then sand lightly with 400-grit paper and buff with 0000 steel wool.
- Apply paste wax to protect the repaired area.
For overall maintenance, avoid water and alcohol — even from coasters left sweating on the surface.
Lacquer and Varnish
These finishes don’t benefit from conditioning oils or waxes the way penetrating finishes do. Maintenance is mostly about protecting the film intact:
- Wipe down regularly with a damp microfiber cloth.
- For dullness or light surface haze, use a liquid polish specifically formulated for lacquer (look for silicone-free formulations).
- Light scratches can sometimes be leveled with a paste of rottenstone and mineral oil, buffed gently with the grain.
- Deep scratches or chips need a professional touchup or a full panel refinish.

Preventing Damage Before It Happens
Maintenance products can only do so much. The best results come from controlling the environment and habits around the furniture.
Keeping wood furniture in good shape is easier when it isn’t buried under clutter, so pairing this routine with How to Declutter Your Home Step by Step (That Actually Works) can help protect surfaces from accidental bumps and spills.
Heat and Moisture
- Always use coasters, trivets, and tablecloths under hot dishes and sweating glasses. A hot pan set directly on a lacquered surface can permanently print its outline.
- Keep indoor humidity between 40% and 60% if possible. Wood expands and contracts with humidity swings, and finishes — especially lacquer — can crack or “check” when the wood movement is severe.
- Don’t place wood furniture directly in front of radiators, heat vents, or sunny windows. Direct UV exposure bleaches some species and breaks down finish polymers.
Scratches and Physical Wear
- Felt pads under objects placed on the surface are non-negotiable for tables and sideboards. Replace them when they get dirty or compressed — a gritty felt pad scratches more than bare wood.
- Rotate accessories and decorative objects occasionally so wear patterns don’t develop in the same spot.
- For dining tables, a protective pad under the tablecloth is worth having — it reduces both impact and heat transfer.
Touch-Ups Between Major Maintenance
Keep a few tools at home for minor repairs:
- Furniture touch-up markers (available in multiple wood tones) hide shallow scratches in seconds.
- Walnut meat — the natural oils in a fresh walnut, rubbed along a scratch, can temporarily fill and darken superficial marks on dark-toned oiled wood.
- Hard paste wax sticks in wood tones fill small dings and dents before buffing flush.
A Practical Maintenance Schedule
Keeping wood furniture in good shape doesn’t require a dedicated weekend every month. Here’s a realistic rhythm:
| Frequency | Task |
|---|---|
| Weekly | Dust with microfiber cloth; wipe any spills immediately |
| Monthly | Damp-wipe with mild cleaner; inspect for dull spots or scratches |
| Every 3–6 months | Reapply wax or oil as appropriate for finish type |
| Annually | Strip and renew wax finishes; assess oil finishes for depth and saturation; inspect lacquer for cracking |
| As needed | Spot repairs, touch-ups, professional consultation for antiques |
When to Call a Professional
Some situations are beyond home maintenance:
- Deep structural cracks in the finish that have allowed moisture into the wood
- Blushing or white haze across a large area of shellac or lacquer that doesn’t respond to polishing
- Antique pieces with original patina — wrong products can permanently reduce value
- Veneer lifting at edges or bubbling, which requires adhesive work before refinishing
A furniture conservator (rather than a general refinisher) is the right call for antiques or pieces with sentimental value. They work to preserve original material rather than strip and start fresh.

If your piece has gone beyond routine care and needs actual repair work, our guide to How to Repair Damaged Wooden Furniture at Home walks you through fixing dents, scratches, and structural issues at home.
Conclusion
Looking after natural wood furniture finishes comes down to three things: knowing what finish you have, keeping it clean without attacking it with the wrong products, and refreshing it before it breaks down rather than after. That last point matters more than anything — restoration is always harder and more expensive than prevention.
With a clear routine and the right materials on hand, most pieces will improve with age rather than deteriorate. Good wood furniture is designed to outlast the people who buy it; the finish is simply the part that needs your help to do that.