How to Repair Damaged Wooden Furniture at Home

Wooden furniture takes a beating over time — scratches from daily use, water rings left by careless guests, joints that wobble, and finishes that cloud or peel. Most of these problems look worse than they are. With the right materials and a methodical approach, you can restore a piece yourself without sending it to a professional refinisher or replacing it entirely.
This guide covers the most common types of damage — from superficial scratches to structural repairs — and gives you honest guidance on what’s DIY-able and when to call it a day.

Assessing the Damage Before You Do Anything
Before reaching for sandpaper or filler, spend five minutes diagnosing what you’re actually dealing with. Repairs go wrong most often because people skip this step.
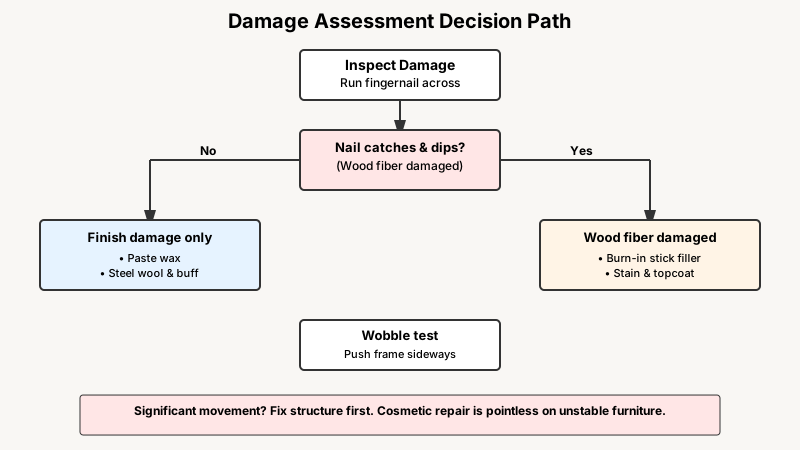
Surface finish vs. wood damage: Run a fingernail across a scratch. If it doesn’t catch, the damage is in the finish only — much easier to fix. If your nail catches and dips, the wood fiber itself is damaged.
Solid wood vs. veneer: Tap the piece lightly and listen. A flat, dull sound often signals veneer over particleboard. Veneer can be repaired but requires a lighter touch — aggressive sanding will cut right through it.
Structural soundness: Wobble every joint. Push the frame sideways. If a piece moves significantly, the structure needs attention before cosmetics. Refinishing a wobbly chair is pointless — it’ll fall apart in six months.
Finish type: Older furniture often has shellac or lacquer; newer pieces are typically polyurethane or oil. You can do a quick solvent test: dab a cotton swab with denatured alcohol in a hidden spot. If the finish dissolves, it’s shellac. If it doesn’t, try lacquer thinner next. Polyurethane resists both. Knowing the finish type helps you match products and avoid incompatibility disasters.
If the piece has been buried under years of stuff before you could even inspect it, How to Declutter Your Home Step by Step (That Actually Works) can help you clear the space first.
Fixing Scratches and Surface Marks
Scratches are the most common complaint, and the good news is most of them are fixable in under an hour.
Light Scratches in the Finish
For scratches that haven’t broken through the finish, try a paste wax or a furniture scratch repair marker that matches the wood tone. Minwax and Old English both make touch-up products worth keeping in a drawer. Apply, buff with a soft cloth, and the scratch typically blends into the surrounding finish.
For a slightly deeper scratch still confined to the finish layer, 0000-grade steel wool (the finest grade available) rubbed lightly along the grain can level the edges. Follow with paste wax and buffing.
Deeper Scratches Into the Wood
When the scratch has cut into the wood itself:
- Clean the area with a damp cloth to remove any wax or polish — fillers and stains won’t adhere over residue.
- Use a burn-in stick or wax fill stick in a color close to your wood tone. Soften the stick slightly (a hair dryer works better than an open flame for beginners) and press the material into the scratch. Level it off with a plastic putty knife or an old credit card — avoid metal here, which can add new scratches.
- Blend the color with a wood stain marker if the filler sits lighter or darker than the surrounding area. Layer lightly; it’s easier to add than remove.
- Seal with a compatible topcoat — a brushed-on or aerosol touch-up finish in the appropriate sheen (matte, satin, or gloss).
Water Rings and White Haze
White rings are moisture trapped in the finish, not necessarily in the wood. The classic DIY fix: rub the area with a cloth dampened with a small amount of petroleum jelly or mayonnaise, leave it for a few hours, then buff dry. This works surprisingly well on shellac and older lacquer finishes because the oils help the trapped moisture migrate out.
For stubborn white rings on polyurethane, try rubbing with 0000 steel wool and paste wax along the grain. If the ring is dark (not white), the moisture has penetrated through the finish into the wood and caused a stain — that requires stripping the finish and treating the wood with oxalic acid, which is a bigger project but still manageable.

Repairing Dents and Gouges
Dents compress wood fibers rather than remove them — and that distinction matters, because compressed fibers can often be raised back up.
Raising Dents With Steam
This technique works on solid wood but not on veneer or painted surfaces:
- Wet the dented area with a few drops of water.
- Lay a damp cloth directly over the dent.
- Press a clothes iron set to medium heat on the cloth for 5–10 seconds at a time.
- Check progress after each pass. The steam causes the compressed wood cells to swell back toward their original shape.
Repeat as needed. It rarely gets a dent back to 100%, but it can reduce it enough that a little filler takes care of the rest.
Filling Larger Gouges
For gouges or chips where material is actually missing:
- Wood filler (water-based): Easy to sand, accepts stain, dries fast. Best for natural wood finishes. Brands like Elmer’s Carpenter’s Wood Filler or Timbermate are reliable options. Overfill slightly, let it cure fully, then sand flush with the surrounding surface.
- Epoxy wood filler: Better for outdoor furniture or areas with structural stress (table edges, chair legs). Two-part epoxy cures very hard and doesn’t shrink. It won’t accept stain, so you’ll need to paint over it or choose a pre-tinted version.
- Wax fill sticks: Best for small surface defects when you don’t want to re-finish the whole area. They’re not sandable, so use them as a final cosmetic step.
After filling and sanding, always re-apply finish over the repaired area — bare filler is porous and will absorb dirt.
Fixing Loose Joints and Structural Wobble
A chair or table with loose joints is genuinely dangerous, not just annoying. Here’s how to address it properly.
Disassembling and Re-Gluing
The best approach for a loose mortise-and-tenon or dowel joint is to fully disassemble it, clean off the old glue, and re-glue with fresh adhesive.
- Disassemble carefully. Wooden mallets and protective blocks of scrap wood prevent damage during separation. Never force a joint with a metal hammer directly on the wood.
- Clean the old glue. Scrape dried glue from both surfaces with a chisel or old file. Residual glue prevents new adhesive from bonding properly. A heat gun or damp cloth can soften stubborn old glue before scraping.
- Apply fresh glue. PVA wood glue (Titebond II or III is widely trusted) works for most indoor joints. Apply a thin, even coat to both mating surfaces.
- Clamp and let it cure. Assemble the joint, apply clamping pressure, wipe away squeeze-out with a damp cloth, and leave it for at least 24 hours. Don’t rush clamping time — the label minimum is often the manufacturer’s minimum, not an ideal.
When You Can’t Disassemble
If the joint is difficult to separate (common in older furniture with multiple interlocking pieces), use a syringe-style glue injector to work fresh PVA or thin cyanoacrylate glue into the gap. Then clamp or use rope tourniquet clamping — wrapping rope around the frame and twisting a stick through it — to apply pressure evenly.
Reinforcing Weak Spots
For chairs that repeatedly loosen in the same spot, consider adding a small angle bracket inside a hidden corner or drilling and inserting a new wooden dowel across the joint for mechanical reinforcement. These aren’t visible fixes but they dramatically extend structural life.
Dealing With Peeling or Cloudy Finish
When the finish itself is failing — bubbling, peeling in sheets, or uniformly cloudy — a touch-up won’t cut it. You’re looking at a partial or full refinish.
Stripping the Old Finish
Chemical strippers (gel formulas are easier to control than liquid) applied with a brush, left to work for 15–30 minutes, and then scraped off with a plastic scraper are the most controllable approach. Methylene chloride strippers work faster but carry serious health risks — low-VOC alternatives like Citristrip take longer (sometimes overnight) but are much safer for home use.
After stripping, neutralize with mineral spirits, let the wood dry fully, then sand progressively: 80-grit to remove any remaining finish, 120-grit to level, 180-grit to smooth.
Applying New Finish
Choose a finish appropriate for the piece’s use:
- Polyurethane: Durable, water-resistant, good for tables and floors. Brush or wipe-on versions available.
- Danish oil or tung oil: Penetrating finishes that enhance grain and feel more natural to the touch. Less protective than polyurethane but easier to maintain and spot-repair.
- Shellac: Traditional, fast-drying, easy to repair. Not water-resistant, so avoid it on dining or kitchen surfaces.
Apply in thin coats, sand lightly between coats with 220-grit paper, and always finish in the direction of the grain.

Once your new finish has cured, keeping it looking good long-term is its own skill, which our guide Natural Wood Furniture Finishes: How to Maintain Them at Home covers in detail.
Veneer Repairs: A Special Case
Veneer — a thin layer of real wood glued over a substrate — requires its own approach because the material is only a millimeter or two thick.
Bubbling veneer: Slice the bubble along the grain with a sharp craft knife, inject PVA glue with a syringe, press down with a flat weight or clamp and wax paper, and leave for 24 hours. This fix is more reliable than it sounds.
Chipped veneer: If you have the chip, glue it back in place precisely with wood glue and clamp. Missing veneer requires a patch — source matching veneer from specialty lumber suppliers or salvage shops, cut to fit with a sharp knife using a ruler, and glue in place. The skill is in matching grain direction and color.
Avoid excessive moisture and heat on veneer. Unlike solid wood, the glue layer underneath can soften and the veneer can warp or delaminate if you use steam or water carelessly.
Knowing When to Stop
Not every piece is worth the effort, and not every repair is within the realistic range of DIY. A few honest guidelines:
- Antique furniture with significant collector value: consult a professional conservator before touching it. DIY repairs can reduce value dramatically.
- Structural damage to chairs (cracked seat rails, broken legs) that you’re relying on for daily use — if you’re not confident in the repair’s strength, don’t risk it.
- Veneer over MDF that has swollen from water damage: the substrate is ruined, and no surface repair will hold long-term.
For everything else, the skills here are genuinely accessible with patience and the right materials. Start on a piece you’re not precious about — a garage-sale find, a yard table — and work up to the heirlooms. Wood is a forgiving material, and most damage is less permanent than it looks.