Most Leaky Kitchen Faucets Are a DIY Fix
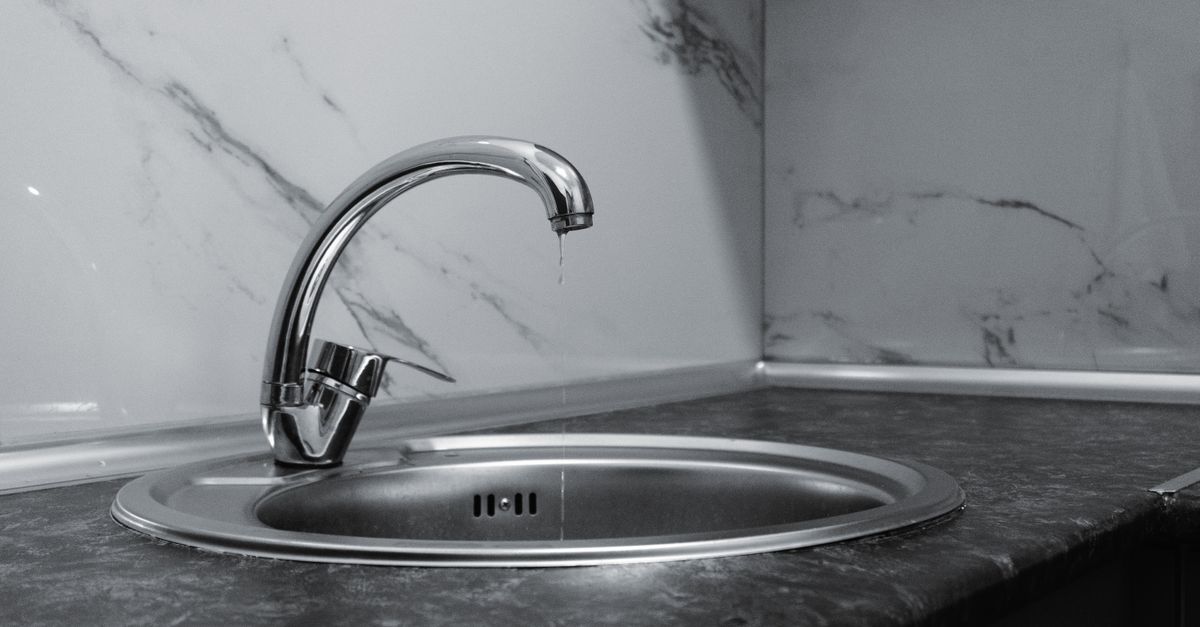
Dripping faucets are one of the most common household repairs, and the vast majority of them come down to a worn part that costs a few dollars and takes under an hour to swap out. You do not need a plumber for most of them. What you do need is to know which type of faucet you have, because the internal mechanism varies and so does the fix.
Four Faucet Types, Four Different Approaches
Before you buy anything or pick up a wrench, identify your faucet. The repair path branches here.
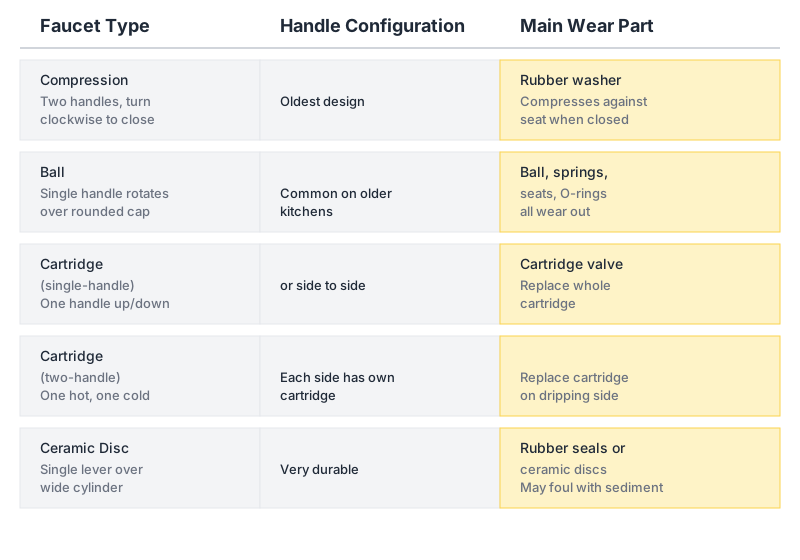
Ball faucet: A single handle that rotates over a rounded ball-shaped cap. Common on older kitchens. The ball, springs, seats, and O-rings all wear out and each can be the culprit.
Cartridge faucet (single-handle): One handle moves up and down or side to side. Inside is a cartridge, essentially a self-contained valve. When it fails, you typically replace the cartridge whole rather than individual parts.
Cartridge faucet (two-handle): One handle for hot, one for cold. Each side has its own cartridge. The drip usually comes from whichever side you use more.
Ceramic disc faucet: A single lever over a wide cylindrical body. Two ceramic discs rotate against each other. These are durable but the discs can crack or the seals can foul with sediment.
Compression faucet: Two handles that you turn clockwise to close. The oldest design. A rubber washer compresses against a seat each time you shut the water off; that washer wears out and causes the drip.
If you are unsure what you have, look up the brand name stamped on the faucet body (often underneath or on the back of the spout) and search for its model. Most manufacturers publish parts diagrams online.
What You Need Before You Start
Gather these before turning off the water:
- Adjustable wrench and a set of screwdrivers (flat and Phillips)
- Needle-nose pliers
- Replacement parts (see below)
- Plumber’s grease (silicone-based)
- A small bowl or towel under the sink
- A phone or camera to photograph the assembly before you disassemble it
For parts, take the old part to a hardware store and match it physically, or photograph the faucet brand and model and order the manufacturer’s replacement kit. Generic kits exist but manufacturer-specific parts fit better and last longer.
While you have your tools out for faucet repairs, you might also tackle other nagging kitchen annoyances, like in our guide Fix a Sticky Kitchen Drawer or Cabinet Door: Wax, Sand, Realign, Done.
Fixing a Compression Faucet
This is the simplest repair in plumbing. The drip comes from one side: hot side drips when hot water valve is worn, cold side when the cold valve is worn. You can usually tell by whether the water dripping is warm.
- Shut off the supply valves under the sink by turning them clockwise. Turn on the faucet to release pressure and confirm water stops.
- Remove the handle. There is often a decorative cap on top covering a screw. Pop it off, unscrew the screw, and lift the handle away.
- Unscrew the packing nut with your adjustable wrench (turn counter-clockwise). This exposes the stem.
- Pull out the stem. At the bottom you will see a rubber washer held by a brass screw. If the washer looks flat, grooved, or cracked, that is your culprit.
- Replace the washer with one of the same diameter. While the stem is out, inspect the O-ring around the stem body and replace that too if it looks worn.
- Reassemble in reverse order. Turn the supply back on slowly and check.
Fixing a Ball Faucet
Ball faucets have more parts and more potential failure points, but repair kits sold at hardware stores include everything: a new ball, springs, seat inserts, and O-rings. Buy the kit for your brand rather than a universal one if you can find it.
- Shut off the supply valves and release pressure.
- Loosen the handle set screw (usually hex/Allen) at the base of the handle and lift the handle off.
- Use pliers (pad the jaws with tape to avoid scratching) to unscrew the collar cap. Lift it and the plastic cam piece off.
- Lift out the ball. Note its orientation before removing it.
- Use needle-nose pliers to pull out the small springs and rubber seats from the two ports inside the faucet body. These are almost always the leak source.
- Replace springs and seats, drop the new ball back in the correct orientation, and press the cam back down.
- Inspect and replace the O-rings on the faucet body before reassembling the collar.
- Reassemble, turn on the supply, and test.
Fixing a Cartridge Faucet
Cartridge replacements are fast once the cartridge is out, which is sometimes the hard part.
- Shut off the supply, release pressure.
- Remove the handle (usually a Phillips screw under a decorative cap).
- There may be a retaining clip, a small U-shaped piece of metal or plastic at the top of the cartridge. Pull it straight up with pliers and set it aside. Do not lose it.
- Grip the top of the cartridge with pliers and pull straight up. It should come out with steady pressure. If it is stuck, a cartridge puller tool (inexpensive, available at hardware stores) makes this much easier.
- Note the orientation. Cartridges are directional. Installing one rotated 180 degrees will reverse your hot and cold.
- Press the new cartridge in, replace the retaining clip, and reassemble.
For a two-handle version, the process is the same but you do each side separately. Replace only the side that is dripping.
Fixing a Ceramic Disc Faucet
Ceramic disc faucets rarely fail outright; more often the rubber seals at the base of the cylinder foul with mineral deposits or crack.
- Shut off the supply.
- Move the handle to the fully open position (this makes removing the cylinder easier).
- Remove the handle screw and lift the handle off.
- Unscrew the cylinder from the faucet body and lift it out.
- At the base of the cylinder are two or three rubber seals. Pull them off. If they look hard, cracked, or coated in white mineral scale, clean the scale off the ceramic discs with white vinegar and a soft cloth. Replace the seals.
- If a ceramic disc itself is cracked, the whole cylinder usually needs replacing. Take it to the hardware store for a match.
- Reassemble and turn the supply back on very slowly; sudden pressure can crack new ceramic discs.
Where the Drip Actually Comes From Matters
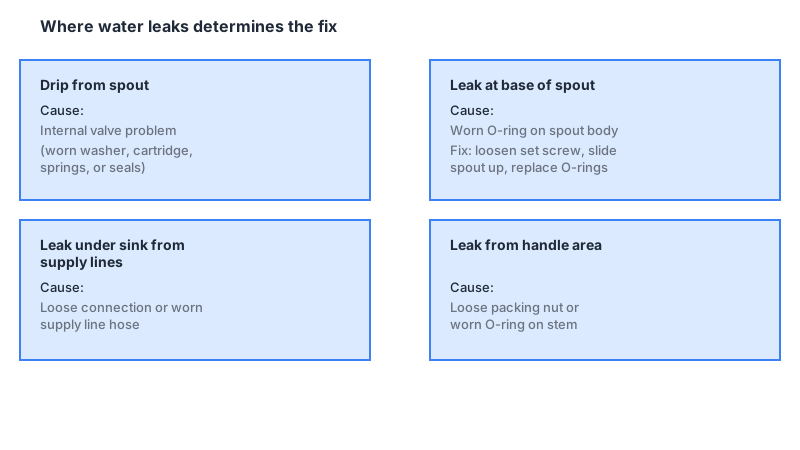
Not all drips are the same and misreading the location sends you to the wrong repair.
- Drip from the spout: Almost always an internal valve problem (the repairs above).
- Leak at the base of the spout: Usually a worn O-ring around the spout body. Remove the spout by loosening the set screw, slide it up, replace the O-rings, and reseat it.
- Leak under the sink from the supply lines: Tighten the connection gently first. If that does not stop it, the supply line hose or its compression fitting may need replacing. These connections are hand-tightened plus a quarter-turn; overtightening cracks plastic fittings.
- Leak from the handle area: Usually the packing nut is loose or the O-ring on the stem is worn.
When to Call a Professional
Most drips are DIY territory, but stop and call a plumber if:
- Water is coming from inside the wall or cabinet and you cannot trace a specific fitting as the source.
- The shutoff valve under the sink does not fully close, or it is corroded and you cannot turn it.
- You discover the faucet body itself is cracked.
- Any repair reveals galvanized steel pipe that looks heavily corroded (that is a larger system issue).
- You replaced the part correctly but the drip persists and you cannot diagnose further.
Fitting identification and a $10 replacement part handle the majority of kitchen faucet drips. The only way to find out is to open it up.
If it’s your toilet rather than your faucet giving you trouble, our guide on How to Stop a Running Toilet: Fix It Fast & Save Water can help you solve that leak just as easily yourself.
Frequently Asked Questions
How do I shut off water to just the kitchen faucet without turning off the whole house?
Look under the sink for the shutoff valves on the hot and cold supply lines. They are typically small oval or oval-shaped handles on the water lines going up to the faucet. Turn them clockwise until they stop. If those valves do not close fully or are absent, the main shutoff for the house (usually near the water meter) is the fallback.
Can I do this repair without any plumbing experience?
Compression and single-handle cartridge repairs are genuinely beginner-level jobs. Ball faucets have more parts and benefit from photographing each step before disassembly. Ceramic disc repairs are also straightforward but require care when turning the water back on. If you work methodically and photograph before pulling things apart, most people complete their first faucet repair without incident.
Why is my faucet still dripping after I replaced the washer?
The seat (the metal ring the washer presses against) can become pitted or rough over time, and a new washer against a damaged seat will still leak. A seat wrench can resurface or replace the seat. On cartridge faucets, a continuing drip usually means the cartridge is the wrong size for your model, was installed in the wrong orientation, or the retaining clip was not fully seated.
How long do replacement cartridges and washers typically last?
There is no universal figure; it depends on water quality, usage frequency, and part quality. Hard water accelerates wear on rubber seals noticeably. A manufacturer-spec cartridge in moderate-use conditions with average water hardness can last several years; a generic part in hard-water areas may need replacing sooner. If you keep replacing the same part frequently, investigate a water softener or scale filter.
Do I need to replace the whole faucet or just the internal parts?
Replacing internal parts is almost always sufficient for a drip. Replace the whole faucet only if the body is cracked, the finish is failing and aesthetics matter to you, or the faucet is so old that replacement parts are no longer made. A full faucet swap is also DIY-possible but takes longer and involves disconnecting supply lines and a drain if it is a pull-out sprayer type.