How to Cook Lentils from Scratch: Why Variety Choice Matters Most

Lentils are one of the most forgiving ingredients in a kitchen — cheap, fast compared to other legumes, and genuinely filling. Yet a surprising number of people end up with a mushy grey pile or, worse, chalky undercooked lentils that wreck an otherwise good dish. The difference almost always comes down to a few small decisions made before the lentils even touch water.
This guide covers everything: choosing the right type, preparation, cooking methods, timing, and how to fix mistakes. By the end, you’ll cook lentils confidently without a recipe telling you what to do.
Understanding Lentil Varieties Before You Cook
Not all lentils behave the same way, and treating them as interchangeable is the most common source of disappointment.
Brown and Green Lentils
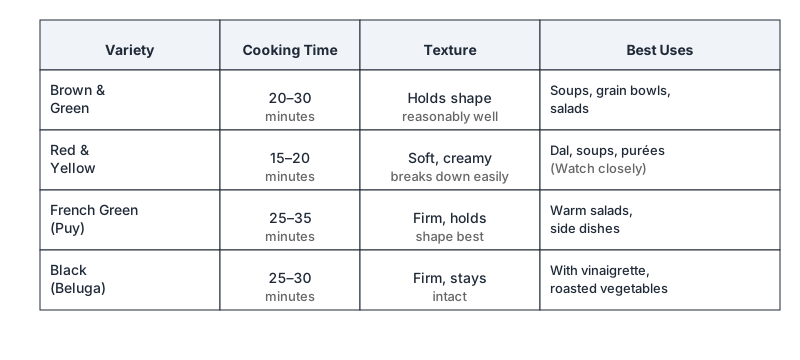
These are the workhorses — earthy, mild, and widely available. They hold their shape reasonably well when cooked correctly, which makes them ideal for soups, grain bowls, and lentil salads. Cooking time: roughly 20–30 minutes.
Red and Yellow Lentils
These are split lentils, meaning the hull has been removed and the lentil halved. They cook down into a soft, creamy texture — perfect for dal, soups, and purées. Because they lack the outer hull, they absorb water quickly and can go from perfectly tender to paste in just a few minutes. Cooking time: 15–20 minutes. Watch them closely.
French Green (Puy) Lentils
Smaller, darker, and speckled, these come originally from the Le Puy region in France, though similar varieties are grown elsewhere. They have a firmer skin and a peppery, mineral flavour. They hold their shape better than any other variety, making them the go-to for warm lentil salads or side dishes where texture matters. Cooking time: 25–35 minutes.
Black (Beluga) Lentils
Named for their resemblance to beluga caviar, these tiny black lentils stay firm and have a rich, slightly earthy flavour. They work brilliantly tossed with vinaigrette or paired with roasted vegetables. Cooking time: 25–30 minutes.

How to Prepare Lentils Before Cooking
Do You Need to Soak Lentils?
Unlike dried beans, lentils do not require soaking. Their small size means they hydrate and cook quickly without pre-soaking. That said, a 30-minute soak can slightly reduce cooking time and may improve digestibility for people who find legumes hard on the stomach — but it is entirely optional.
If you’re curious how soaking rules differ for other legumes, How to Cook Chickpeas from Dried: Why Soaking Actually Matters explains why that step matters so much more for chickpeas than for most lentils.
Sorting and Rinsing
This step is non-negotiable. Tip your lentils onto a light-coloured plate or baking sheet and scan for small stones, shrivelled lentils, or debris. It takes two minutes and prevents a broken tooth or a gritty mouthful. Then transfer them to a fine-mesh strainer and rinse under cold running water until the water runs clear.
Aromatics: Building Flavour from the Start
Lentils are bland on their own, but they absorb surrounding flavours readily. This is an advantage — it means you can build complexity cheaply. Consider adding any of the following to the cooking liquid:
- A bay leaf or two — classic and almost universal
- Half an onion — adds sweetness and depth
- Smashed garlic cloves — mellows as it cooks
- A sprig of thyme or rosemary
- A small piece of kombu (dried kelp) — a Japanese trick said to aid digestibility
- A dried chilli — for subtle warmth
These are not garnishes; they infuse into the lentils during cooking. Fish them out before serving.
The Stovetop Method: Step by Step
Stovetop cooking is the most reliable, hands-on method and gives you the most control.
Ratio: Use approximately 1 cup of dry lentils to 2.5–3 cups of water or stock. Red lentils need slightly less liquid (closer to 1:2) because they break down and would become soup with too much.
Step 1 — Add lentils and liquid to the pot. Use a medium saucepan. If using aromatics, add them now. Cold water is fine; there’s no need to start with boiling water.
Step 2 — Bring to a boil. Over medium-high heat, bring the pot to a full boil. You’ll see some foam collect on the surface — skim it off with a spoon if you like a cleaner result, though it isn’t harmful.
Step 3 — Reduce heat and simmer. Lower to a gentle, steady simmer. A rolling boil will break the lentils apart and cause uneven cooking. Partially cover the pot — this keeps the temperature stable without building up too much steam.
Step 4 — Check early and often. Start tasting around the lower end of the time range for your variety. You want lentils that are tender all the way through with no chalky centre, but still have some structure (unless making dal or soup).
Step 5 — Drain and season. Drain any excess liquid through your fine-mesh strainer. Season with salt now — not before or during cooking, if possible.
The Salt Question
Salting lentils at the start of cooking is a contested point. Some cooks insist early salt toughens the skin; others salt throughout with no problem. The safest practice is to salt lightly halfway through cooking — enough to season the interior — then adjust at the end. Avoid acidic ingredients (tomatoes, vinegar, lemon juice) until the lentils are fully tender; acid absolutely does slow down the softening of the outer hull.

Alternative Cooking Methods
For heartier legumes that need a bit more time and patience, How to Cook Dried Beans from Scratch (The Right Way) walks through the same stovetop and pressure cooker logic in more detail.
Instant Pot or Pressure Cooker
Pressure cooking lentils is fast and mostly hands-off. Use a 1:1.75 liquid-to-lentil ratio (slightly less than stovetop because no evaporation occurs). Cook on high pressure:
- Brown/green lentils: 8–10 minutes, natural release for 5 minutes
- Red/yellow lentils: 5–6 minutes, quick release
- Puy/beluga lentils: 10–12 minutes, natural release
Be cautious with red lentils in a pressure cooker — they can foam and partially block the steam valve. Use a large enough pot and add a teaspoon of oil to reduce foaming.
Slow Cooker
Slow cookers work, but they aren’t ideal for lentils that need to hold their shape. The extended low heat tends to produce a softer result. They’re well-suited to lentil soups or dal, where a creamy texture is the goal. Cook on low for 4–6 hours or high for 2–3 hours with plenty of liquid.
Oven-Baked Lentils
Less common, but worth knowing: lentils can be cooked in a covered Dutch oven at around 190°C (375°F). Combine rinsed lentils with boiling liquid (3 cups per cup of lentils), cover tightly, and bake for 30–40 minutes. The steady, even heat of an oven can produce beautifully tender, intact lentils — useful when you already have the oven running for something else.
How to Tell When Lentils Are Done
The only reliable way is to taste them — repeatedly. A done lentil should:
- Yield easily when pressed between your tongue and the roof of your mouth
- Show no white, chalky interior when bitten in half
- Hold its shape for varieties like Puy or beluga, or collapse smoothly for red/yellow
If the water runs out before they’re cooked, simply add more hot water and continue. Running dry causes them to scorch on the bottom.
Seasoning and Using Cooked Lentils
Plain cooked lentils are a blank canvas. Here are directions worth going:
Warm lentil salad: Toss Puy lentils while still warm with a sharp Dijon vinaigrette, shallots, parsley, and a handful of toasted walnuts.
Dal: Simmer red lentils into a thick purée, then pour a hot tempered oil (tadka) of mustard seeds, cumin, turmeric, and garlic over the top just before serving.
Lentil soup: Use brown or green lentils with onion, celery, carrot, canned tomatoes, smoked paprika, and vegetable stock. Blend partially for body.
Fridge staple: Cook a large batch plain, refrigerate for up to five days, and use them throughout the week as a protein-packed addition to salads, wraps, or pasta.

Troubleshooting Common Lentil Problems
Lentils are mushy: You cooked them too long, used too much water, or added acid too early. Next time, start checking 5 minutes before you expect them to be done. Use red lentils intentionally when you want a soft result.
Lentils are tough and chalky: Not cooked long enough, or acid was added too early. Return them to the pot with more water and continue cooking. Old lentils (stored more than a year) also take significantly longer and sometimes never fully soften — buy from a shop with decent turnover.
Lentils are bland: You skipped aromatics and salt. Fix by finishing with good olive oil, lemon juice, salt, and fresh herbs. A small spoonful of miso stirred in adds instant umami depth.
Lentils have a grey colour: Most common with brown lentils cooked in plain water with no acid or colour-boosting ingredients. Add a splash of lemon juice or red wine vinegar at the end — it brightens the colour noticeably.
A Note on Storage
Dry lentils store almost indefinitely in a sealed container in a cool, dry cupboard, though quality and cooking time both decline after about two years. Cooked lentils keep well in the fridge for 4–5 days in an airtight container, or freeze for up to three months. Freeze them flat on a tray first if you want them loose rather than clumped.
Conclusion
Cooking lentils from scratch is genuinely straightforward once you understand the logic: pick the right variety for the texture you want, rinse them, add aromatics for flavour, keep a steady simmer, hold off on acid until they’re tender, and taste early. There’s no complicated technique, no special equipment, and no timing that requires a stopwatch. Get these basics right, and lentils become one of the most useful things in your kitchen — fast, cheap, and surprisingly good.