How to Patch a Small Hole in Drywall: Making Doorknob Dents Disappear

Patching a small hole in drywall is one of those repairs most homeowners run into sooner or later — a doorknob that swings too hard, an anchor that pulled free, or a shelf bracket that didn’t hold. The good news is that holes up to about four inches across are genuinely a DIY job, and with the right materials and a little patience, you can make the repair nearly invisible.
This guide walks you through the full process, from gathering supplies to the final paint touch-up, with tips that separate a smooth finish from a lumpy mess.
What You Need Before You Start
Having everything on hand before you begin saves a lot of frustration. Here’s what the job actually requires:
For nail holes and dents (under ½ inch):
- Lightweight spackling compound (a single small tub is plenty)
- Putty knife (a flexible 3-inch blade works well)
- Fine-grit sandpaper (220 grit)
- Primer and matching paint
For larger holes (½ inch to 4 inches):
- Self-adhesive mesh patch or a peel-and-stick drywall patch kit
- Joint compound (also called “mud”) — not spackling, which shrinks too much over bigger areas
- 4–6 inch putty knife or drywall knife
- Sanding sponge or 120/220-grit sandpaper
- Primer and matching paint
A note on joint compound vs. spackling: spackling is fine for pinhole-sized repairs because it dries fast, but it shrinks noticeably on anything larger than about a centimeter. For holes bigger than your thumbnail, use joint compound.

Step-by-Step: Patching the Hole
Step 1 — Clean the Damaged Area
Before anything goes on the wall, spend sixty seconds cleaning up the hole. Knock away any loose drywall paper, crumbled gypsum, or old anchor hardware. If a screw or anchor is still in the wall, remove it fully. Use your putty knife to scrape off any torn paper edges that are lifting away from the surface — those will telegraph through your repair if you leave them.
For very small dents or holes, lightly sand the surrounding area so your filler has a slightly roughened surface to grip.
Step 2 — Choose the Right Repair Method
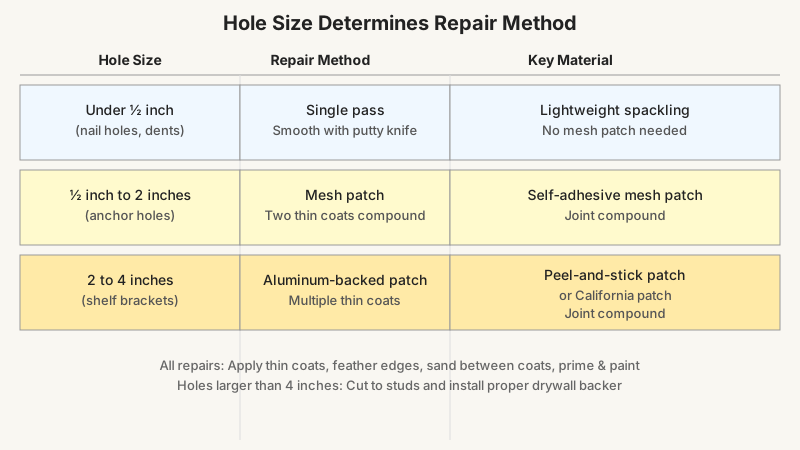
The hole size determines your approach:
- Nail holes and hairline cracks: A single thin pass of lightweight spackling, wiped smooth with a putty knife, is all you need. Skip the mesh patch entirely.
- Holes from ½ inch to about 2 inches: A self-adhesive mesh patch applied directly over the hole gives the joint compound a stable base to bridge the gap.
- Holes from 2 to 4 inches: Use a peel-and-stick aluminum-backed patch or a “California patch” (a piece of drywall with its paper backing left intact to act as a tab). Both methods give you a rigid backing so the compound doesn’t cave inward.
For holes larger than 4–5 inches, you’re generally better off cutting back to the nearest studs and installing a proper drywall backer — that’s a slightly bigger project, but still DIY-friendly.
Step 3 — Apply the Patch Backing (for Larger Holes)
If you’re using a self-adhesive mesh patch, center it squarely over the hole and press it firmly into place. Smooth down all four edges — any lifted mesh will create ridges in your compound. The patch should extend at least an inch beyond the hole on every side.
If you’re using a peel-and-stick aluminum patch kit (often sold at hardware stores), same principle applies: center, press, and smooth.
Step 4 — Apply Your First Coat of Joint Compound
Load your putty knife with a modest amount of joint compound. Apply it in a thin layer over the mesh or patch, pressing firmly so compound works into the mesh openings. Use angled, overlapping strokes and feather the edges out onto the surrounding wall — meaning you gradually thin the compound as you move away from the center, blending it into the flat wall surface.
For nail holes, a single thin swipe of spackling is usually enough. Let it dry completely (the compound will change from gray-white to bright white as it dries — typically 2–4 hours, or overnight for thicker coats).
Important: Don’t try to fill the hole fully in one thick pass. Thick coats of compound trap air and crack as they dry. Thin layers are the professional approach.
Step 5 — Sand, Inspect, and Apply a Second Coat
Once the first coat is dry, sand lightly with 120-grit sandpaper or a sanding sponge. You’re not trying to make it perfect yet — just knock down any ridges and high spots. Wipe away the dust with a barely damp cloth.
Now look at the repair at a low angle, with a flashlight if needed. You’ll almost certainly see low spots, small divots, or the mesh texture telegraphing through. That’s normal — this is what the second coat is for.
Apply a second thin coat, feathering it slightly wider than the first. Drywall finishers call this “widening the footprint” — each coat extends a little further onto the undamaged wall to create a gradual, invisible transition.
Let the second coat dry fully, then sand again with 220-grit sandpaper. At this point the surface should feel smooth under your fingertips and look flat under raking light.

Step 6 — Prime Before You Paint
Skipping primer is the most common mistake that turns a decent repair into an obvious blotch. Joint compound and spackling are porous — raw compound will absorb your topcoat unevenly, leaving a dull “flashing” spot that’s easy to spot from across the room, even if the surface is physically smooth.
Apply a thin coat of drywall primer (also called PVA primer) or a general interior primer over the repaired area and let it dry fully. A small foam roller gives a texture that blends better than a brush on large flat walls.
If your walls have a stippled or orange-peel texture, you’ll need to recreate it before priming. A can of spray texture works well for small areas — practice on a scrap piece of cardboard first to dial in the pattern before hitting the wall.
Step 7 — Paint to Match
For touch-ups to work, you need the right paint. If you saved the original paint, stir it well and apply with a small foam roller. Feather the edges into the surrounding area rather than painting a sharp rectangle.
If the original paint is gone, take a chip or a photo to a paint store for a color match — most can match to within a small margin. Keep in mind that even a perfect color match can look slightly different if the existing paint has faded, so sometimes painting the entire wall from corner to corner gives the most seamless result.
Two thin coats of paint are better than one thick one. Let each coat dry per the manufacturer’s recommendation before evaluating the result.
Common Mistakes That Ruin the Repair
Even experienced DIYers make these errors. Knowing them upfront saves rework:
- Rushing the drying time. Joint compound that isn’t fully dry will crack when sanded or painted over. If in doubt, wait another hour.
- Using only one coat. One pass of compound almost never fully hides a hole. Budget for two coats as the minimum.
- Not feathering the edges. A repair that’s applied in a small, defined area creates an obvious hump. Spread the compound wide.
- Painting without primer. The fix looks good until the paint dries, then flashing appears. Prime first.
- Ignoring wall texture. A smooth patch on a textured wall stands out immediately. Match the texture before painting.
- Over-sanding. Aggressively sanding a repair can tear through the paper face of the surrounding drywall, creating new damage. Use moderate pressure and let the grit do the work.
Tips for an Invisible Finish
A few habits that separate a truly invisible repair from one that catches the eye under certain lighting:
Check the repair under raking light. Hold a flashlight or your phone flashlight nearly parallel to the wall surface. This side-lighting reveals any unevenness that’s invisible under normal room lighting. Do this check before priming and before painting.
Use topping compound for the final coat. If your hardware store carries it, “topping compound” (sometimes called finishing compound) is formulated finer than all-purpose joint compound. It sands more easily and leaves a smoother surface. Use all-purpose for the first coat to build up the repair, and topping compound for the finish coat.
Don’t skip the second primer coat if the surface still looks thirsty. If the first coat of primer absorbs unevenly and the compound still looks dull in spots, hit it with a second primer coat before painting.

Match your application tool to the wall surface. A foam roller gives a slight orange-peel texture that matches many standard interior walls. A brush leaves stroke marks. A smooth roller leaves a flat finish that stands out on textured walls. Know what texture your wall has before you paint.
Once your walls are flawless again, How to Make a Small Room Look Bigger: Light, Color, And Tone Tricks offers more ideas for making the whole room feel brighter and more spacious.
When to Call a Professional
Most small holes genuinely don’t warrant a contractor. But there are a few situations where a professional is the smarter call:
- The hole is larger than about 6 inches — especially if it’s in the middle of a wall panel with no nearby studs.
- You suspect the damage involves water — swollen, soft, or discolored drywall around the hole may mean moisture behind the wall, which needs to be addressed before any patch will hold.
- The patch is in a highly visible location (a formal dining room, an entryway) and you want a factory-smooth finish. Achieving a truly seamless Level 5 finish on a repair takes practice; a skilled plasterer can often do it in one visit.
- The hole goes all the way through to an exterior wall and you’re not sure about insulation or vapor barriers.
While you’re thinking about home upkeep, you might also want to check out How to Make Your Home More Energy Efficient: Seal, Insulate, Save for ways to cut utility costs while you’re at it.
Conclusion
Patching a small hole in drywall comes down to three things: the right materials, thin coats applied with patience, and never skipping the primer. Nail the process once and you’ll never hesitate to hang a picture or pull an anchor again, because you’ll know fixing any mistake takes less than an afternoon and about ten dollars in supplies. Take your time on the feathering, check your work under raking light, and match the texture before you paint — those three habits produce repairs that genuinely disappear into the wall.