How to Make Homemade Jam Without Pectin: Set Fruit With Sugar Alone

Making jam without pectin isn’t a workaround — it’s the original method. Before commercial pectin packets became a pantry staple, every jar of strawberry preserves or plum jam on the shelf was set using nothing but fruit, sugar, and time. The results are often richer and less rubbery than pectin-based jams, and once you understand the science behind the gel, the process becomes intuitive.
This guide covers everything: which fruits work best, the exact ratio of sugar to fruit, how to test the set, and what to do when things go wrong.
Why Pectin Matters — and Why You Don’t Always Need It
Pectin is a naturally occurring polysaccharide found in the cell walls of all fruits. When heated with sugar and an acid (like lemon juice), it forms a three-dimensional network that traps water and creates the familiar gel structure of jam.
Commercial pectin is simply a concentrated, purified extract — usually from apple cores or citrus peels — added to speed up that process. It’s convenient, but it also means you’re working within a narrow window: too little and the jam won’t set; too much and you get a stiff, overly firm preserve that tastes more like candy than fruit.
When you skip commercial pectin and let the fruit’s own pectin do the work, you’re trading speed for flavour depth. The jam cooks longer, concentrating the fruit sugars and creating more complex, jammy notes. The trade-off is that you need to pay closer attention during cooking.
The Three Elements That Create a Set
- Natural pectin — from the fruit itself or boosted with high-pectin additions
- Acid — lemon juice lowers the pH, which activates pectin
- Sugar — pulls water away from pectin molecules, allowing the gel network to form
Get these three in the right balance and the jam will set without any packet from the baking aisle.
Choosing the Right Fruit
Not all fruit is equal when it comes to natural pectin content. Choosing well — or knowing how to compensate — is the most important decision you’ll make.

If you’d rather cook fruit down into a smooth, spreadable batch without worrying about a set at all, our guide to Homemade Applesauce: 7 Easy Steps to a Perfect Batch is a good place to start.
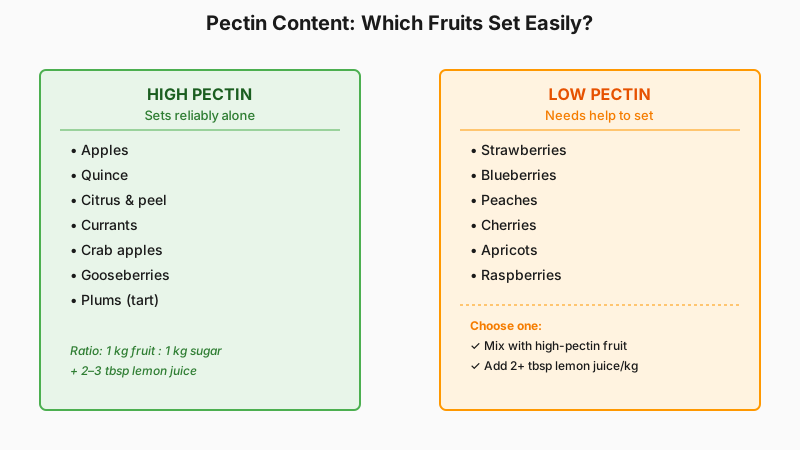
High-Pectin Fruits (Easy to Set Without Help)
These fruits contain enough natural pectin to gel reliably on their own:
- Apples (especially underripe or cooking varieties like Bramley)
- Quince
- Citrus fruit (lemons, oranges, grapefruits — the peel and pith are pectin-rich)
- Currants (red and black)
- Crab apples
- Gooseberries
- Plums (particularly tart varieties)
Low-Pectin Fruits (Need a Little Help)
These fruits are delicious but naturally low in pectin:
- Strawberries
- Blueberries
- Peaches
- Cherries
- Apricots
- Raspberries (moderate — borderline)
For low-pectin fruits, you have two good options:
Option 1: Mix them with a high-pectin fruit. Strawberry-rhubarb jam sets beautifully because rhubarb contains significant pectin. A peach jam made with a handful of chopped tart apple will firm up reliably without tasting like apple.
Option 2: Add lemon juice generously. Two tablespoons of freshly squeezed lemon juice per kilogram of fruit is a starting point. The acid doesn’t add pectin, but it improves the extraction of whatever pectin is present and helps the gel form.
A Note on Ripeness
Underripe fruit contains more pectin than fully ripe fruit. The enzyme that breaks down pectin becomes active as fruit ripens. For jam-making, a mixture of mostly ripe fruit with about one-quarter slightly underripe fruit gives the best balance of flavour and setting ability.
The Core Recipe: Basic Ratio and Method
The classic no-pectin jam ratio is equal weights of fruit and sugar — sometimes written as 1:1. For fruits that are very sweet or very low in acid, you can drop to 750g of sugar per 1kg of fruit, which produces a softer set and a fresher-tasting jam but slightly shorter shelf life.
Ingredients (makes approximately 4–5 standard 250ml jars)
- 1 kg prepared fruit (weighed after hulling, pitting, or peeling)
- 750g–1 kg granulated sugar (see note on ratio above)
- 2–3 tablespoons freshly squeezed lemon juice
- Optional: 1 small cooking apple, peeled and grated, for low-pectin fruits
Equipment You’ll Need
- A large, heavy-bottomed pot (stainless steel or enamel-coated; avoid reactive aluminium)
- A candy or jam thermometer
- Sterilised jars with lids
- A wide-mouth funnel (optional but very useful)
- A cold plate or saucer in the freezer
Step 1: Macerate the Fruit
Combine the prepared fruit and sugar in your pot and stir to coat. Leave it to sit for at least 30 minutes, or up to overnight in the fridge. The sugar draws moisture out of the fruit through osmosis, creating a syrup at the bottom of the pot. This step dissolves the sugar more evenly and gives you a head start on cooking.
Step 2: Bring to a Boil Slowly, Then Hard-Boil
Place the pot over medium heat, stirring occasionally, until all the sugar has dissolved — you should feel no grittiness when you drag a wooden spoon along the bottom of the pot. This is important: if you boil the jam before the sugar has fully dissolved, you risk crystallisation later.
Once the sugar is dissolved, turn the heat to high. The jam needs to reach a rolling boil — the kind that keeps bubbling even when you stir it. This is where pectin gelling happens. Maintain this hard boil for 10–20 minutes, depending on the fruit, checking for the set regularly.

Skim the foam as it rises to the surface. Foam is just air bubbles and some fruit proteins — it won’t affect safety, but it makes for a less clear, attractive jam. A knob of cold butter stirred in at the end also reduces foam effectively.
Step 3: Test for the Set
This is where most beginners feel uncertain. There are two reliable tests:
The Cold Plate Test (most reliable) Drop a small spoonful of jam onto your pre-chilled plate and return it to the freezer for 60 seconds. Push it with your finger — if it wrinkles and holds its shape rather than flooding back, the jam has set. If it’s still liquid, keep boiling and test again every 2–3 minutes.
The Temperature Test Jam sets at around 104–105°C (219–221°F). A jam thermometer clipped to the side of the pot gives you a reliable indicator, though altitude affects this slightly (at higher elevation, boiling point is lower, so the set point drops accordingly).
Use both methods together when you’re starting out — they complement each other.
Step 4: Jar and Seal
Remove the pot from heat as soon as the set is confirmed. Let it rest for 5 minutes to allow fruit pieces to settle (this prevents them from floating to the top of jars).
Ladle into sterilised jars, leaving about 5mm of headspace. Wipe the rims clean, seal with lids, and process in a boiling water bath for 10 minutes if you’re canning for longer shelf storage. Alternatively, store in the fridge and use within 3–4 weeks without water bath processing.
Troubleshooting: When the Jam Doesn’t Set
A runny jam isn’t a failure — it’s fixable.
Jam is too runny after cooling: Return it to the pot, add the juice of one lemon, and boil again until it reaches set point. Test carefully before re-jarring. This works well.
Jam is too stiff or rubbery: You’ve overcooked it or used too much sugar. There’s no simple fix, but the jam is still perfectly edible — use it as a glaze or swirl it into yogurt where the firm texture won’t matter.
Jam crystallises in the jar: Sugar crystallisation usually means the jam was boiled before the sugar fully dissolved, or it was cooked too long. Stirring a tablespoon of glucose syrup into the batch before boiling can prevent this with very sweet fruits.
Mould on the surface: This means the jar wasn’t properly sterilised, the seal was poor, or there was too much headspace. Always sterilise jars by running them through a hot dishwasher cycle or holding them in a 120°C (248°F) oven for 15 minutes. Use lids that are in good condition.

Flavour Variations Worth Trying
Once you’ve nailed the basic method, these combinations work particularly well without commercial pectin:
- Plum and cinnamon — plums have enough natural pectin; add a cinnamon stick during cooking and remove before jarring
- Blackcurrant — high pectin, intensely flavoured; reduce sugar to 750g per kg to keep it from becoming too sweet
- Quince paste (membrillo) — cook low and slow for longer than jam; the result is a firm, sliceable paste that goes with cheese
- Strawberry with lemon and basil — use equal parts sugar, 3 tablespoons lemon juice, and add 4–5 basil leaves in the last 2 minutes of cooking; remove before jarring
- Apricot — add one grated tart apple per 500g of apricots; the apple provides pectin without changing the flavour
Sterilisation and Safe Storage
Homemade jam is a high-sugar, high-acid product, which makes it naturally resistant to most bacterial spoilage. Sugar content above around 60% acts as a preservative by reducing water activity — most microbes can’t thrive in that environment. However, moulds can still form if oxygen is present, which is why proper sealing matters.
For long-term shelf storage (6–12 months):
- Use the boiling water bath method
- Ensure jars are sterilised and lids are new
- Store in a cool, dark place
For short-term use (3–4 weeks):
- Clean, hot jars are sufficient
- Store in the fridge once opened
Once you open a jar, keep it refrigerated and use it within a month.
Once your jars are safely sealed, you might also enjoy putting some of that homemade jam to good use in a batch of Homemade Croutons: The Easy Guide to Perfect Results.
Conclusion
Making jam without pectin requires nothing exotic — just good fruit, sugar, lemon juice, and the patience to watch the pot. The key variables are fruit pectin level, the right ratio of sugar, and catching the set point at the right moment. Master those three things and you’ll rarely need a pectin packet again.
Start with a high-pectin fruit like plums or currants if you want a reliable first batch. Once you’re confident with the process, move to lower-pectin fruits, blending them with apple or boosting the lemon juice. Each batch teaches you something about how that particular fruit behaves — and that’s most of the pleasure of it.