How to Sharpen Kitchen Knives at Home: Why Honing Alone Won't Cut It

A dull knife is one of the most genuinely dangerous tools in a kitchen. It demands more force, slips more easily, and produces ragged cuts that bruise herbs and tear meat instead of slicing cleanly. The good news: keeping your knives sharp at home is not complicated, and you do not need to spend much money to do it well.
This guide walks through every practical sharpening method — from a $10 ceramic rod to a full whetstone progression — so you can match the technique to the knife, your budget, and how much time you want to spend.

Understanding the Difference Between Sharpening and Honing
Before reaching for any tool, it helps to understand what you are actually trying to fix.
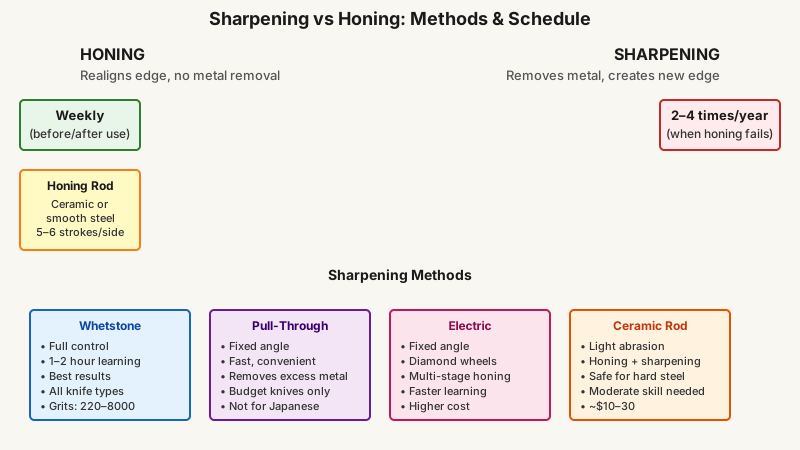
Honing realigns the edge. The microscopic teeth along a blade’s edge roll to one side with normal use — honing straightens them back. It does not remove meaningful amounts of metal. A honing rod used before or after each session keeps a sharp knife sharp for longer.
Sharpening removes metal to create a new edge. You do this when honing no longer restores cutting performance — when the knife genuinely struggles to push-cut a sheet of printer paper or slice a ripe tomato without dragging.
Most home cooks need to hone weekly and sharpen two to four times a year, depending on how hard the knife works and what surfaces it meets. Cutting on glass, ceramic tiles, or the edge of a metal bowl accelerates edge damage far faster than a wood or plastic board.
The 7 Methods, Explained
1. Whetstone (Water Stone)
This is the gold standard. A whetstone gives you full control over the angle, the bevel, and the finish — and a good stone lasts years. The trade-off is a learning curve of perhaps an hour before the motion becomes consistent.
What you need: A combination stone with a coarse grit (around 220–400) for reprofiling or heavily damaged edges, and a finer grit (1,000–3,000) for regular sharpening. A polishing stone at 6,000–8,000 grit is optional but produces a noticeably refined edge on quality knives.
How to do it:
- Soak the stone in water for five to ten minutes (or check the manufacturer — some Japanese finishing stones need only a splash, not soaking).
- Set the stone on a damp cloth or a purpose-built holder so it does not slide.
- Hold the knife at the correct angle. For most Western chef’s knives, that is 20–22 degrees per side. Japanese knives, especially single-bevel gyutos, are typically sharpened at 10–15 degrees. A simple angle guide clipped to the spine helps while you build feel.
- Place your fingertips on the flat of the blade (not the spine) to apply pressure and guide the bevel. Push the blade forward — edge leading — across the stone from heel to tip in a sweeping arc, as if you were trying to slice a thin layer off the stone’s surface.
- Maintain consistent pressure and angle. Do 5–10 strokes on one side, then switch. Keep the stone wet.
- Feel for a burr — a thin wire of metal raised on the opposite side. Once you feel it consistently along the full edge, switch sides to raise the burr on the other side, then do lighter alternating strokes to remove it.
- Move to the finer grit and repeat with less pressure. Strop on cardboard or leather if you have it.
Best for: All knife types, including single-bevel Japanese knives. Requires practice but produces excellent results.
2. Honing Rod (Steel)
A honing rod is not a sharpener — but used consistently, it dramatically extends the time between sharpenings.
Smooth or fine-ridged rods are preferable for hard Japanese steel (above 60 HRC), which can chip on an aggressively ribbed rod. A ceramic rod is a good middle-ground choice that lightly abrades while it hones.
Technique: Hold the rod tip-down on a cutting board. Draw the blade downward and away from you, maintaining your target angle (15–20 degrees for most knives). Five to six strokes per side before a cutting session is usually sufficient.
3. Pull-Through Sharpener
Pull-through sharpeners — the plastic housing units with carbide or ceramic V-shaped slots — are genuinely convenient and produce a usable edge quickly. Their limitation is the fixed angle: you have no control over the bevel, and they remove more metal than necessary because the abrasive material is aggressive.
They also set a single factory angle regardless of the knife’s original geometry, which matters if you own high-quality Japanese knives. For a budget Western chef’s knife used daily on a wood board, a pull-through is a perfectly reasonable tool.
Technique: Three to four slow, light draws through the slot is enough. Press lightly — the abrasive does the work.
4. Electric Sharpener
Electric sharpeners use motorized abrasive wheels or belts set at a fixed angle. Good models (such as those from Chef’sChoice) use diamond abrasives and have multiple stages: coarse shaping, medium honing, and fine polishing. They are fast — a fully dull edge can be restored in two minutes — and they are consistent.
The downside is the same as pull-through devices: fixed angle, and more metal removal than a whetstone. They are also expensive relative to a whetstone and take up counter space. For a household with many knives and no interest in the hands-on skill, they are a reasonable investment.

5. Diamond Plate
Diamond sharpening plates are flat metal surfaces bonded with industrial diamonds. They cut faster than aluminum oxide whetstones, require no soaking, and stay flat indefinitely — unlike traditional whetstones, which develop hollow grooves over time and need periodic flattening.
A coarse diamond plate is also the best tool for flattening a dished whetstone, which is why many serious home cooks keep one around regardless of their primary sharpening method.
Grit range typically available: Extra-coarse (120), coarse (220–325), fine (600), extra-fine (1,200). For most home sharpening, a 325/1,200 combination plate handles everything short of a polished finish.
6. Ceramic Rod
A ceramic rod sits between a smooth steel rod and a whetstone. It hones and lightly sharpens at the same time, removing a tiny amount of metal while realigning the edge. It is particularly suited to hard Japanese knives where a grooved steel rod would cause micro-chipping.
Brand names like Spyderco Sharpmaker popularized the ceramic rod format in a guided-angle system, which makes the technique accessible for beginners.
7. Leather Strop
A leather strop is the finishing step, not a sharpening step. After any sharpening method, draw the blade backward (spine-leading, edge trailing) across the leather to remove the final wire burr and align the edge at a microscopic level. Even a piece of flat cardboard works in a pinch.
A compound-loaded strop — rubbed with chromium oxide or diamond paste — adds a light abrasive element and can produce a mirror-polished edge that a whetstone alone rarely matches.
Choosing the Right Angle for Your Knife
Angle matters more than most beginners expect. A blade sharpened too steeply (say, 30 degrees per side) will be durable but mediocre at slicing. Too shallow (8 degrees per side) will be razor-sharp but fragile and prone to rolling.
| Knife Type | Angle Per Side |
|---|---|
| Western chef’s knife (e.g., Wüsthof, Victorinox) | 20–22° |
| Japanese gyuto, santoku | 12–15° |
| Single-bevel Japanese (yanagiba, deba) | 10–15° one side only |
| Hunting/outdoor knife | 22–25° |
| Serrated knife | Manufacturer spec, or professional service |
For serrated knives: sharpen each individual serration with a tapered ceramic rod, holding it at the angle of the serration bevel. It is slow, but serrated edges last a long time before needing attention.
How to Test Sharpness
Skip the dramatic arm-hair shaving test — it is theatrical but not useful for a kitchen context. Use these instead:
- Paper test: Slice a single sheet of printer paper from corner to corner. A sharp knife glides through cleanly; a dull one drags or tears.
- Tomato test: A sharp knife will slice through the skin of a ripe tomato with zero downward pressure — just draw the blade forward.
- Fingernail test: Rest the blade lightly on your thumbnail at a slight angle. A sharp edge catches; a dull one skates. (No pressure, no cutting — just a light rest.)
Caring for Your Edge Between Sharpenings
Sharpening is only half the picture. Edges dull primarily through contact with hard surfaces, improper storage, and mechanical dishwasher cycles.
- Use a wood or plastic cutting board. End-grain wood is gentlest.
- Never put quality knives in the dishwasher. The heat, vibration, and caustic detergent degrade the edge and handle faster than a month of daily use.
- Store on a magnetic strip or in a knife block. Loose knives in a drawer bang against each other and dull edges quickly.
- Wash and dry by hand immediately after use. Acids from food (tomatoes, citrus) etch carbon and high-carbon stainless steel if left wet.

Once your blades are properly sharpened, keeping them that way is just as important, so check out How to Clean and Maintain Kitchen Knives for Longevity for tips on rust prevention, storage, and washing habits.
Frequently Asked Questions
How often should I sharpen my kitchen knives?
For most home cooks, two to four times a year is enough if you hone regularly. A knife used daily on a wood board and stored properly needs less frequent sharpening than one that lives in a drawer and hits a ceramic plate.
Can I sharpen a Japanese knife on a regular whetstone?
Yes, but use a finer grit and a lower angle (12–15 degrees per side rather than 20–22). Avoid serrated or grooved honing rods on hard Japanese steel — opt for a smooth or ceramic rod instead.
Is a pull-through sharpener bad for expensive knives?
For knives above roughly $100–$150, a whetstone or professional service is preferable. Pull-through devices remove more metal than necessary and set a fixed angle that may not match the knife’s original geometry. They work fine for budget Western knives.
What is the easiest sharpening method for a complete beginner?
A guided-angle system using diamond rods or ceramic rods (such as the Spyderco Sharpmaker) removes most of the difficulty in holding a consistent angle. An electric sharpener with multiple stages is another reliable beginner option for Western knives.
Why does my knife go dull so fast even after sharpening?
The most common culprits are: glass or ceramic cutting surfaces, machine dishwashing, improper storage (loose in a drawer), or sharpening to too fine an angle for the steel’s hardness. Softer German-style steel (around 56–58 HRC) holds a very acute edge poorly; sharpen it at 20–22 degrees rather than trying to match the geometry of a hard Japanese blade.
Putting It Together
There is no single “best” method — only the right method for your knives, your habits, and how much you enjoy the process. A whetstone gives the most control and the best long-term value; a honing rod used consistently before every session extends that work considerably. Pull-through and electric sharpeners trade precision for speed and ease, which is a perfectly valid trade-off.
Start with a 1,000-grit whetstone and a decent honing rod, practice the angle until it becomes instinct, and your knives will perform better within a week than they have in years.
If your dull edge has you eyeing an upgrade, our comparison Best Chef Knives for Home Cooks: German Or Japanese Blade Style can help you decide which blade style suits your cooking style best.